Case Reviews System

HYTE Revolt 3 PC Case Revire – Cute cheese grater with a big potential

Assembly of the system

I know a lot about building in small cases, and compared to some earlier movements, the Revolt 3 is almost spacious again. If you want to read about my last ITX adventure again, you can do so here:

Eigenes ITX-Gehäuse aus dem 3D-Drucker – Selbstversuch, Bautagebuch und Benchmarks | Praxis

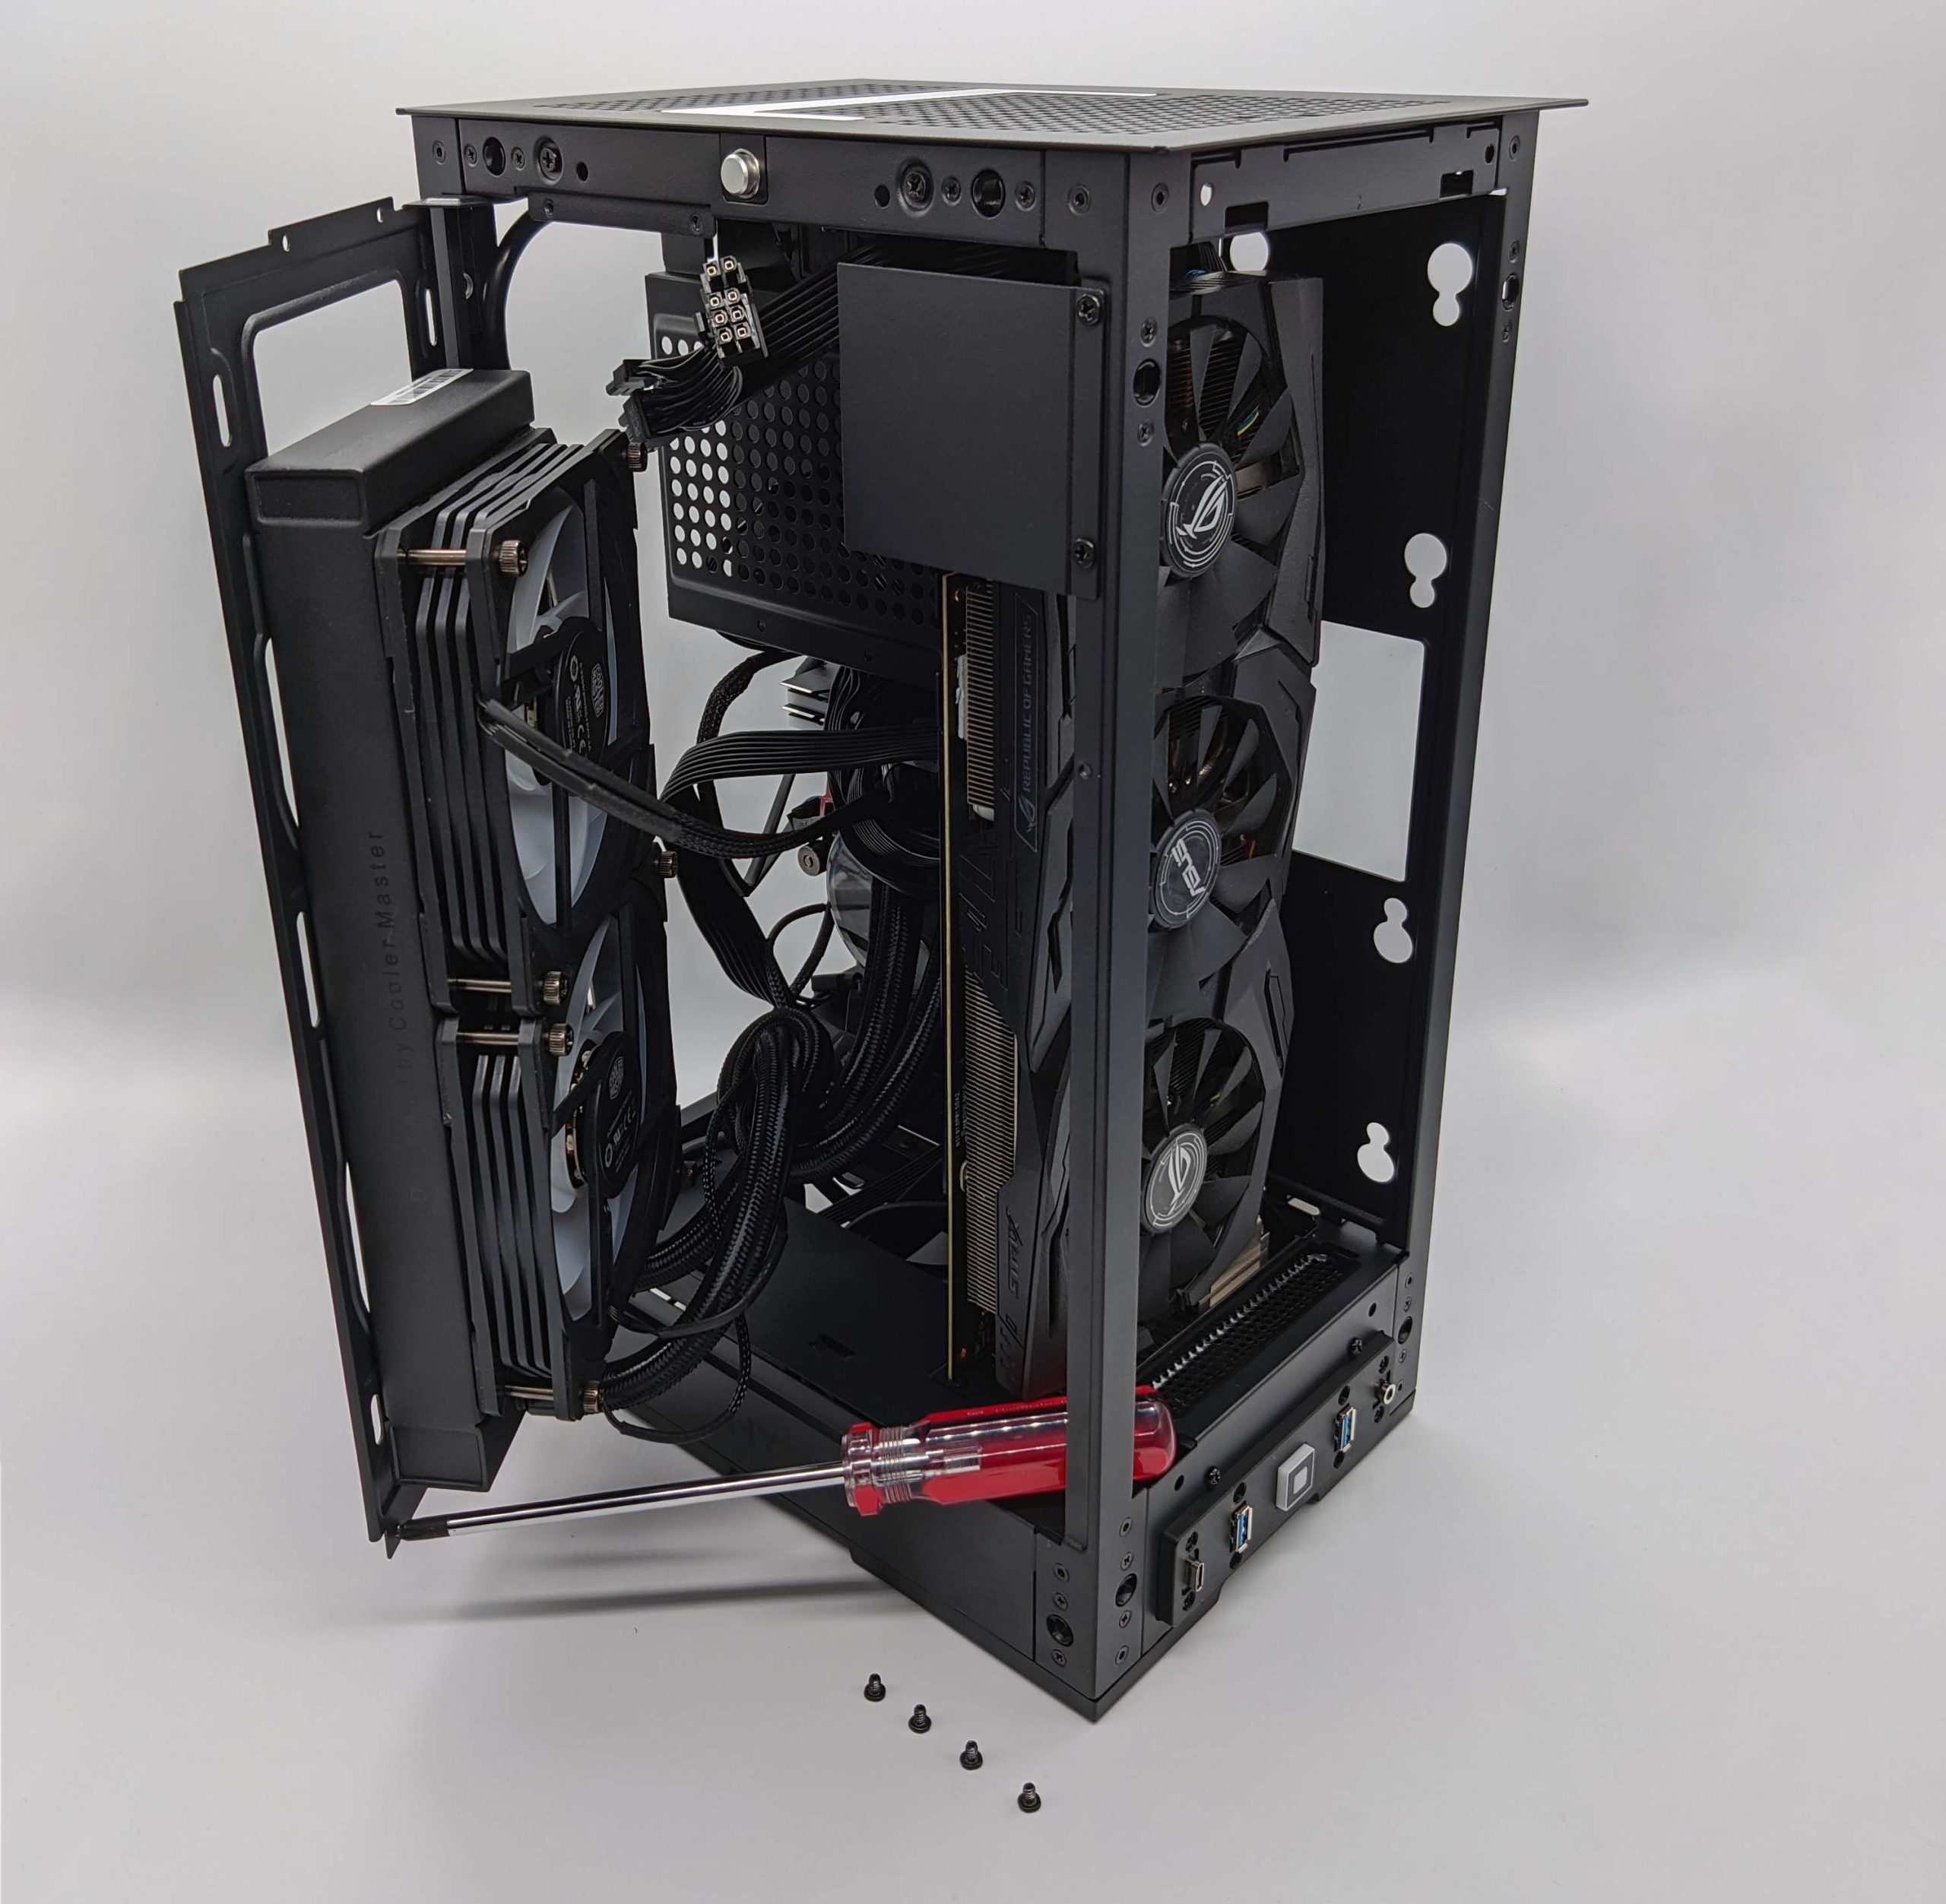
Once all sides are removed from the case, installation and access to the individual components is quite simple as already shown. The mainboard should – as with large systems – best be equipped with processor, RAM and SSDs outside of the case before it moves into the case.

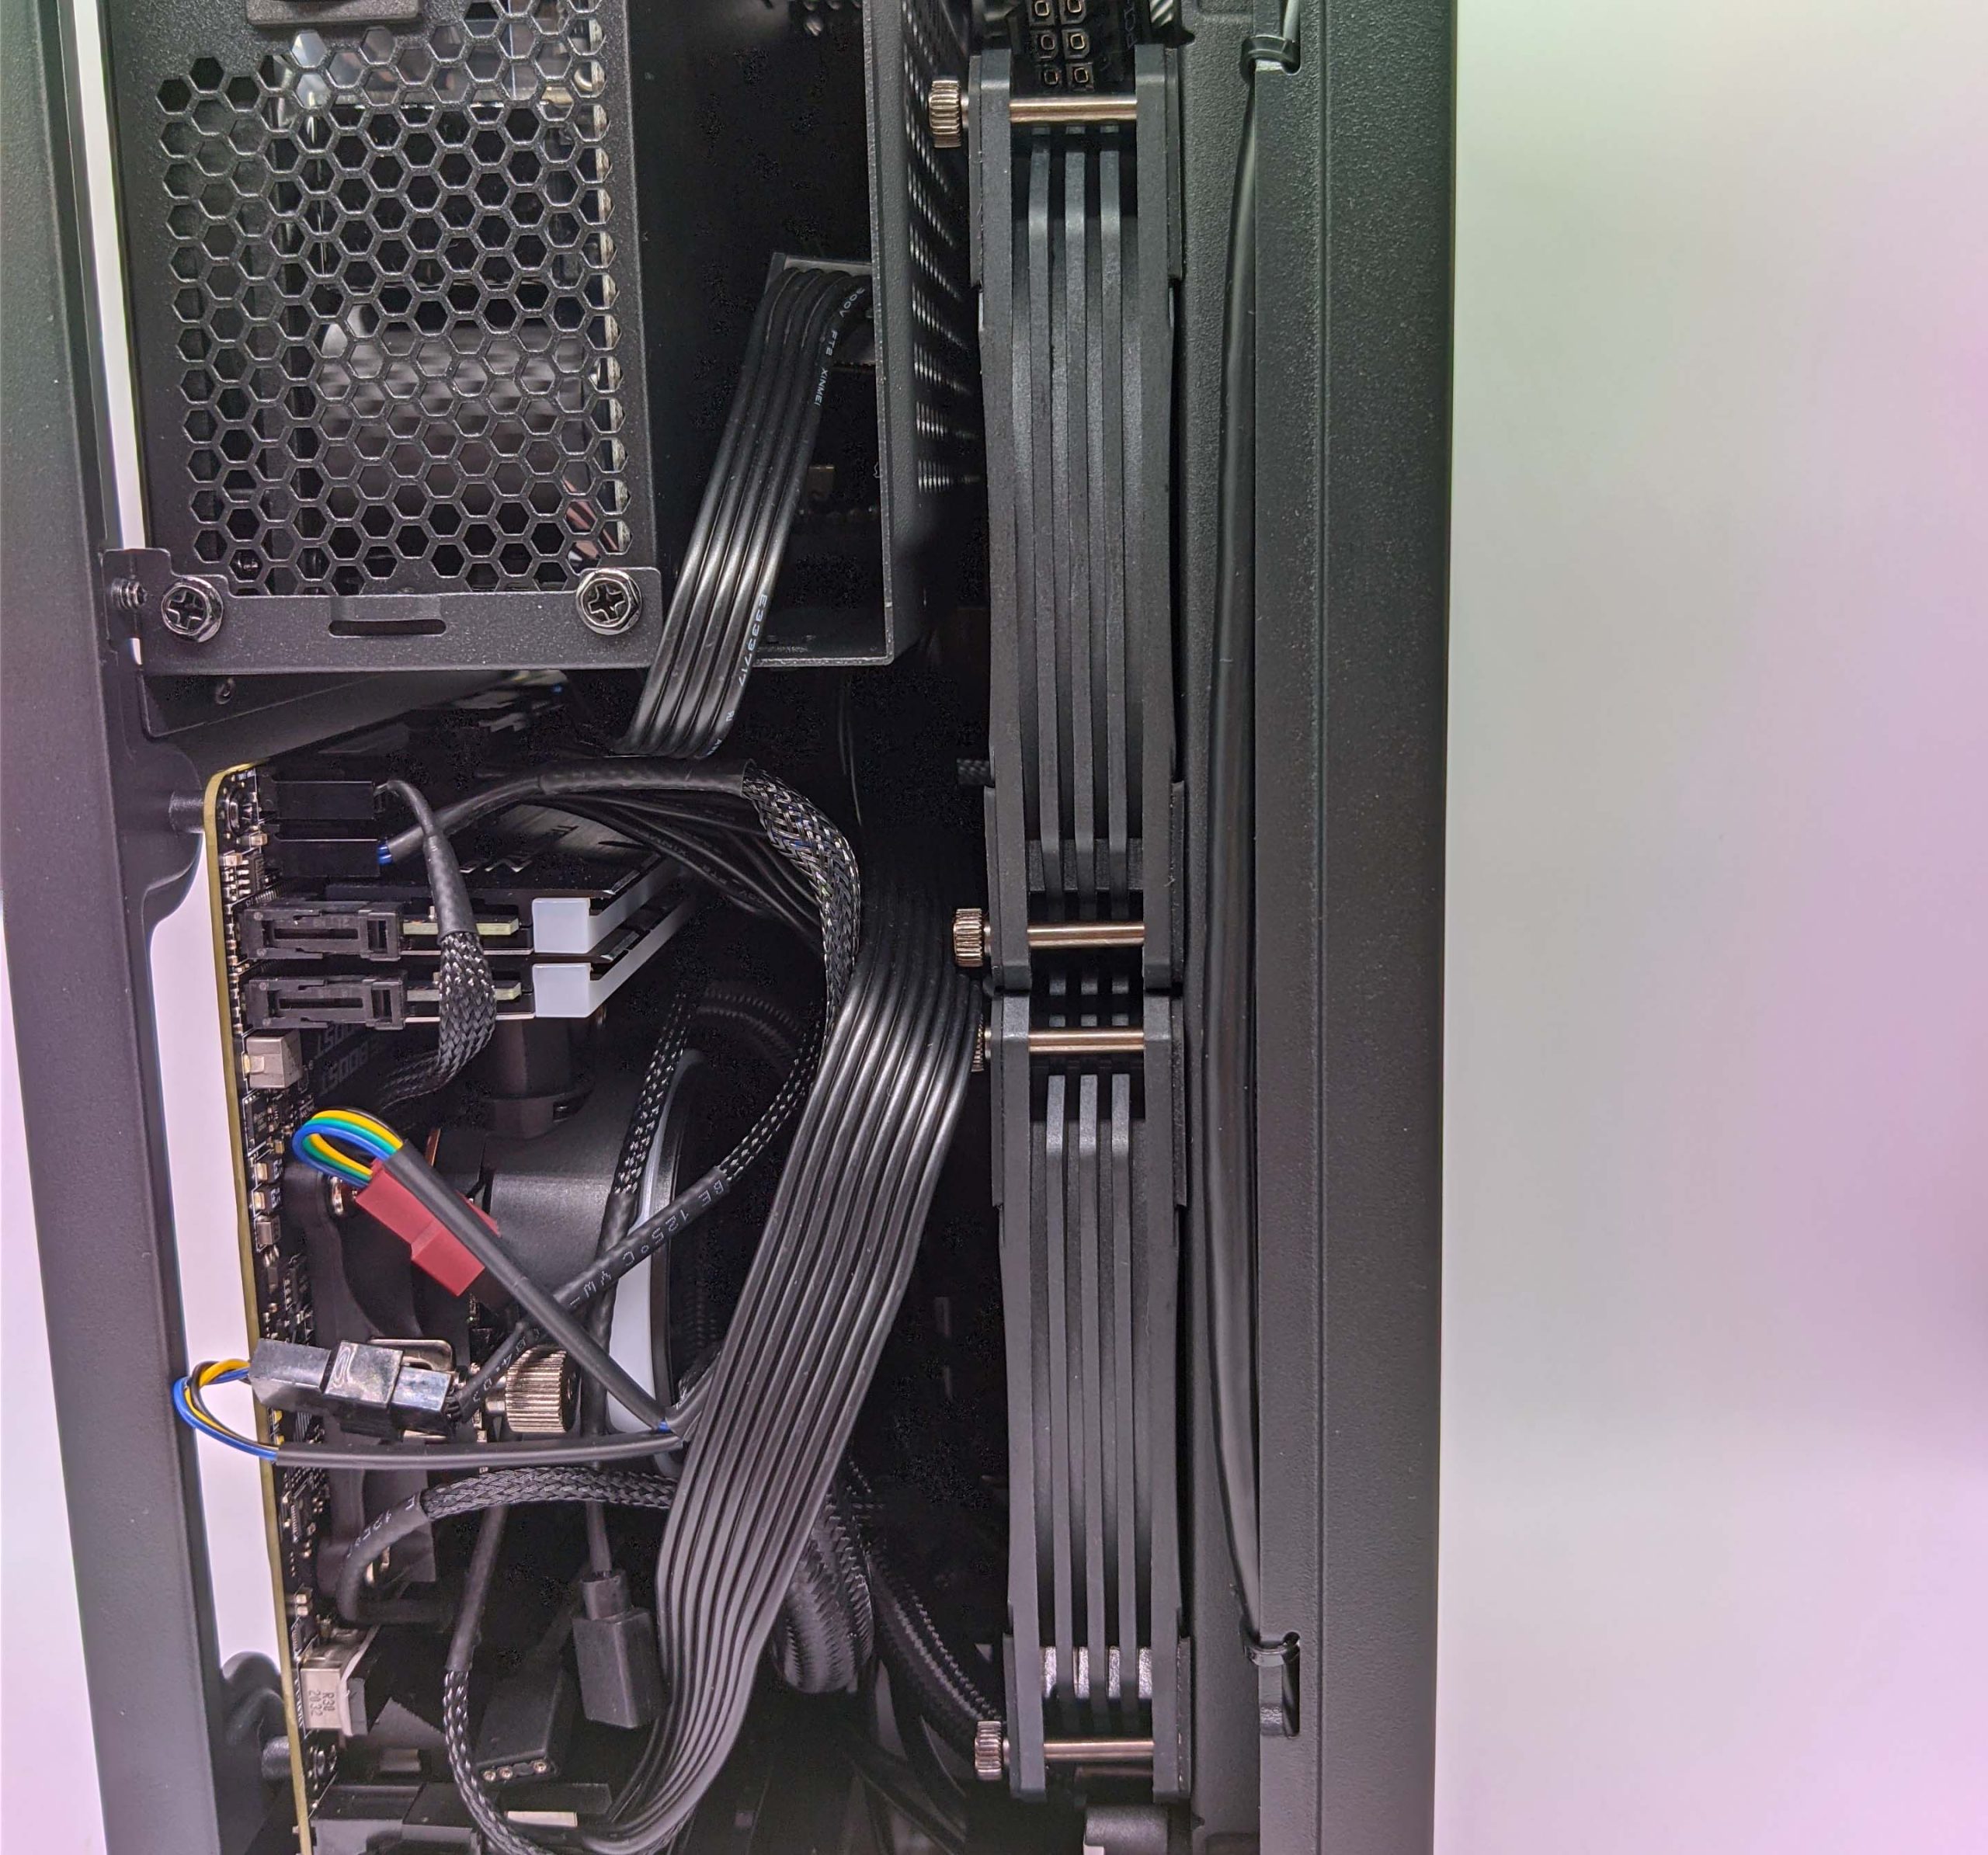
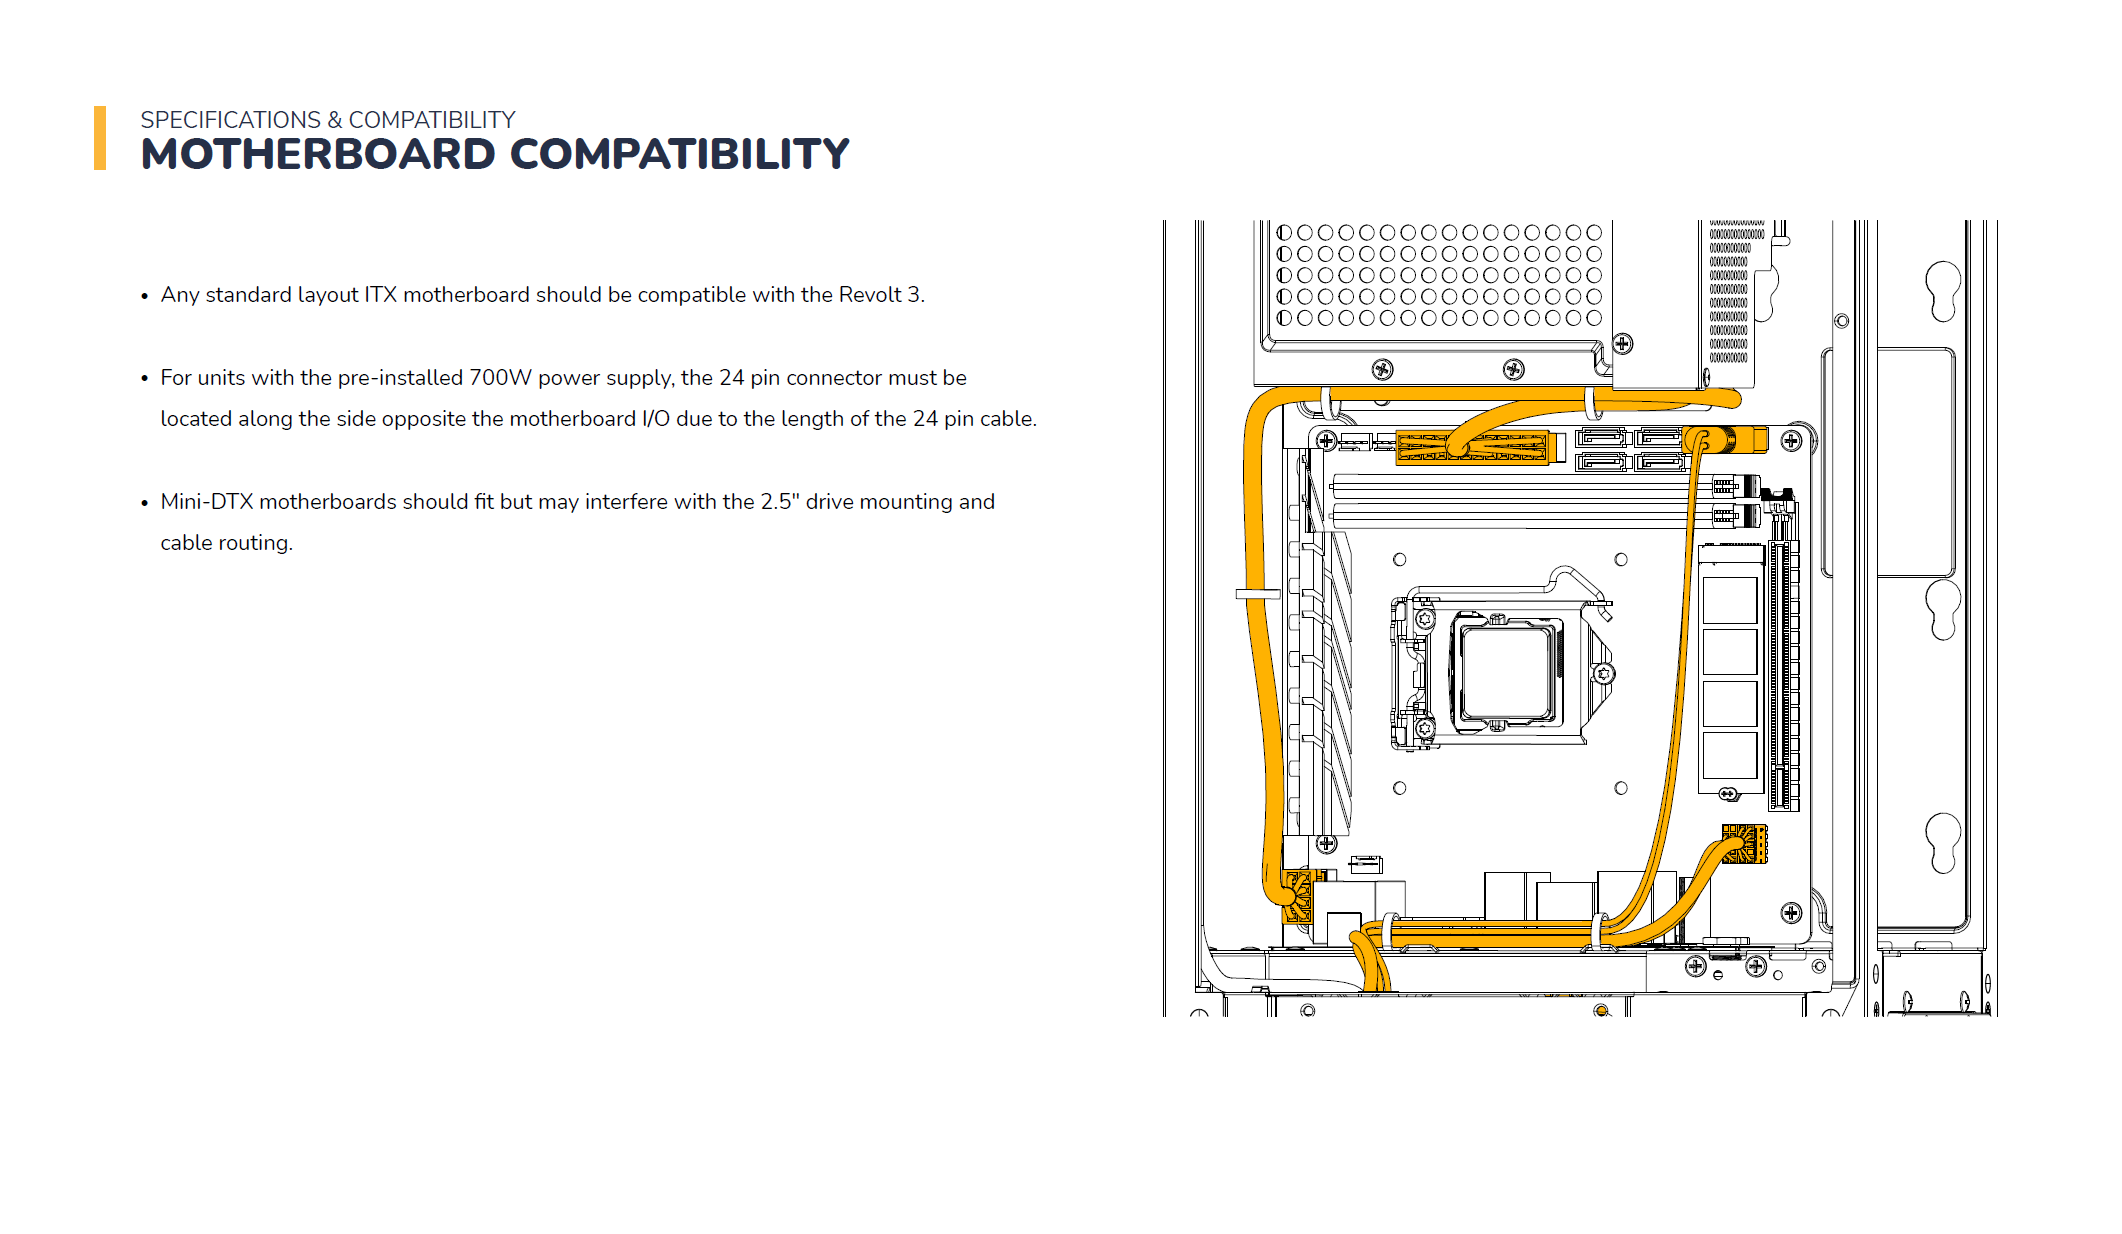
I won’t go into the exact steps here, because in the end it simply depends on the selected parts, but I can recommend the following rough order: First, install the assembled motherboard and connect power, USB and front panel connectors as far as possible. By the way, HYTE bypasses the cable tangle of many small cables in this case and combines them into a single connector. Unlike pretty much all cases I know, the front USB Type-C port is not connected internally to the motherboard, but to the rear I/O via USB Type-C as well

In a small space, however, mediocre chaos can hardly be avoided. However, it should be said that beauty is not important for my review. So, in case of doubt, the temperature values that follow later can be considered the “worst case” with many cables blocking the airflow. For a nicer interior, here’s another tip: Don’t waste space behind the mainboard! The EPS power supply, fan and RGB cables, for example, can be routed between the back of the motherboard and the side of the case before the board is installed.

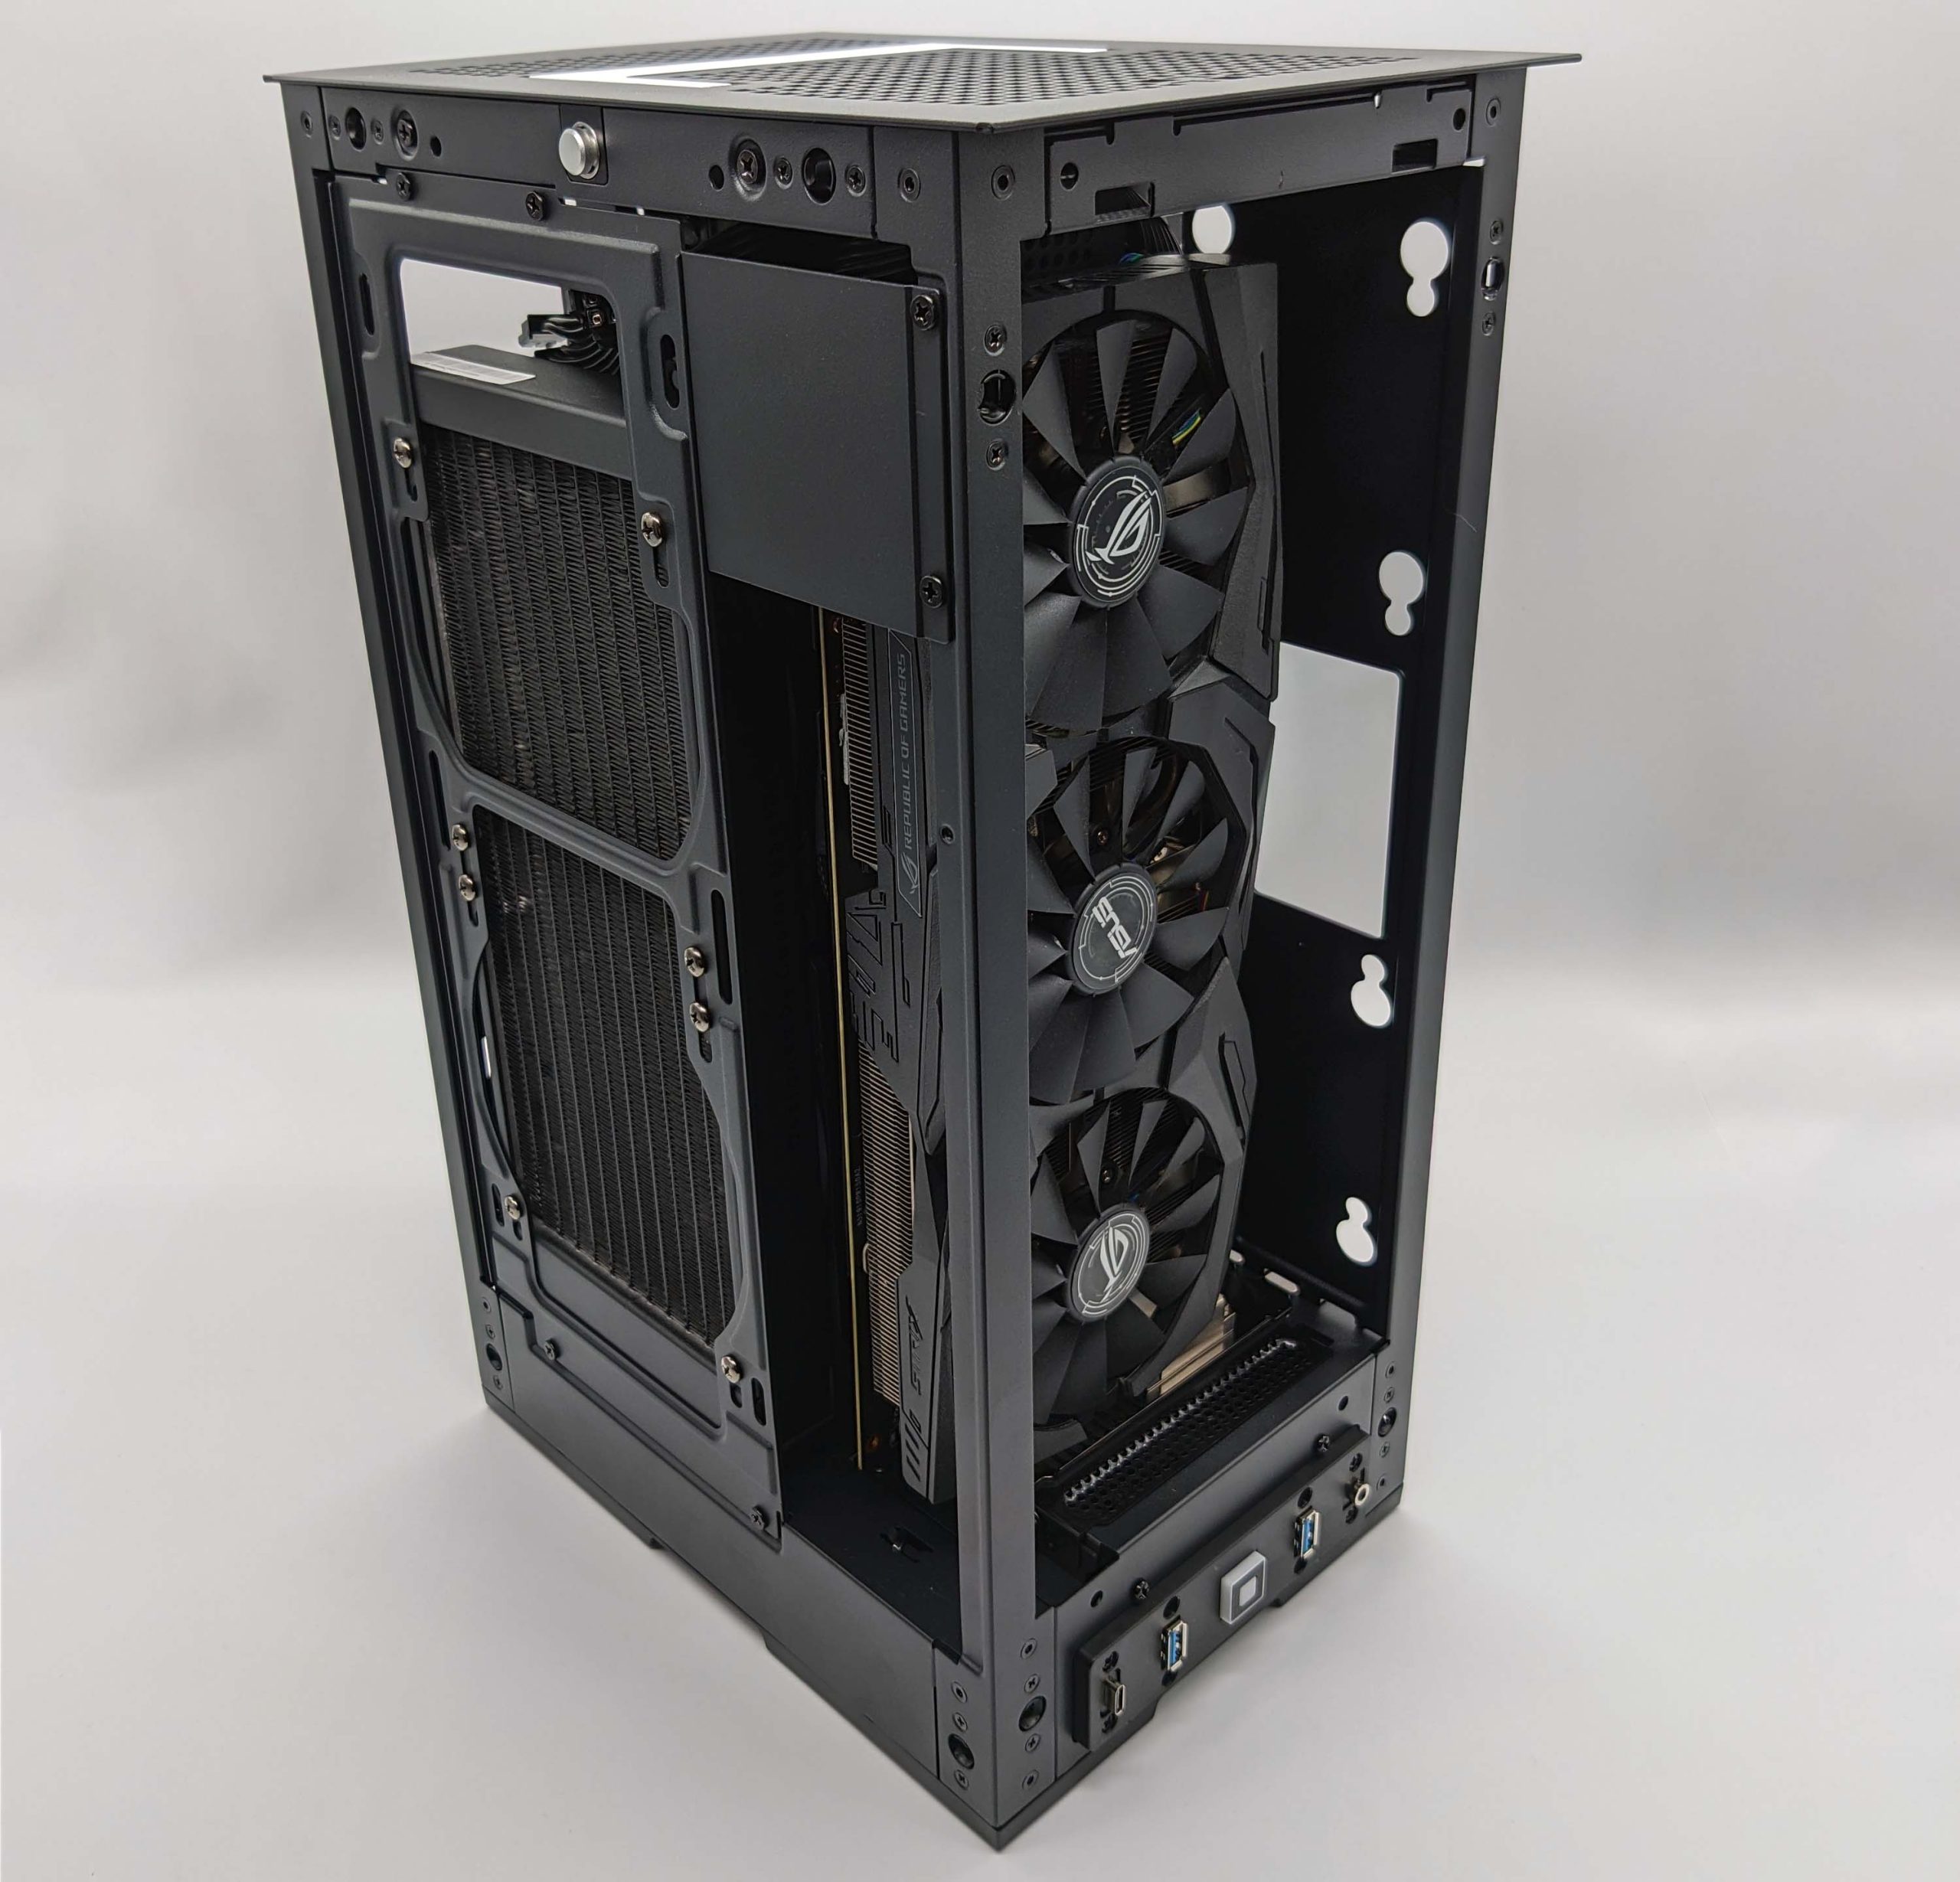
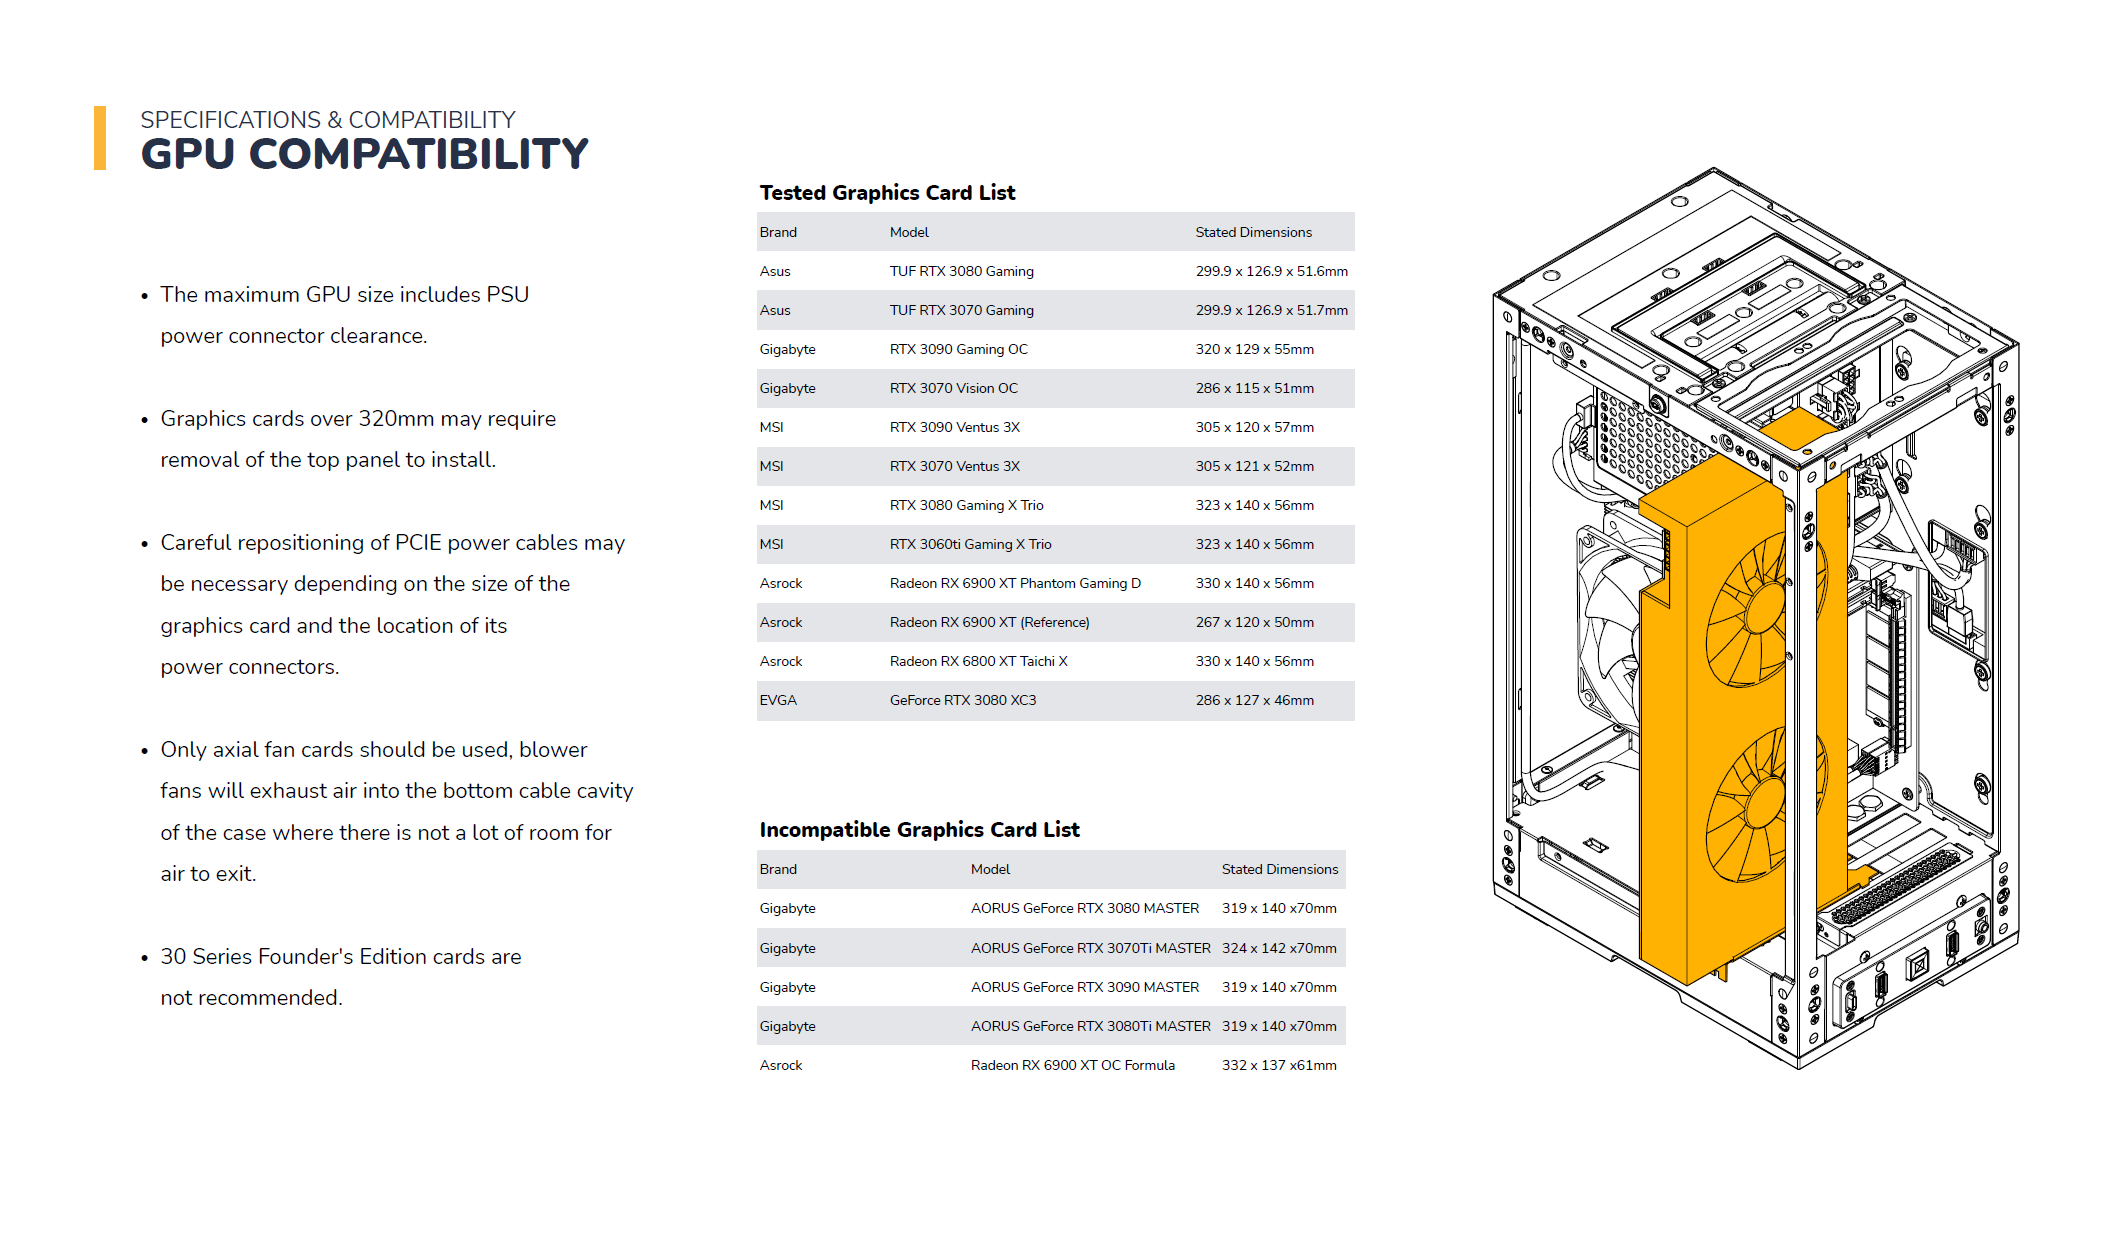
Regarding GPU compatibility, HYTE lists a few models on the product page that definitely fit the Revolt 3. For the rest, you need to follow the specified dimensions and have a little luck.

Another nice advantage of this case is that it doesn’t need PCIe riser cables.

At the top right of the picture, you can see a little curiosity that I can’t quite explain. This cover hides the graphics card’s power connections, so it can lead to problems with particularly wide GPUs here. In addition, some cooling fins and their warm exhaust air are blocked from the outside. Maybe this is to improve the stability of the case, but I can’t make any sense of it. Fortunately, however, it can be easily removed with two screws.

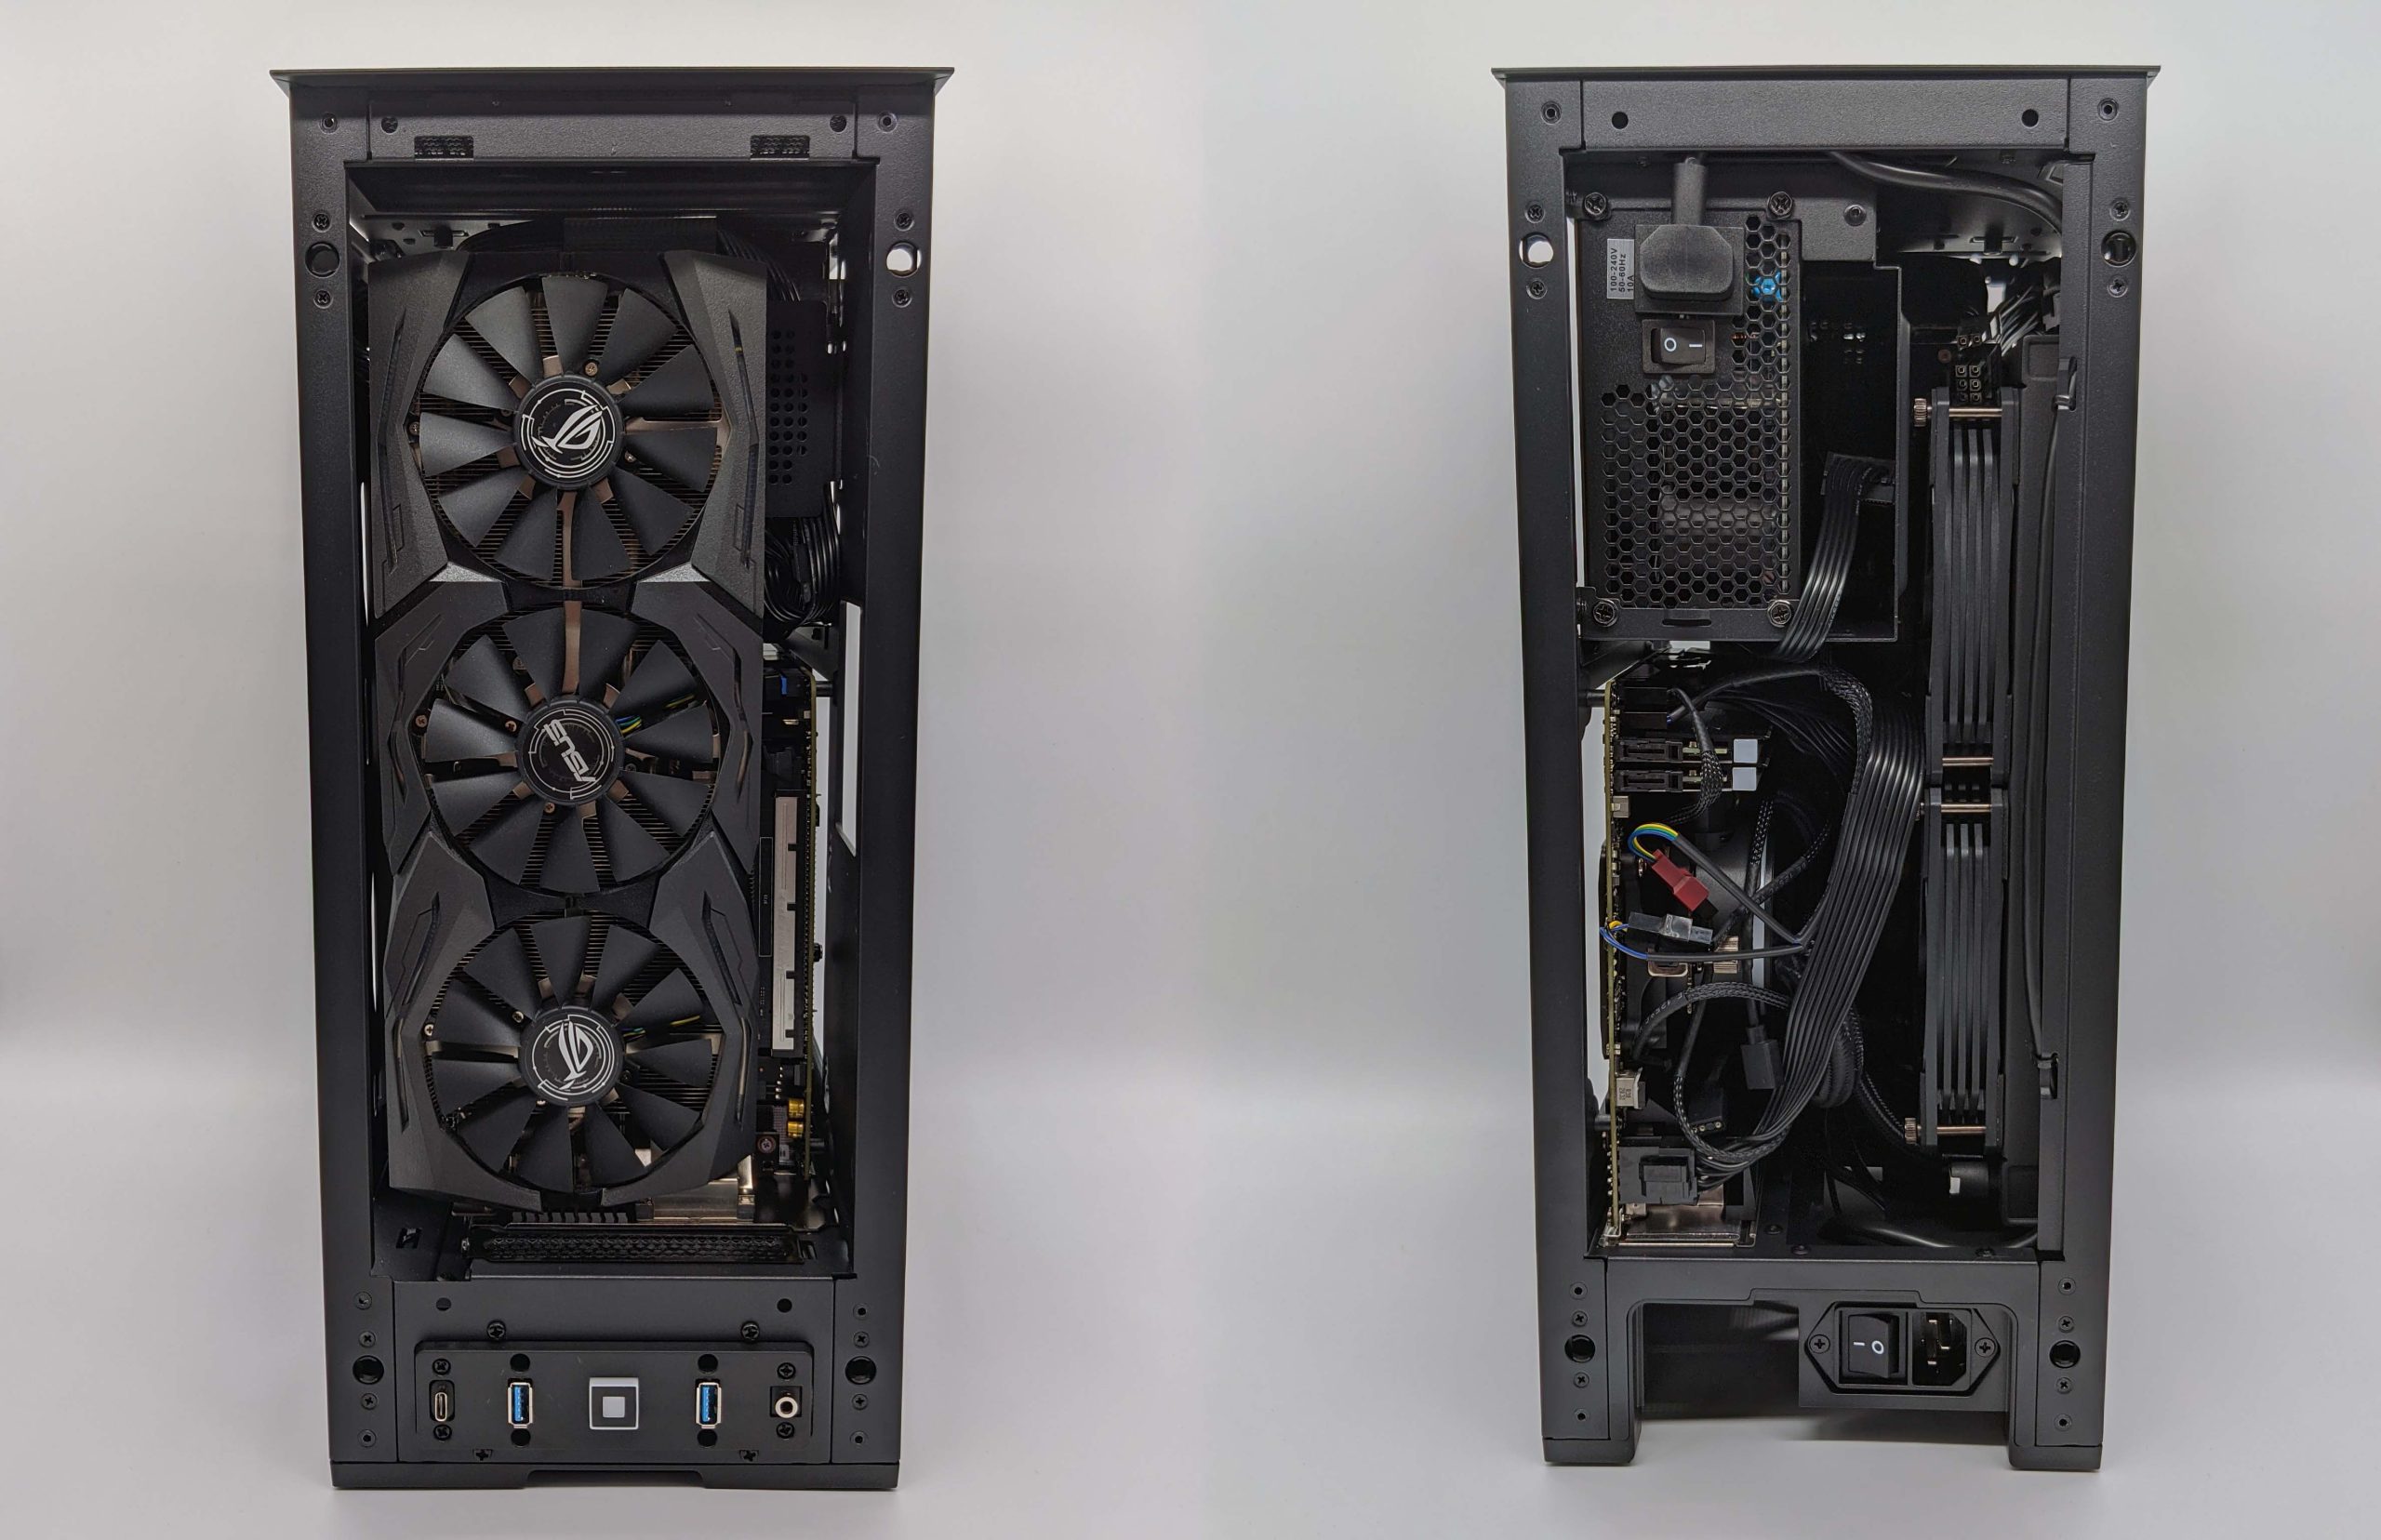
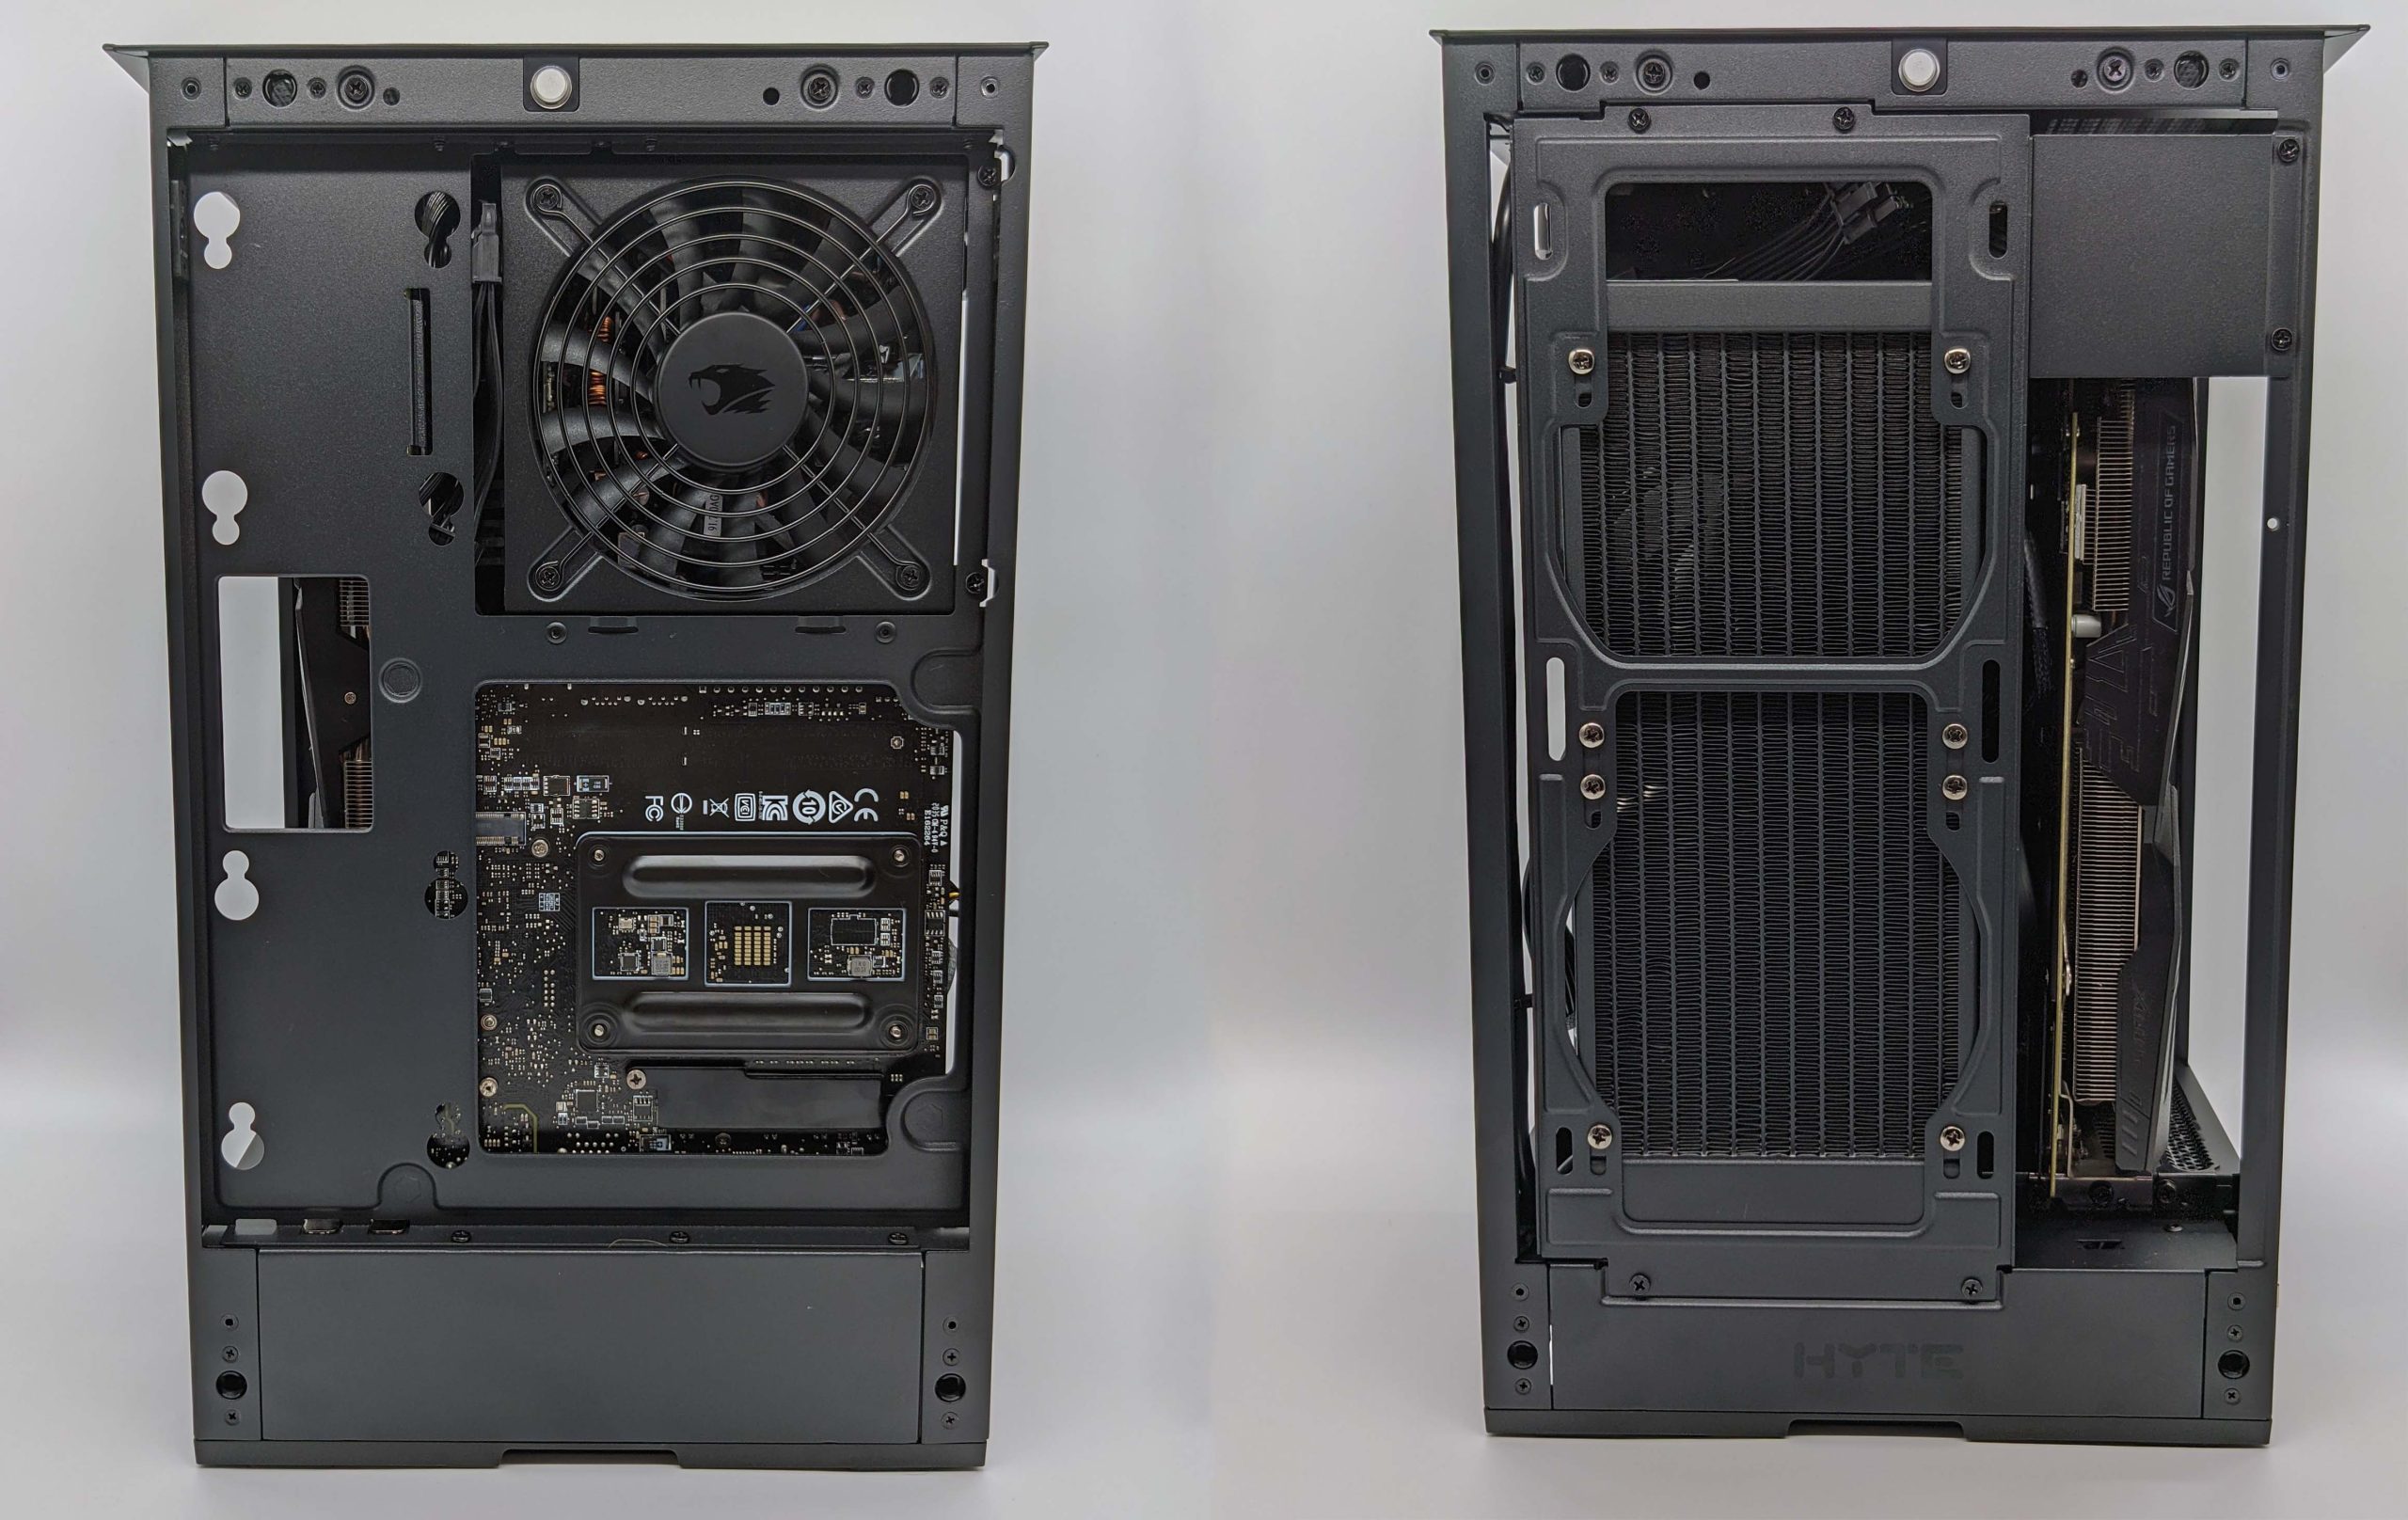
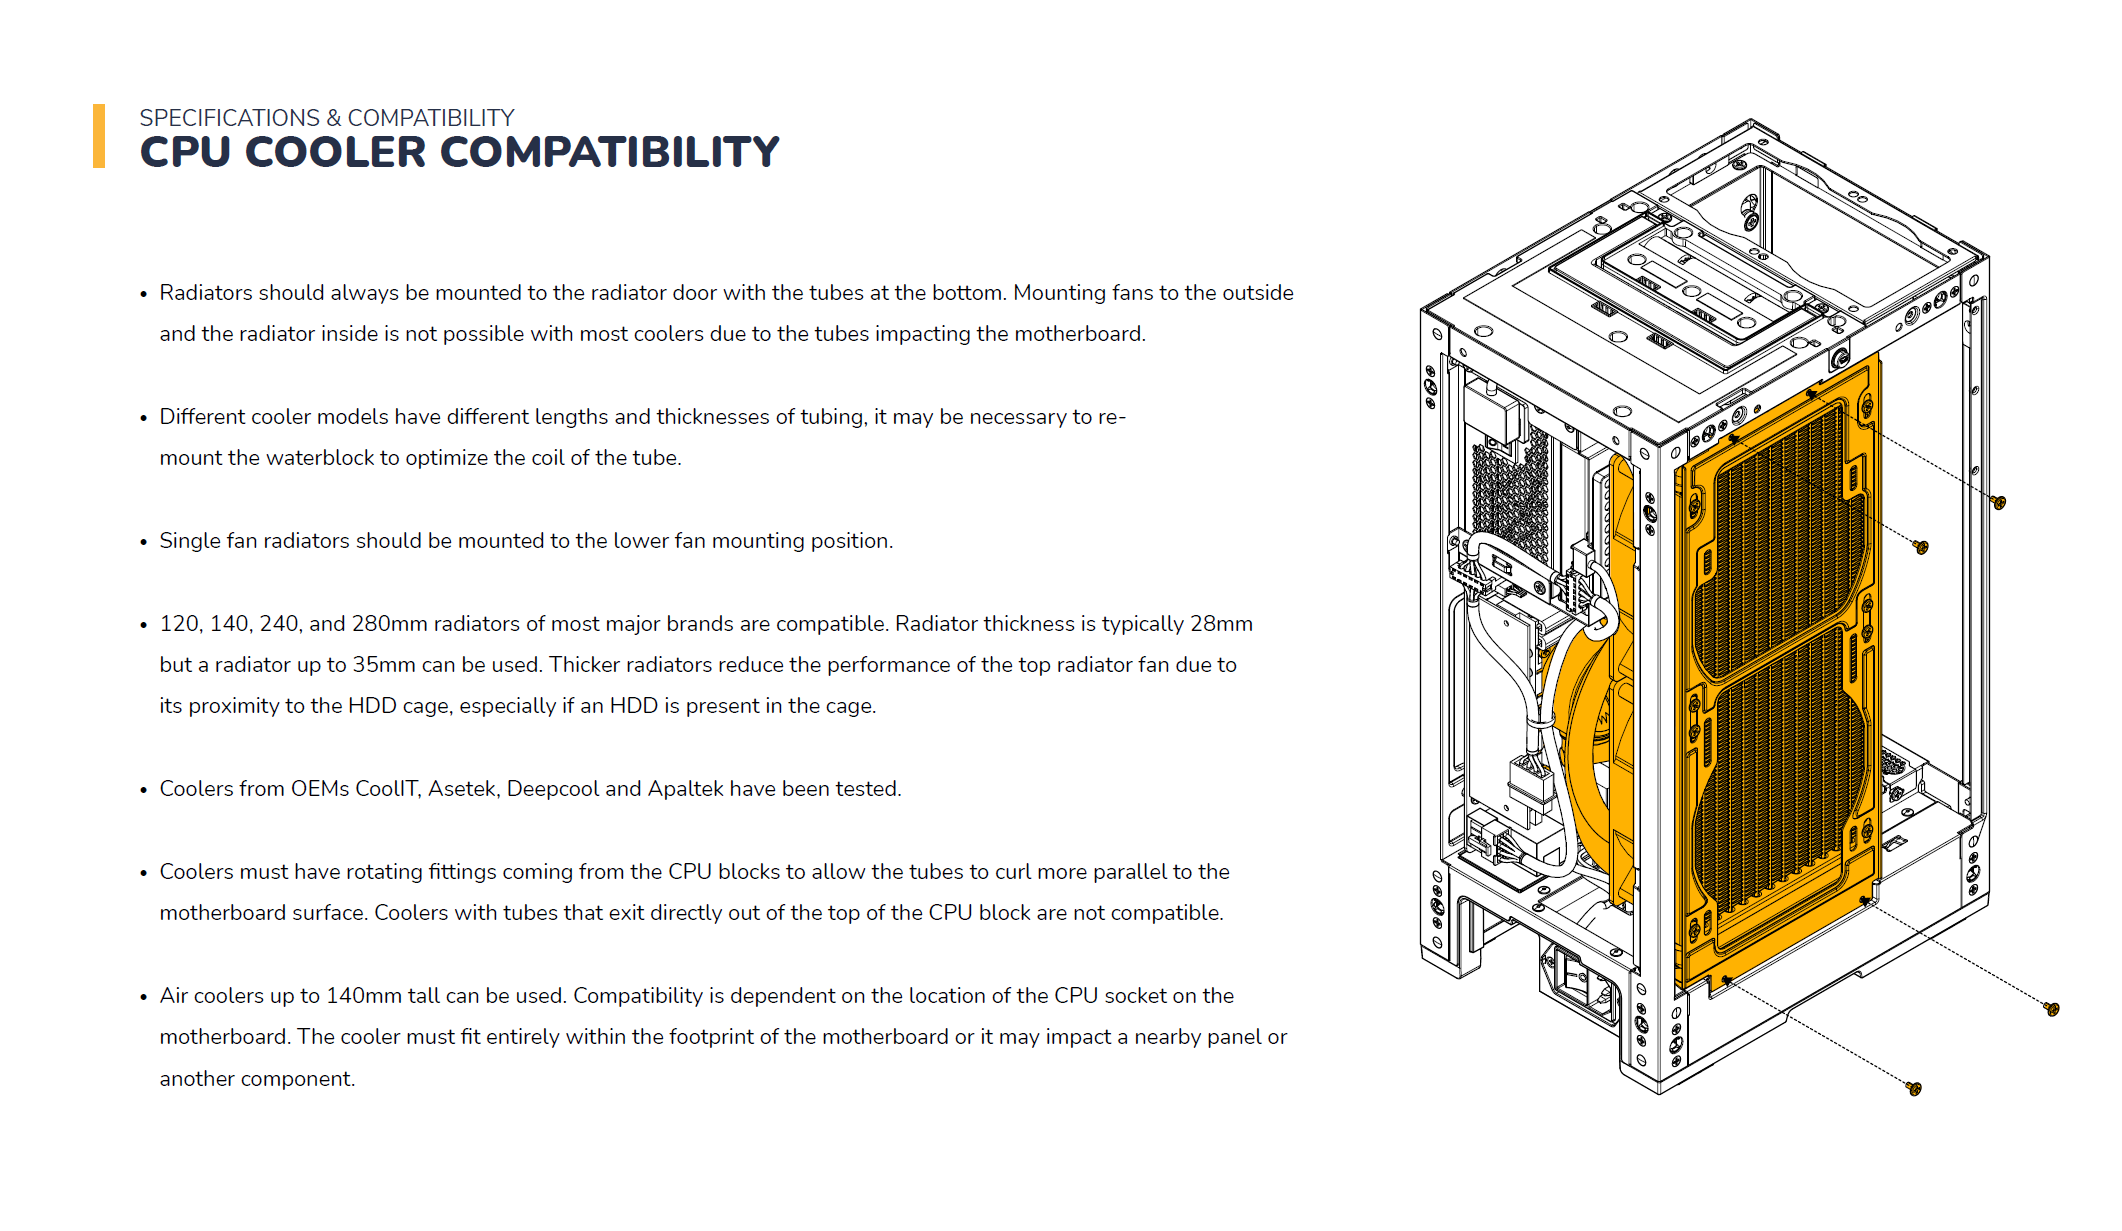
Apart from my poor cable management, however, you can once again see well in this picture that AiO watercoolers can also be used with either protruding screws or slightly thicker fans / radiators (up to 60mm in total). By the way, if you don’t need the 3.5″ bay, you can also stow some cables there!

The biggest hurdle in building this system was probably the installation of the AiO water cooling system. A nevertheless very small distance between radiator and pump block, but at the same time hose length designed for ATX case lets you get creative. So turned the radiator twice with the pump block already mounted, so that the hoses form a “curl”. Then simply screwed into the holder that opens like a door and this problem is also circumvented.

I can give two more tips for your own system in this case: If you want to use the integrated WLAN of your mainboard, use antennas with some cable up to the receiver. If you screw the antennas directly to the motherboard, they are shielded all around by the case, which significantly reduces the range. And when the system is assembled and panic sets in after an unsuccessful first start-up attempt, remember that there are two switches for the power supply. One on the power supply itself and a second on the case. Of course, this did not happen to me as a full professional, not at all!

The manual also contains a number of good tips from the manufacturer:

With a total of 9.6 kg, of which 6.3 kg is the case including the power supply, the system is heavier than expected in the end. I wouldn’t want to run a marathon with it now, but the computer can be carried quite comfortably for shorter distances thanks to the handle on the top.

Kommentar

Lade neue Kommentare

RedF

Urgestein

4,667 Kommentare 2,553 Likes

Gefällt mir das ding. Da ich eh ein kleines portables system "brauche" ist das vieleicht was für mich. : )

Antwort Gefällt mir

Linuxlink

Neuling

5 Kommentare 4 Likes

Ich melde mich mal mit meinen Erfahrungen zu dem Gehäuse zu Wort.

Verbaut waren bei mir bisher zwei Systeme;
einmal ein 9900k, Z390I Aorus, 16Gb Trident Z @3200Cl16, 6800XT Red Devil, Corsair SF750, 280er AIO "Silentium" (später eine NZXT 240er AIO), 3x 80mm Lüfter sowie zwei Nvme M.2 SSDs.

Später kamen dann ein 11900k, Z490I Aorus Ultra, Trident Z @3200CL14, 6800XT Red Devil, Cooler Master V850 SFX, NZXT 240er AIO, 3x 80mm Lüfter sowie zwei Nvme SSDs rein.

Alles in allem war ich mit dem Gehäuse recht zufrieden, mir ist allerdings aufgefallen das die Schirmung des Gehäuses nicht optimal ist, da (in meiner Wohnung lade ich mich über meine Hausschuhe gerne mal elektrostatisch auf) bei Berührung gerne mal das Bild für einen kurzen Moment flackerte.
Die Temperaturen waren bei der Exhaust Variante immer in einem angenehmen Bereich, und dank der 3x 80mm (einer wie vom Hersteller vorgesehen im Deckel oberhalb der GPU, zwei in Eigenregie auf Seite des Radiators vor die GPU geschnallt (führte dazu, dass die GPU im Idle die Lüfter auch wirklich ausgelassen hat.)) waren auch die Idle Temperaturen von CPU und GPU bei angenehmer Lautstärke auf einem guten Level. (GPU bei rund 35°C, CPU bei ca 40-45°C bei etwa 25°C Raumtemperatur und Hardware @Stock)

Langfristig hat sich das Gehäuse jedoch durch meinen kleinen Basteldrang und der ungünstigen, aber sehr ansprechenden Anschlussposition nicht halten können.

Edit: Auch zu erwähnen sei die nicht ganz optimale Anschlusszugänglichkeit.
Genauer ausgedrückt, meine ich den HDMI Anschluss an der GPU.
Die Kabel werden der relativ geringen Höhe unterhalb des Mainboards geschuldet, schon recht früh um 90° zur Seite gedrückt. Langfristig nicht so toll für die Kabel.

Antwort 3 Likes

Klicke zum Ausklappem
Linuxlink

Neuling

5 Kommentare 4 Likes

Bei der Überlegung sollte man sich gewiss auch mal das DAN A4 H²O ansehen. Da passt die von mir bereits genannte 6800XT Red Devil ebenfalls rein. Ist im direkten Vergleich aber etwas eleganter wie ich finde.

Antwort 1 Like

Tim Kutzner

Moderator

819 Kommentare 663 Likes

Danke für dem Einblick eines Langzeitnutzers :)

Antwort 1 Like

Linuxlink

Neuling

5 Kommentare 4 Likes

Nur all zu gerne, das Hyte macht im Bau viel Spaß und ist imm vergleich zu einem Standard DAN A4 welches ich davor hatte ein echtes Raumwunder 🤣
Balsam für die Finger^^

Antwort Gefällt mir

G
Guest

Schöner Test, danke @Tim Kutzner
Aber das mancher Händler für ein NoName-Netzteil dann gleich 120,- € mehr verlangt, ist schon recht sportlich.

Und für das NZXT soll man 400,- € löhnen? Geht´s noch? Wie sollte dieser Preis dafür gerechtfertigt sein?

Für das von mir genutzte BeQuiet 900 habe ich gerade mal 160,- € bezahlt. Da passt das NZXT 3x rein! Und für das letzte Netzteil vor 3 Monaten, ein Seasonic 850W 80Gold, waren es gerade mal 89,- €.

Schon klar, dass jetzt alle meinen, mehr Geld rauszuschlagen, aber irgendwo gibt es Grenzen und mit dieser Preispolitik seitens NZXT oder anderer haben sie sich für mich absolut als Hardware-Lieferanten disqualifiziert!

Sorry für das bisschen Off-Topic, aber da geht mir manchmal echt die Hutschnur hoch, wenn ich solche Preise lese!

Antwort 1 Like

Tim Kutzner

Moderator

819 Kommentare 663 Likes

Dabei aber nicht vergessen, dass SFF und SFX Netzteile einfach generell mehr kosten, da viel Technik auf kleinem Raum und geringerer Absatz einfach den Preis erhöhen.

Antwort 4 Likes

G
Guest

Das mag durchaus sein. Das Netzteil ist aber trotzdem ein NoName mit einem gefakten Siegel. Da würde ich das Geld lieber für eines ausgeben, wo sich der Hersteller die Zertifizierung auch geleistet hat und ich mich dann auch darauf verlassen kann.

Nur meine 2 Cent....

Man muss ja das Teil zum Glück nicht dazu nehmen, sondern kann.

Antwort 1 Like

D
Deridex

Urgestein

2,214 Kommentare 849 Likes

Das Netzteil halte ich auch für problematisch.

Sofern du es nicht zurück schicken musst kann man das ja auch von einer entsprechend ausgebildeten Elektrofachkraft öffnen lassen. Hin und wieder erfährt man übers Innenleben wer das Teil her stellt.

Antwort 1 Like

Tim Kutzner

Moderator

819 Kommentare 663 Likes

Hab mal bisschen rumgefragt, meine Vermutung bezüglich "High Power" scheint richtig zu sein.

Antwort Gefällt mir

D
Deridex

Urgestein

2,214 Kommentare 849 Likes

Einen kleinen Kritikpunkt am Artikel hätte ich:
Die Verlinkung vom Mainboard und der Coolermaster AIO ist ja im Artikel auf der Seite 5 nebeneinander. Das Ergibt auf Smartphone für den Mittäglichen Besuch ein "interressante" und recht lang gezogenes Layout bei mir ;)

Antwort Gefällt mir

Linuxlink

Neuling

5 Kommentare 4 Likes

Da man das Gehäuse auch gänzlich ohne Netzteil ordern kann, was ich zum Beispiel schon vor geraumer Zeit getan hatte, wird es tendenziell eher weniger Leute geben, die sich das wirklich mit bestellen. Die Leistung dürfte, gerade bei aktuelleren Pixelschubsern schon sperrlich ausfallen.

@Stock hatte bei mir ein 600 Watt Corsair SFX Netzteil unter Furmark und Prime95 bereits nachgegeben. Und bei dem Vertreter ist die Güte/Qualität durchaus praxisnah erprobt.

Antwort Gefällt mir

M
Mr.Danger

Mitglied

77 Kommentare 43 Likes

Am besten Barfuß laufen oder Schlappen ohne Gummisohle benutzen und bitte nicht auf der Stoffcouch umherrutschen😜 Dann klappt es auch mit der Erdung😶‍

Antwort 1 Like

Danke für die Spende


Du fandest, der Beitrag war interessant und möchtest uns unterstützen? Klasse!

Hier erfährst Du, wie: Hier spenden.

Hier kannst Du per PayPal spenden.

About the author

Tim Kutzner

Supporting force on cooler, periphery and 3D printing arcticles.
Linux novice and wanna-be datahorder with DIY NAS.

Werbung

Werbung