


Trust, but verify – Asrock Timing Configurator (Intel) / Zentimings (AMD)
As with any OC it’s important to check if the settings you changed actually applied and that there are no unforeseen dependencies with other settings, especially since many boards these days come with built-in recovery functions that kick in after several unsuccessful memory training attempts. For this reason, it’s paramount to use a tool that reads out all the memory timings in a state where your PC has fully booted and the OS is loaded. The best tools for this job are ASRock Timing Configurator (AsrTC), which works for all motherboards of a given CPU generation on Intel, and Zentimings for AMD Ryzen based systems.
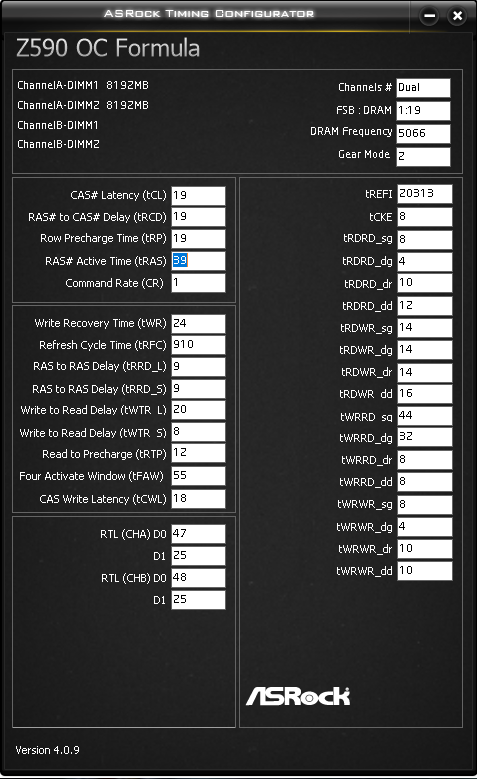
Counter-intuitively AsrTC is actually not a tool to configure the timings, as in change them real-time while the system is running, but actually just read them out and present them in a fairly clear manner on one page, which is also handy for screenshotting. You might have to hunt down specific versions of the tool for specific generations of CPUs and motherboards, like 4.0.9 for Z590, 4.0.3 for Z490 etc. if you don’t have an ASRock board that has the software bundled. Even though it may take a little time and research to find the right version, this tool is definitely very handy and highly recommended for RAM OC on Intel platforms.
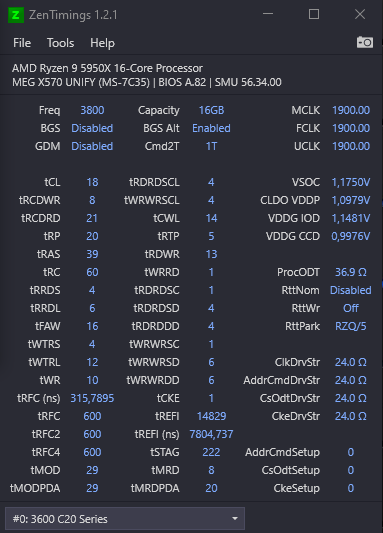
AMD Ryzen owners have it a bit easier, in that Zentimings is a vendor-independent tool that usually just works on whatever Ryzen motherboard and CPU if you just use the latest available version. Apart from the memory timings this tool also shows some more parameters like voltages and resistances, most of which might need tweaking as well to optimize your setup.

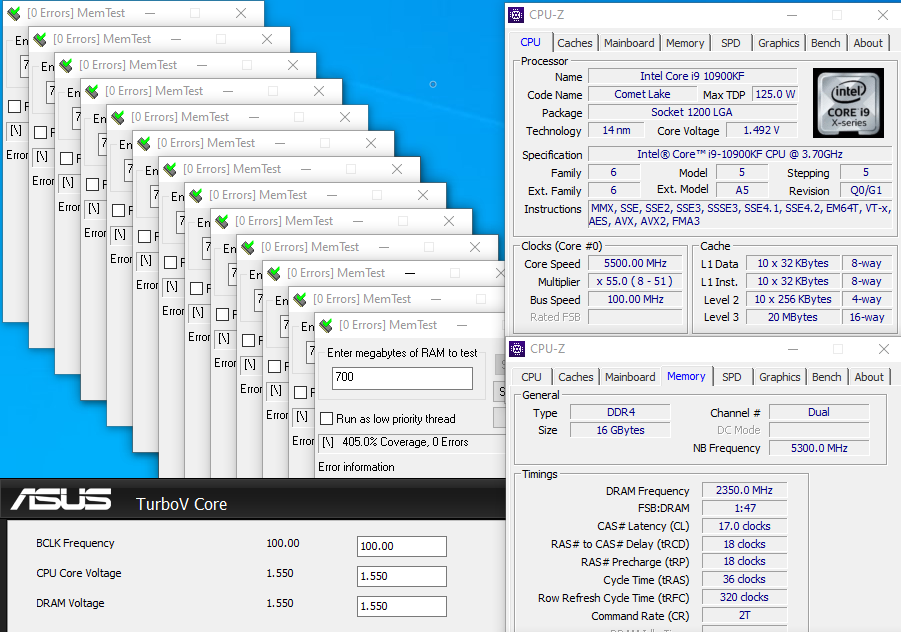
An honerable mention also goes out to MemTweakIt, a tool by Asus that let’s you change most of the memory timings in real time! Yes, you can change timings while the system is running and monitor the affect this has on stability while you are running a test. However this only works on Intel platforms and fining a working version for your specific motherboard is a challenge on it’s own, even if it’s an Asus motherboard.
Voltages and Temps – Hwinfo
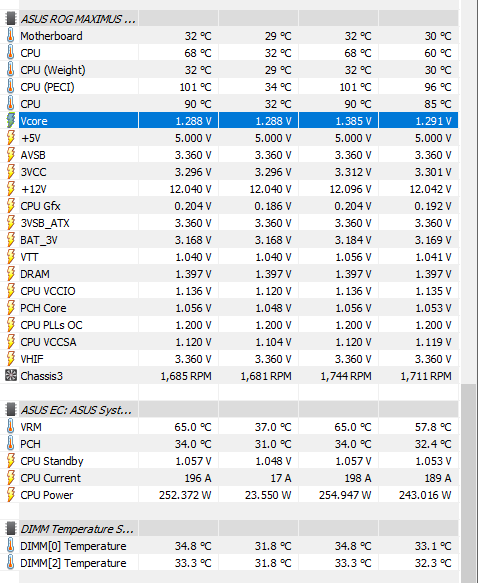
As voltages and temps are also important parameters for any overclock, it’s important to monitor these as well. Especially if you are not on the AMD platform where Zentimings already reads out most voltages important to the memory, HWinfo can come in handy to check what voltages the motherboard has selected with “auto” settings of if your manual settings have actually applied. Apart form the actual RAM voltage, also known as DRAM Voltage or Vdimm, others are also of importance like SOC Voltage for AMD or SA Voltage for Intel, which is what the CPU’s IMC uses to run off of and supporting voltages like VDDG on AMD or IO (Mem) on Intel.
Since these are platform and often also generation specific it’s hard to give concrete recommendations for safe voltages here, so again it’s up to you to do your own research. But either way it’s important to monitor the voltages while the system is running to, again, make sure your settings are actually applied or if you left them on auto, what they resulted in. You may also find that some BIOSes have built in read out functionalities, so those can come in handy as well.
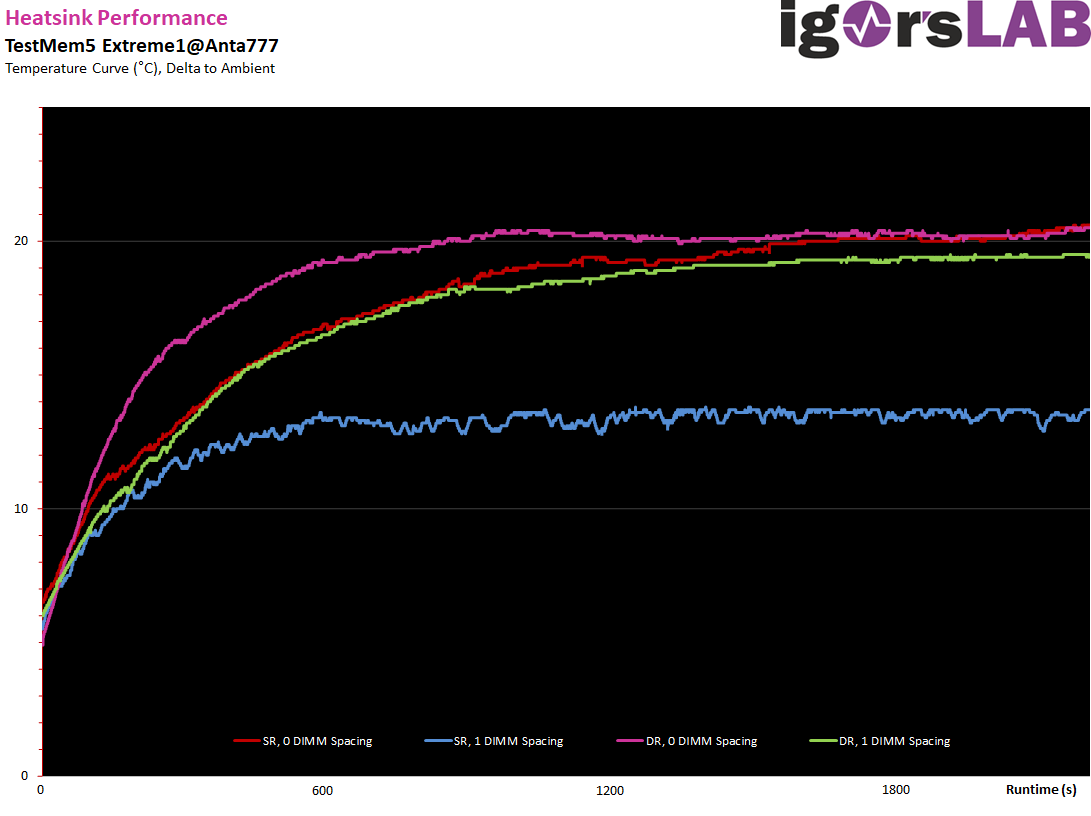
The temperature of your RAM sticks can also have an impact on stability, especially at higher than stock Vdimm. This can become apparent if your RAM OC is stable when you are only stress testing the memory its self, but becomes unstable after a few minutes of gaming with your GPU and CPU dumping heat into your case and thus heating the memory. So for stability it is important to test in a representative way that actually matches your later use case, which we’ll also get to later.
Some memory modules actually have built-in temperature sensors, which show up in HWinfo and can greatly simply diagnosing heat-related instability. If your modules don’t have any and you want to get to the absolute bottom of a particular instability you suspect heat to be the cause of, there is no way around attaching an external temperature probe. Since heat related instability is a common issue, we always point out in our reviews if the tested kit has built sensors and make a suggestion to the manufacturer of adding such sensors, especially if it’s an overclocking focused kit.
Performance testing – is it actually faster?
As mentioned before you should check the performance before, during and after the memory OC. I like to do this at certain “checkpoints”, so states of memory settings that I know to be reproducibly stable. Here are the benchmarks that I like to use:
- Aida64 Cache and memory benchmark: Highly synthetical, but can let you know if a setting is completely wrong, e.g. if read or write performance has suddenly decreased a lot, usually caused by auto tertiaries.
- Geekbench 3 Multicore Memory Score: Middle ground between synthetic and real-world, gives you a weighted performance score that takes clock speed and latency into account. Useful as a single metric to compare different memory setups against each other.
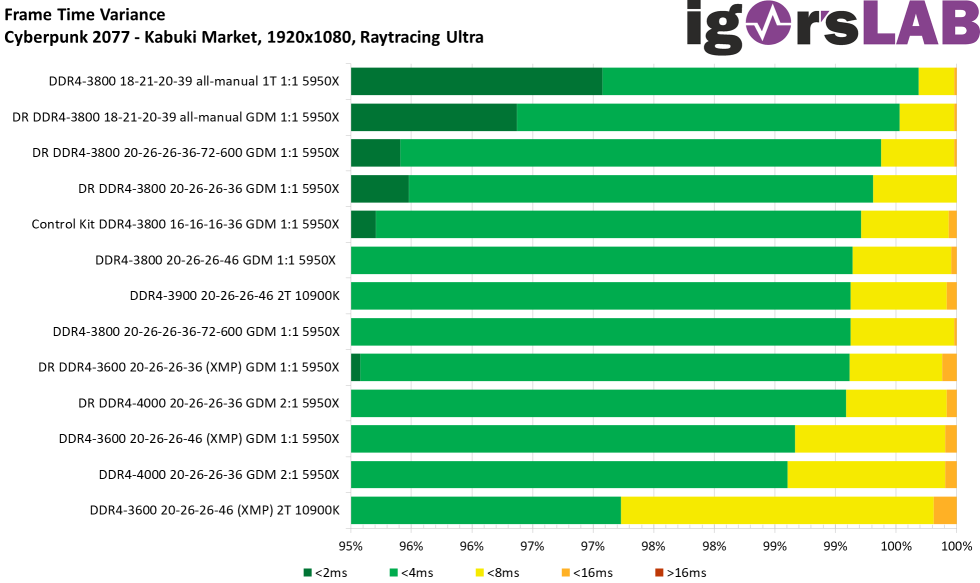
- Gaming/application performance: As mentioned earlier, the most representative use case for testing, is just outright an actual use case. We like to use a fixed part of gameplay in Cyberpunk 2077 that we know is sensitive to memory performance and compare the recorded FPS and frametimes across settings, for which we use Nvidia Frameview. This game also has the useful quirk, that it crashes very easily during loading of a savegame if your memory is only a little unstable, so it also doubles as a quick and dirty stability check.
Of course, there are also a lot of other games, some with built-in benchmarks, like Shadow of the Tomb Raider, that have established themselves as useful metrics for memory performance. If you intent to use your system for work like rendering, comparing the export time of a project can also be a useful benchmark metric. It really comes down to what you want to optimize your system for.
Stability testing – 1 error is 1 too many
For stability testing your RAM overclock there are lot of different tools that do the job. Basically the functionality is always the same in that they try to cover all various combinations of read, write and copy instruction sequences to the memory to ensure the system is stable in all cases. Because literally every combination has to be tested for every chunk of memory, the time needed for this increases proportionally with the size of your system memory, and decreases with the speed your memory is running at. So a lot of slow memory takes a lot of time to test, a small amount of fast memory is a lot faster to test.
All of the following tools have their advantages and disadvantages, mostly in ease of use and if they are free or need to be purchased.
- HCI Memtest: Free version available, but can only test 2000 MB per instance. Automatic or batch spawning of multiple instances is only available in pro version. A coverage of 400 % is considered stable.
- Karhu Memtest: Only available as paid version, but very simple and easy to use, can test all system memory at once. A coverage of 4000% is considered stable.
- TestMem5 (TM5): Free, but cumbersome to use, but can test all system memory at once. Also has support for various testing profiles. We use “Extreme1@Anta777” profile for RAM testing and consider a complete run, consisting of 3 cycles, stable.
- Google Stress App Test (GSAT): Free, requires Windows Subsystem for Linux on Windows systems, runs natively on Linux or with a live DVD. Can also stress test other parts of the system. A “warm” run with 3600 seconds duration (1 hour) per 16 GB of RAM is considered stable.
You can use any program to test the stability of your RAM. Additionally, if other parts of your system are overclocked like the CPU, Infinity Fabric, Cache etc. their instability can have an effect on the result of the memory stability test. So before you validate the stability of your RAM, you should be certain that all other components are stable as well. Even though this is beyond the scope of this guide, commonly used tools to test the whole CPU/cache/memory system are LinX/LinpackXtreme or Prime95 with settings that allocate all or most of the system memory.
But back to our memory. To validate stability you basically just start one of the mentioned programs with the settings you want to validate, let it run for as long as it takes to reach it’s end or a “considered stable” progress. If no errors occurred, the memory overclock is stable, great! However if only 1 single error occurred, it is considered unstable and settings need to be tweaked. Depending on when and how many errors you are getting, you might be able to infer what settings need changing, but under no circumstances should you run your daily OS or any important data processing with a memory setup even if it only throws 1 error per run.
That means going back to the drawing board and tweaking your memory settings until you have found a setup that finishes a stress test in a considered stable state, reproducibly at best. Hence for the final stability testing, I also recommend running two different stress tests to be absolutely sure. So for instance I would want my system to pass one run of TM5 with Extreme1@Anta777 and then 400% with HCI memtest with 0 errors, before deeming it safe for daily usage. Might probably sound a bit paranoid, but when you think about it, your system can never be too stable. 😉


63 Antworten
Kommentar
Lade neue Kommentare
Urgestein
Veteran
Urgestein
Mitglied
Urgestein
Urgestein
Urgestein
Mitglied
Veteran
Urgestein
Mitglied
Urgestein
Mitglied
Urgestein
Urgestein
Urgestein
Urgestein
Mitglied
Veteran
Alle Kommentare lesen unter igor´sLAB Community →