


VRM cooler and holding device á la igor’sLAB
At the beginning, of course, is as always the circuit board. The two copper heat sinks for the two VRM series are also included. And I can already spoil that it is completely sufficient in this form in terms of cooling, because the heatpipes are now better positioned (but I’ll get to that in a moment) and the airflow is less disturbed. In addition, there will also be a new additional fixation for the heavy VRM coolers that I have tested, which is much more secure than the adhesive pads that are currently solely responsible for this. I will come to the actual cooler and the fan assembly on the next page, because it is a bit too much content for this part.
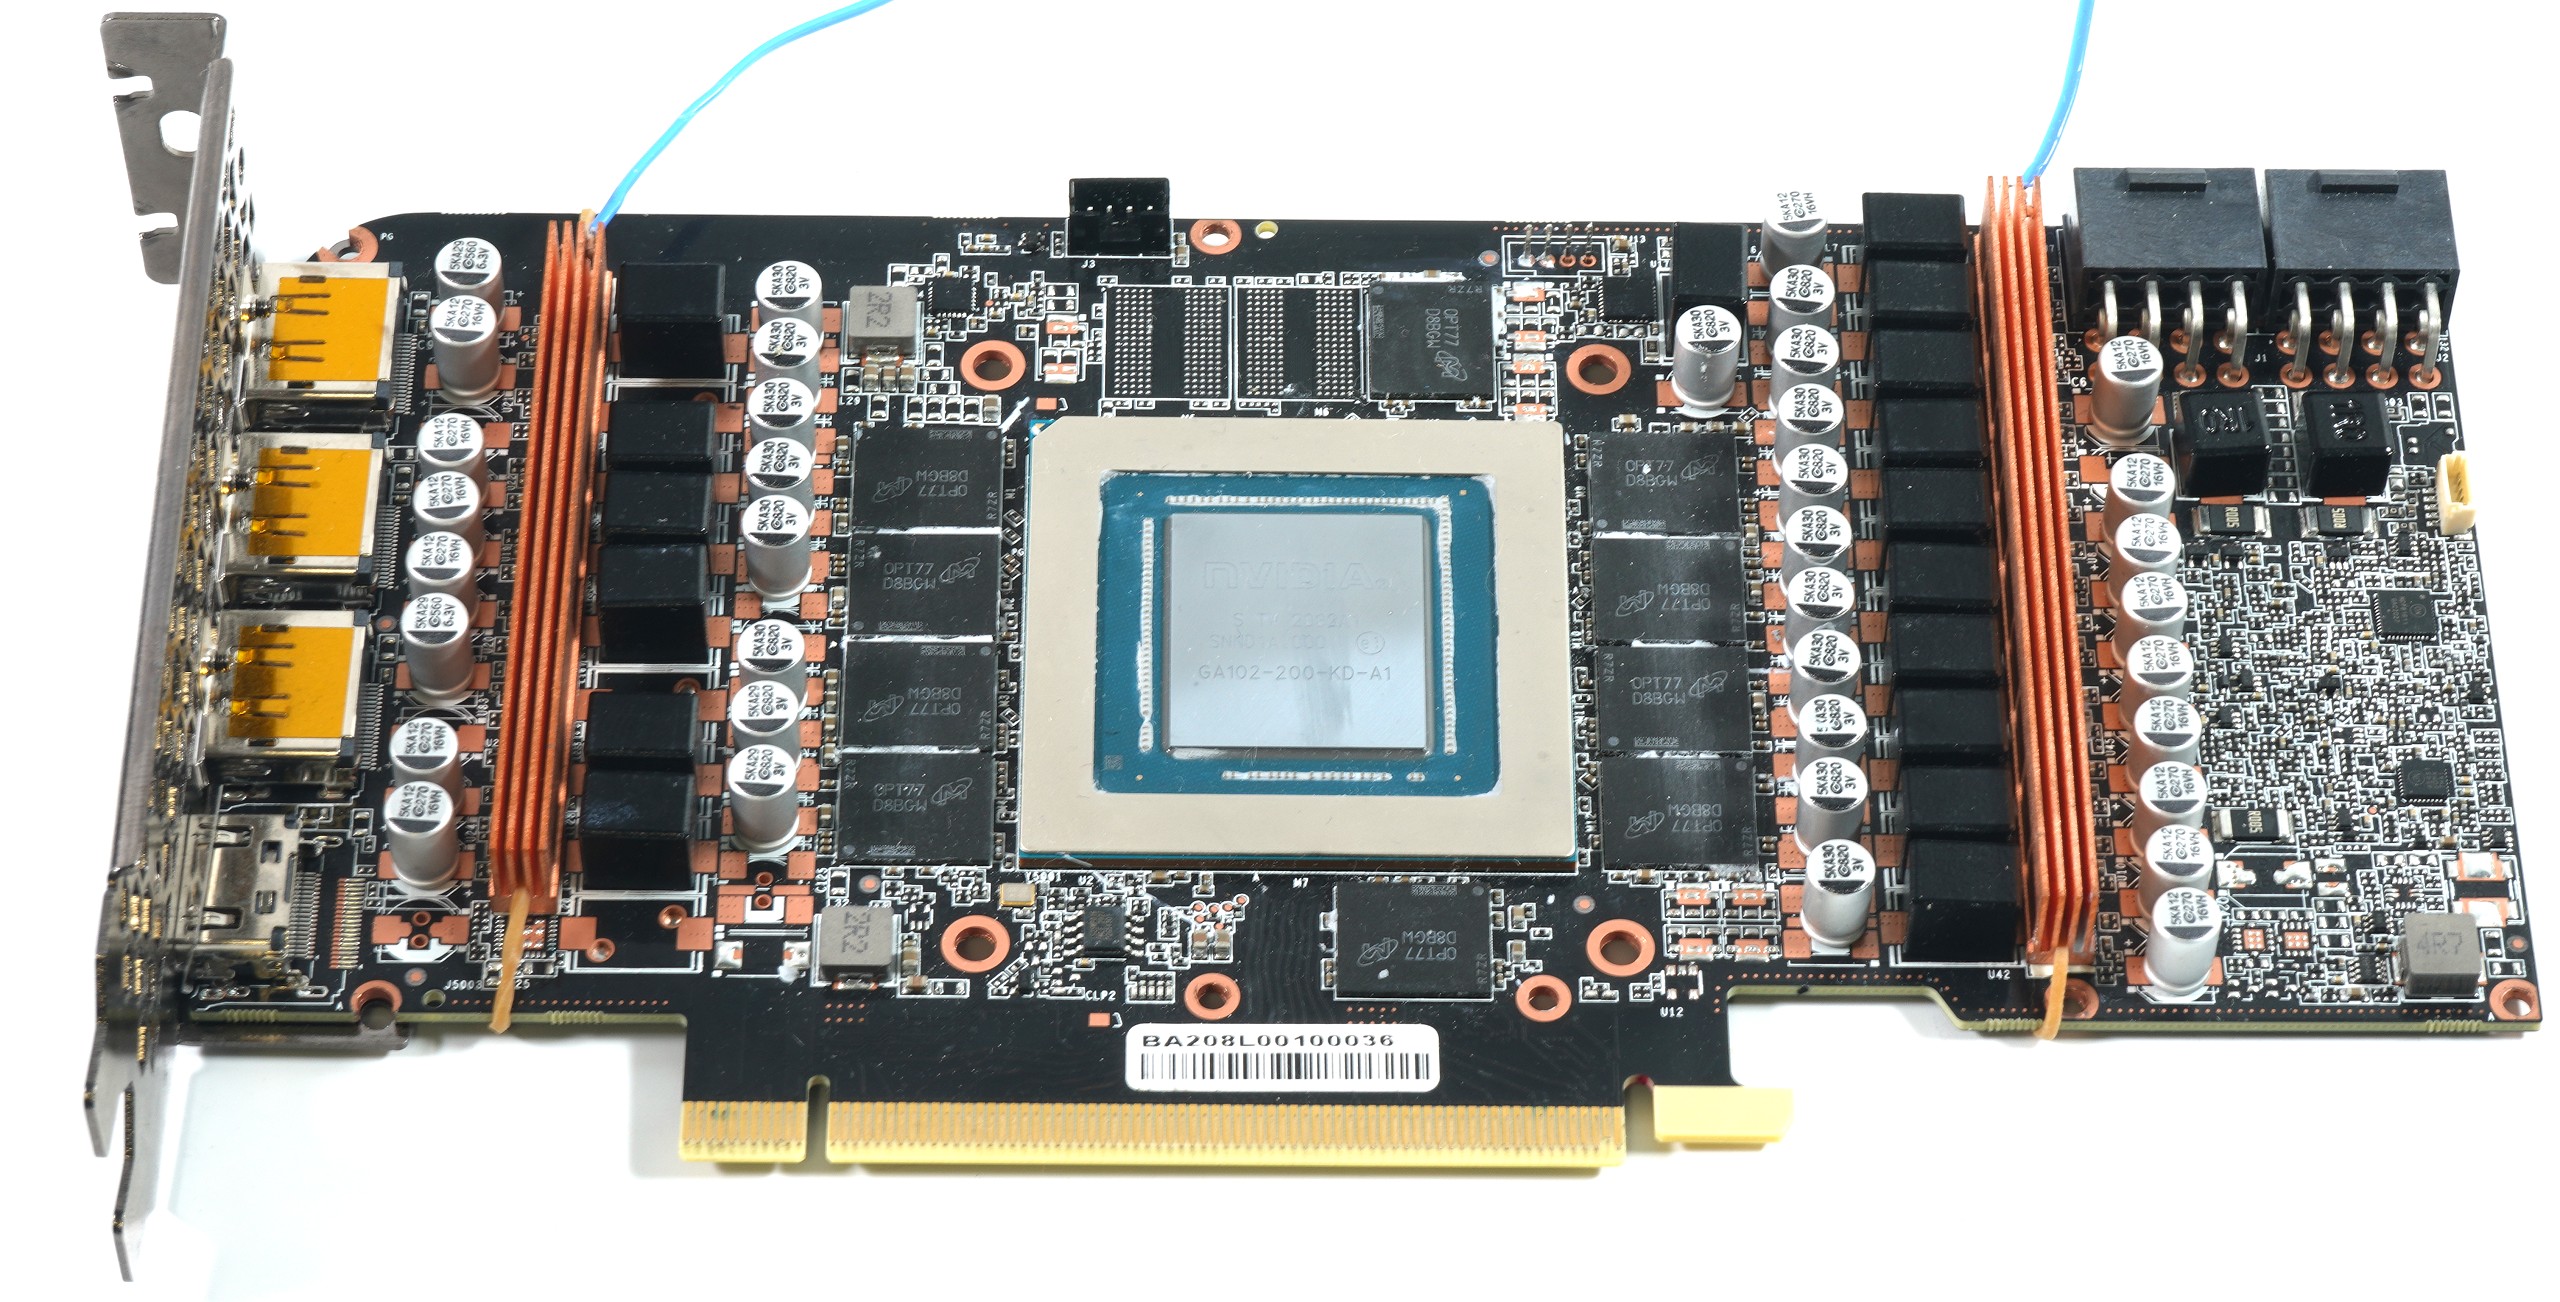
But I also don’t want to (and must not) conceal the preparations for the measurements from you. Since it is currently not possible to read out the voltage converter temperatures for the RTX cards and I was also curious, I clamped a measured K-sensor into each of the two coolers. The temperature drop across the thermal resistances of the individual layers including the adhesive pad can be easily calculated and still provided with a generous tolerance. According to the plausibility check on my digital heater, there are about 18 to 20 Kelvin between the measuring point in the cooler and the substrate of the VRM, whereby I simply assume a generous 20 Kelvin. That’s certainly more than in reality, but better safe than sorry.
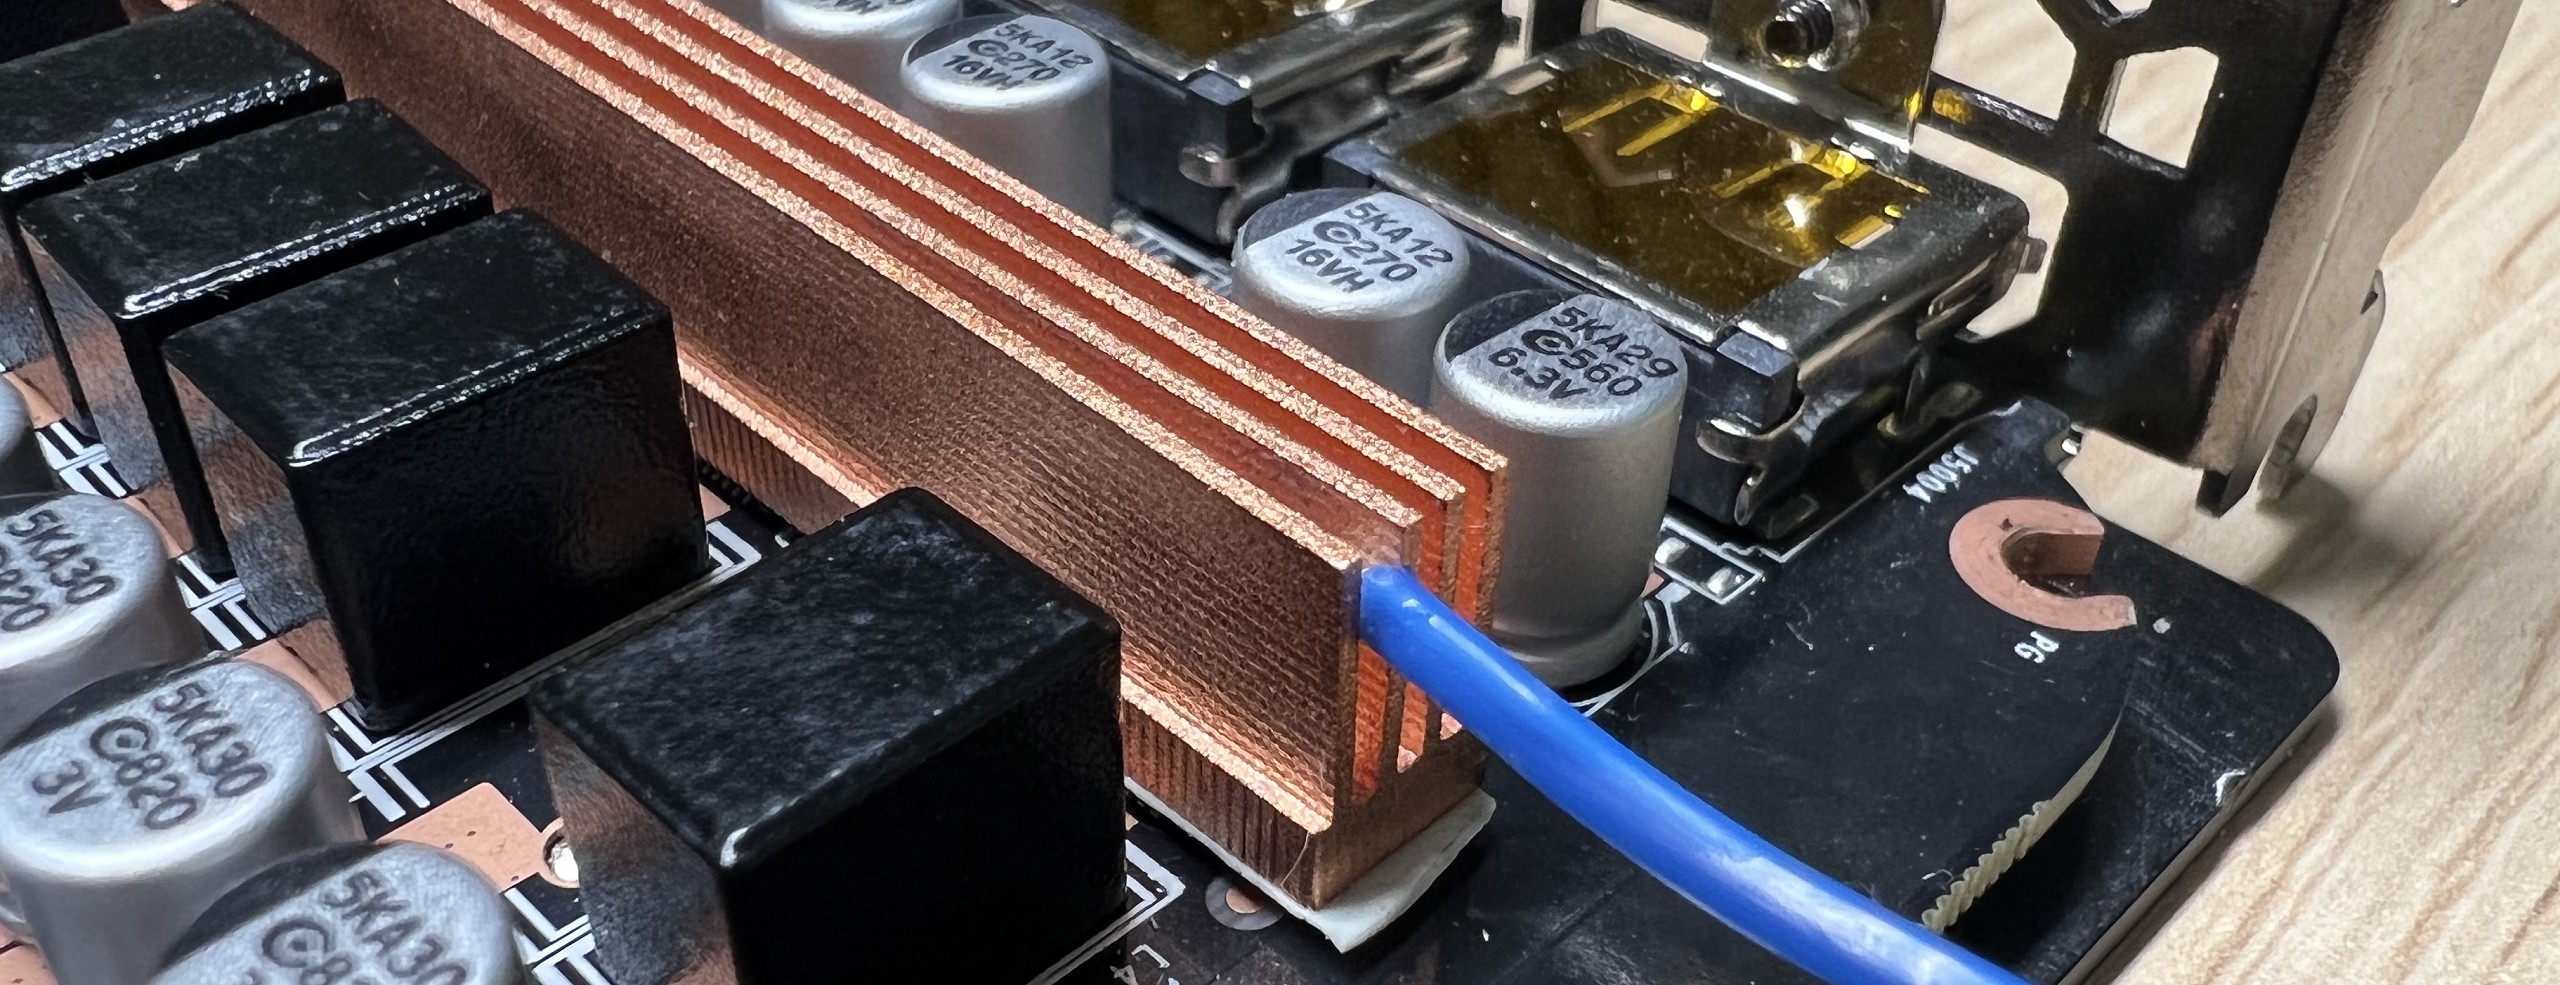
The VRM coolers are attached with thin, double-sided adhesive pads. This may hold at first, but copper is heavy and unfortunately follows the force of gravity all too willingly. In the meantime, however, I have found a method to sufficiently secure these VRM coolers and thus also take away some of the force acting on the glued joint. The solution is as simple as it is inconspicuous, only you have to come up with it first! The solution, by the way, are stinking normal household rubber rings in the appropriate size! Well…
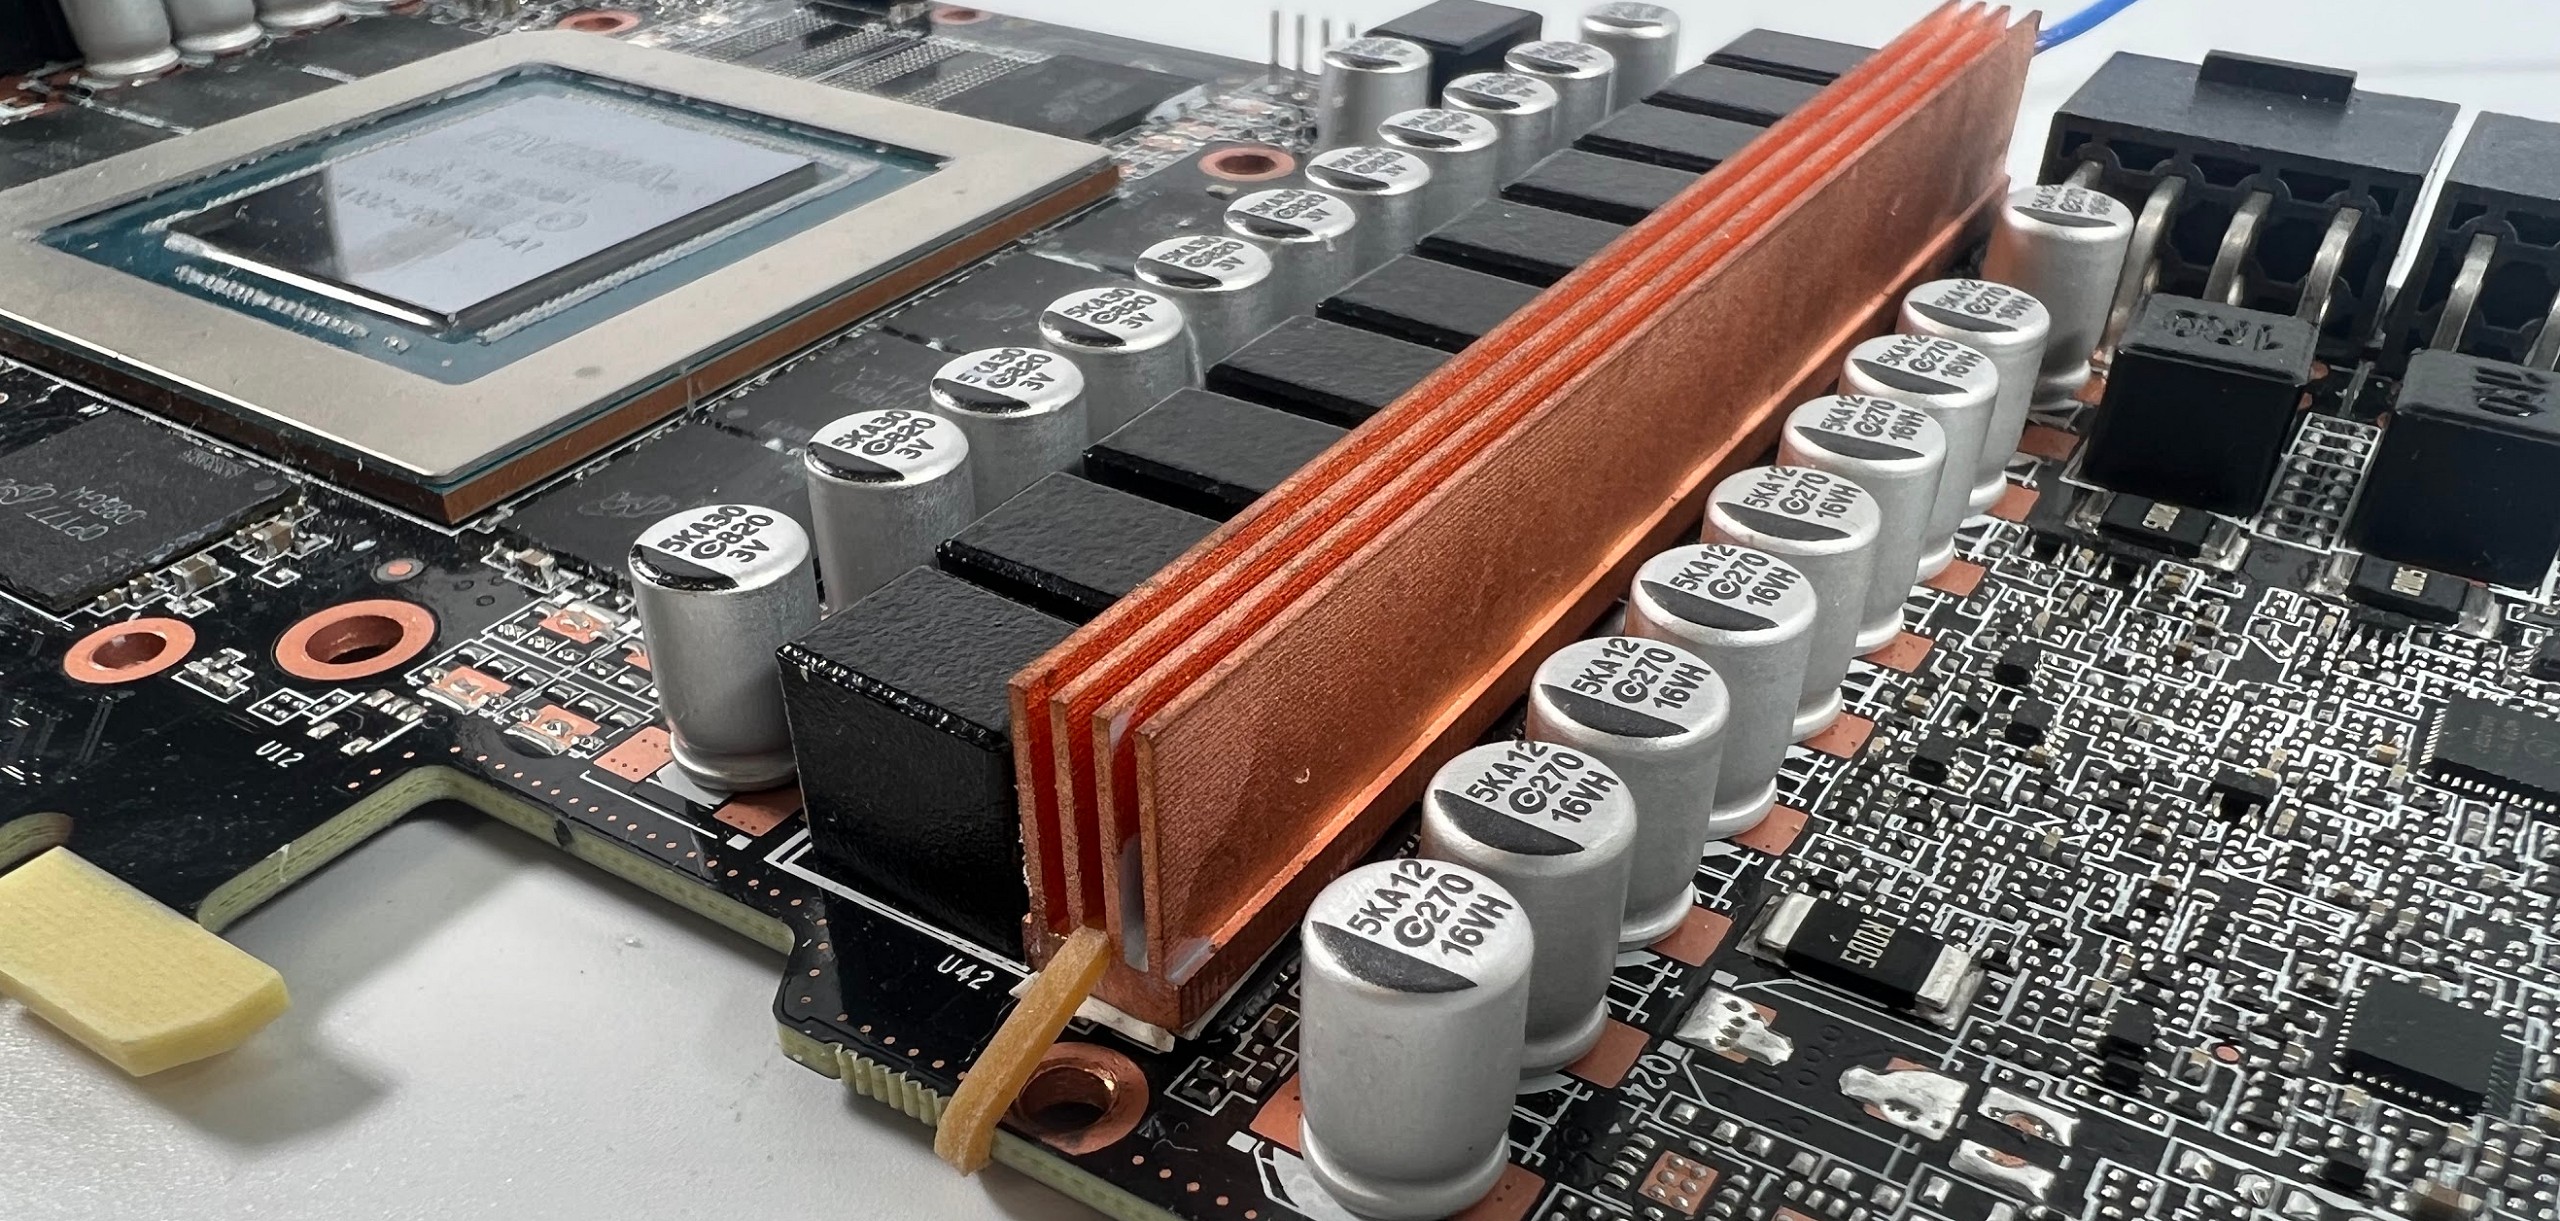
Even natural rubber can withstand temperatures of up to 100 °C easily and permanently, while silicone is even better. While you can hardly see the rubber mount on the front, the mount on the back is still slightly visible. Either take dark green rubbers right away, or simply color them with the help of a matching felt-tip pen. This is then mimicry at its finest. But one thing is helpful: first stretch the rubber and pull it over the board without bumping into anything. Then glue on the VRM radiators and only then pull the rubbers in the middle between the cooling fins.
Thermal pads
The story about the thickness of the heat conduction pads for the memory was still such a thing in the prototype. For such things I have a gauge with tongues, but pads are more or less soft. At that time, only the approach and thermal readout during operation after an initial rough measurement for the starting value of the thickness helped. My stroke of luck was that I always have enough pads of various thicknesses in 0.25 mm increments in the bulk container to really test it out cleanly. The gap is just under 2 mm wide, but the best thermal solution is then at light pressure and 2.25 mm initial thickness of the soft pads.
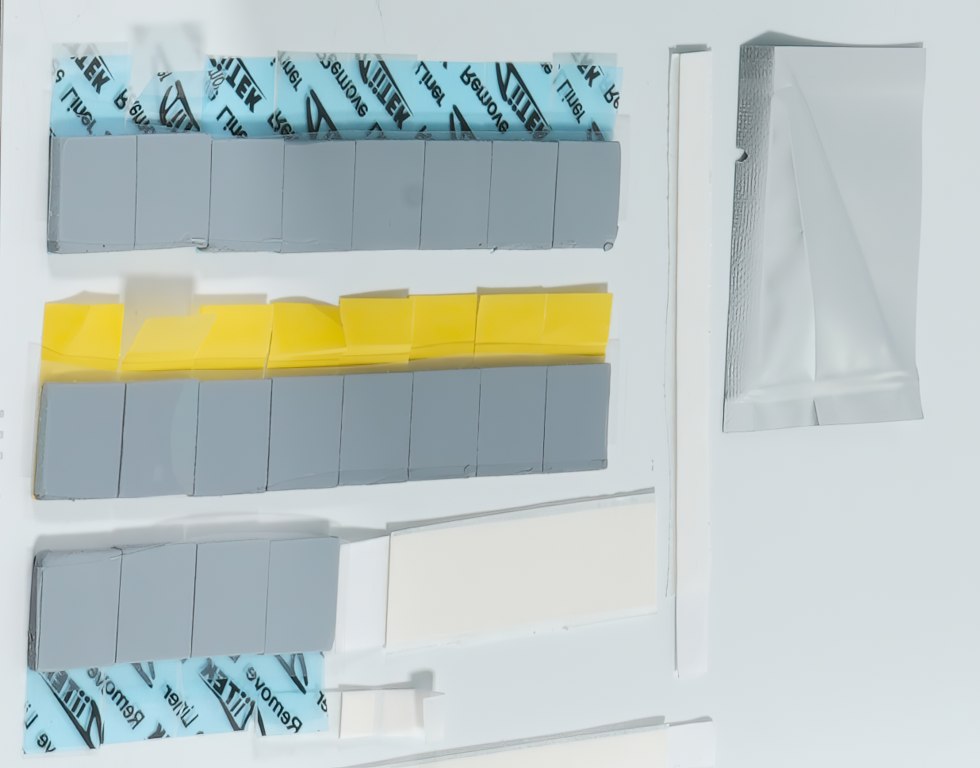
In the current, final version, the accessories for the NVIDIA cards also include 2.25 mm pads from Ziitek, exactly the same ones that I had used in the first test from my own collection. However, the pressure from the soft, somewhat stronger pads is still low enough to prevent the solder beads from breaking away under the RAM modules. Violence is never a solution, especially not with RAM. Without underfill, these are all divas of the highest order. And if the pads are too thick, the heatsink won’t get enough contact pressure on the GPU. In the opposite case, the RAM then gets too hot. If you invest a lot of time in testing, you will be rewarded with a good result later on. But I don’t want to get ahead of myself and Raijintek delivered what fits.
Thermal compound
The right thermal paste is at least as important as these pads. I have been using the Alphacool Apex exclusively for some time. Not because I get money for it, but because this paste as “Apex” first had to prove itself in internal test series against countless other pure industrial pastes and then in the end turned out to be the best paste when it comes to the balancing act of thermal conductivity, user-friendliness (viscosity!) and long-term durability. The stuff comes directly from a large original manufacturer and not from some filler, which is “individualizing” then the pastes from batch to batch turn out differently. In general, the industry does not use pastel colored pastes and relies on the durability of the qualities.
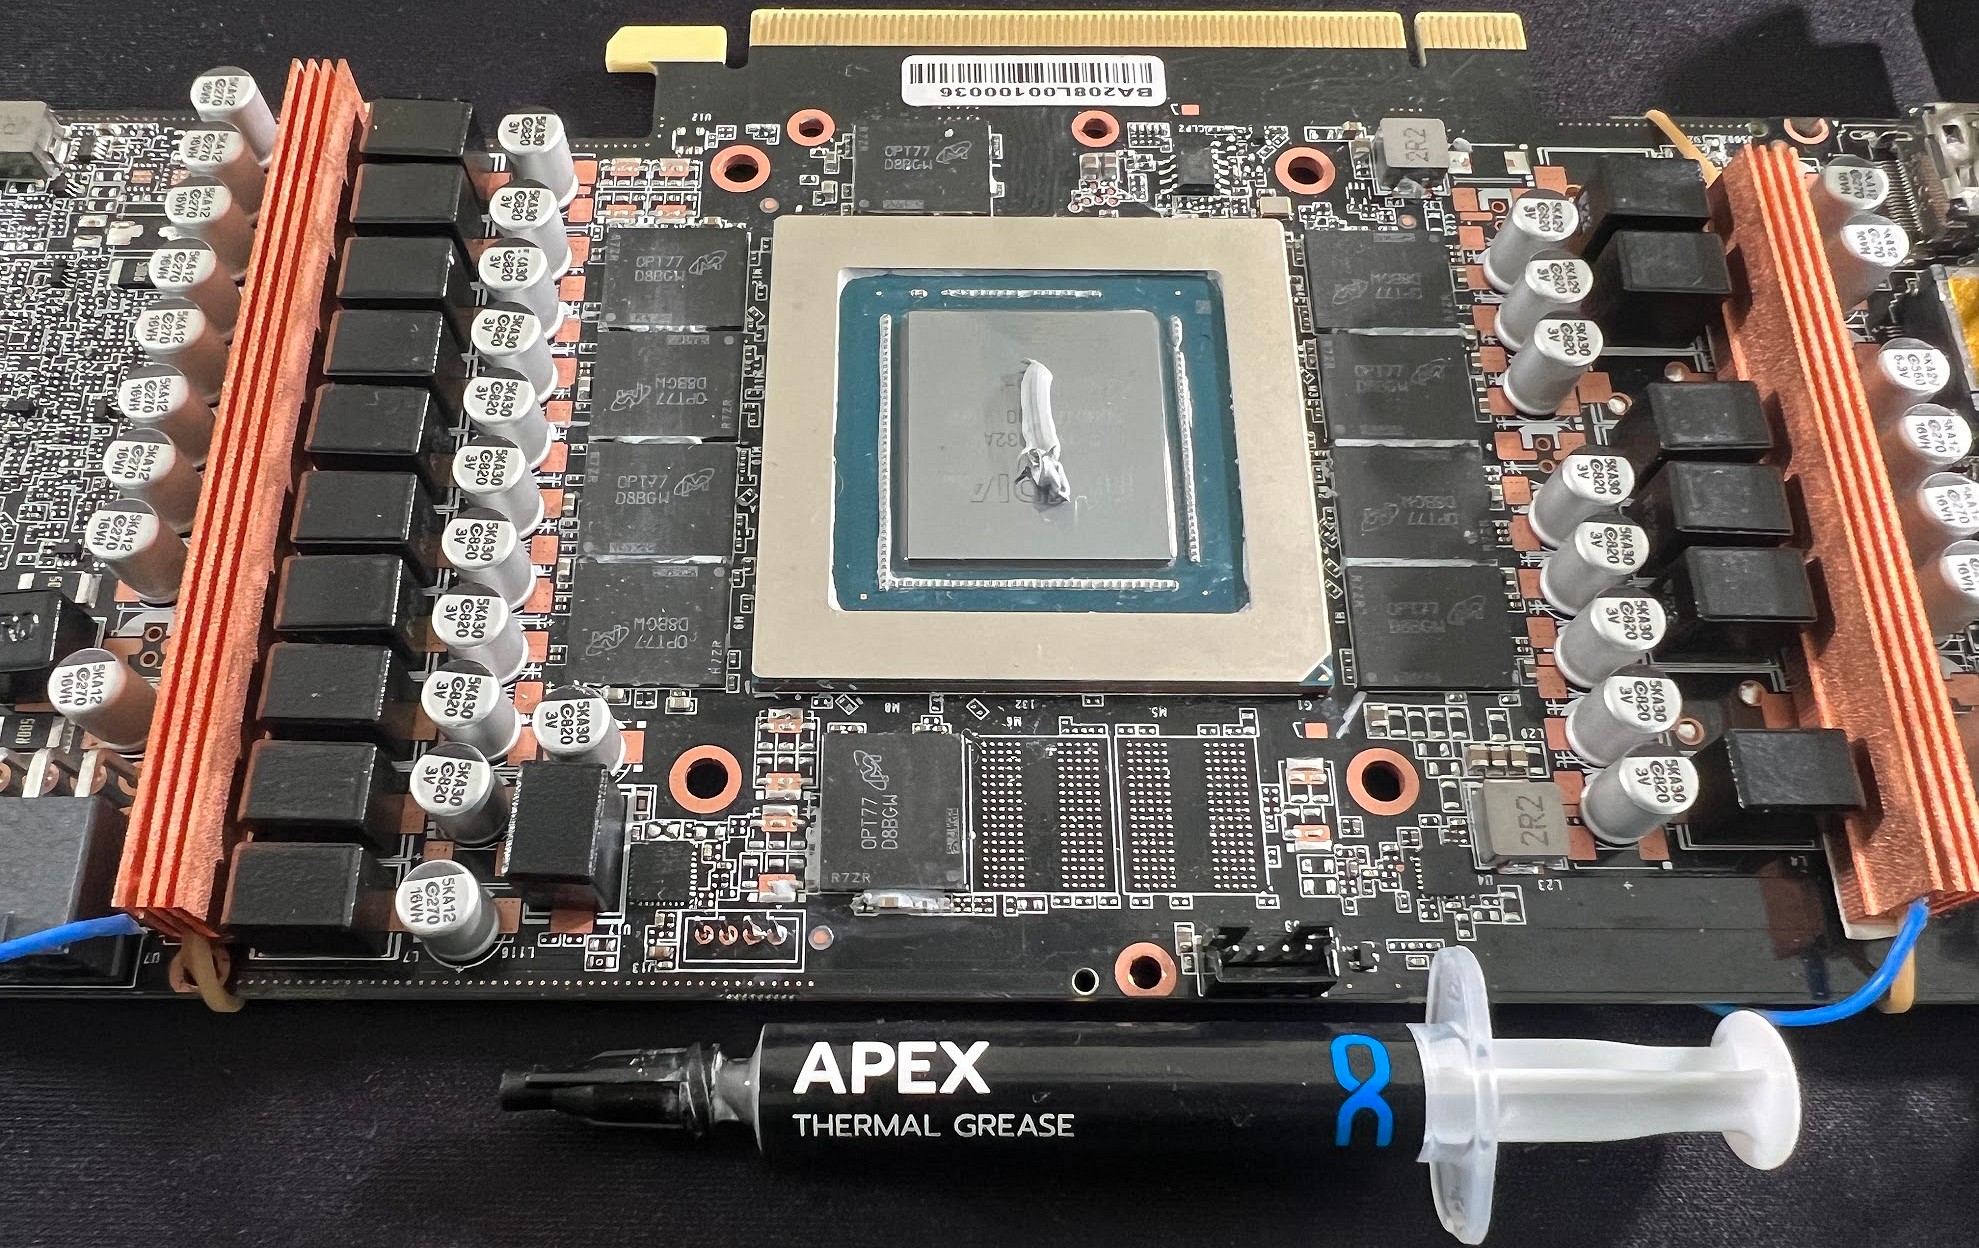
The sausage method is the best here, and I’d also like to explain again why large-scale painting is really pointless. If you alternately tighten the longitudinal edges, the paste pushes elegantly from the center to the outside and what is too much is pushed out. In this way, the layer is always equally thin and uniform. If you spread everything instead, it’s hard to squeeze anything out because everything is already full of paste at the edges. The layer will thus always be thicker. And that’s exactly what you don’t want.
And now that the VRM cooler is attached and the board is prepared, I’ll move on to the new cooler and assembly. And yes, I’ve thoroughly enjoyed stringing you along a bit more up to this point. 😀


104 Antworten
Kommentar
Lade neue Kommentare
Veteran
Veteran
Veteran
Mitglied
Urgestein
Urgestein
Urgestein
Urgestein
Veteran
Veteran
Mitglied
Urgestein
Urgestein
Mitglied
Veteran
Mitglied
Urgestein
Urgestein
Urgestein
Alle Kommentare lesen unter igor´sLAB Community →