


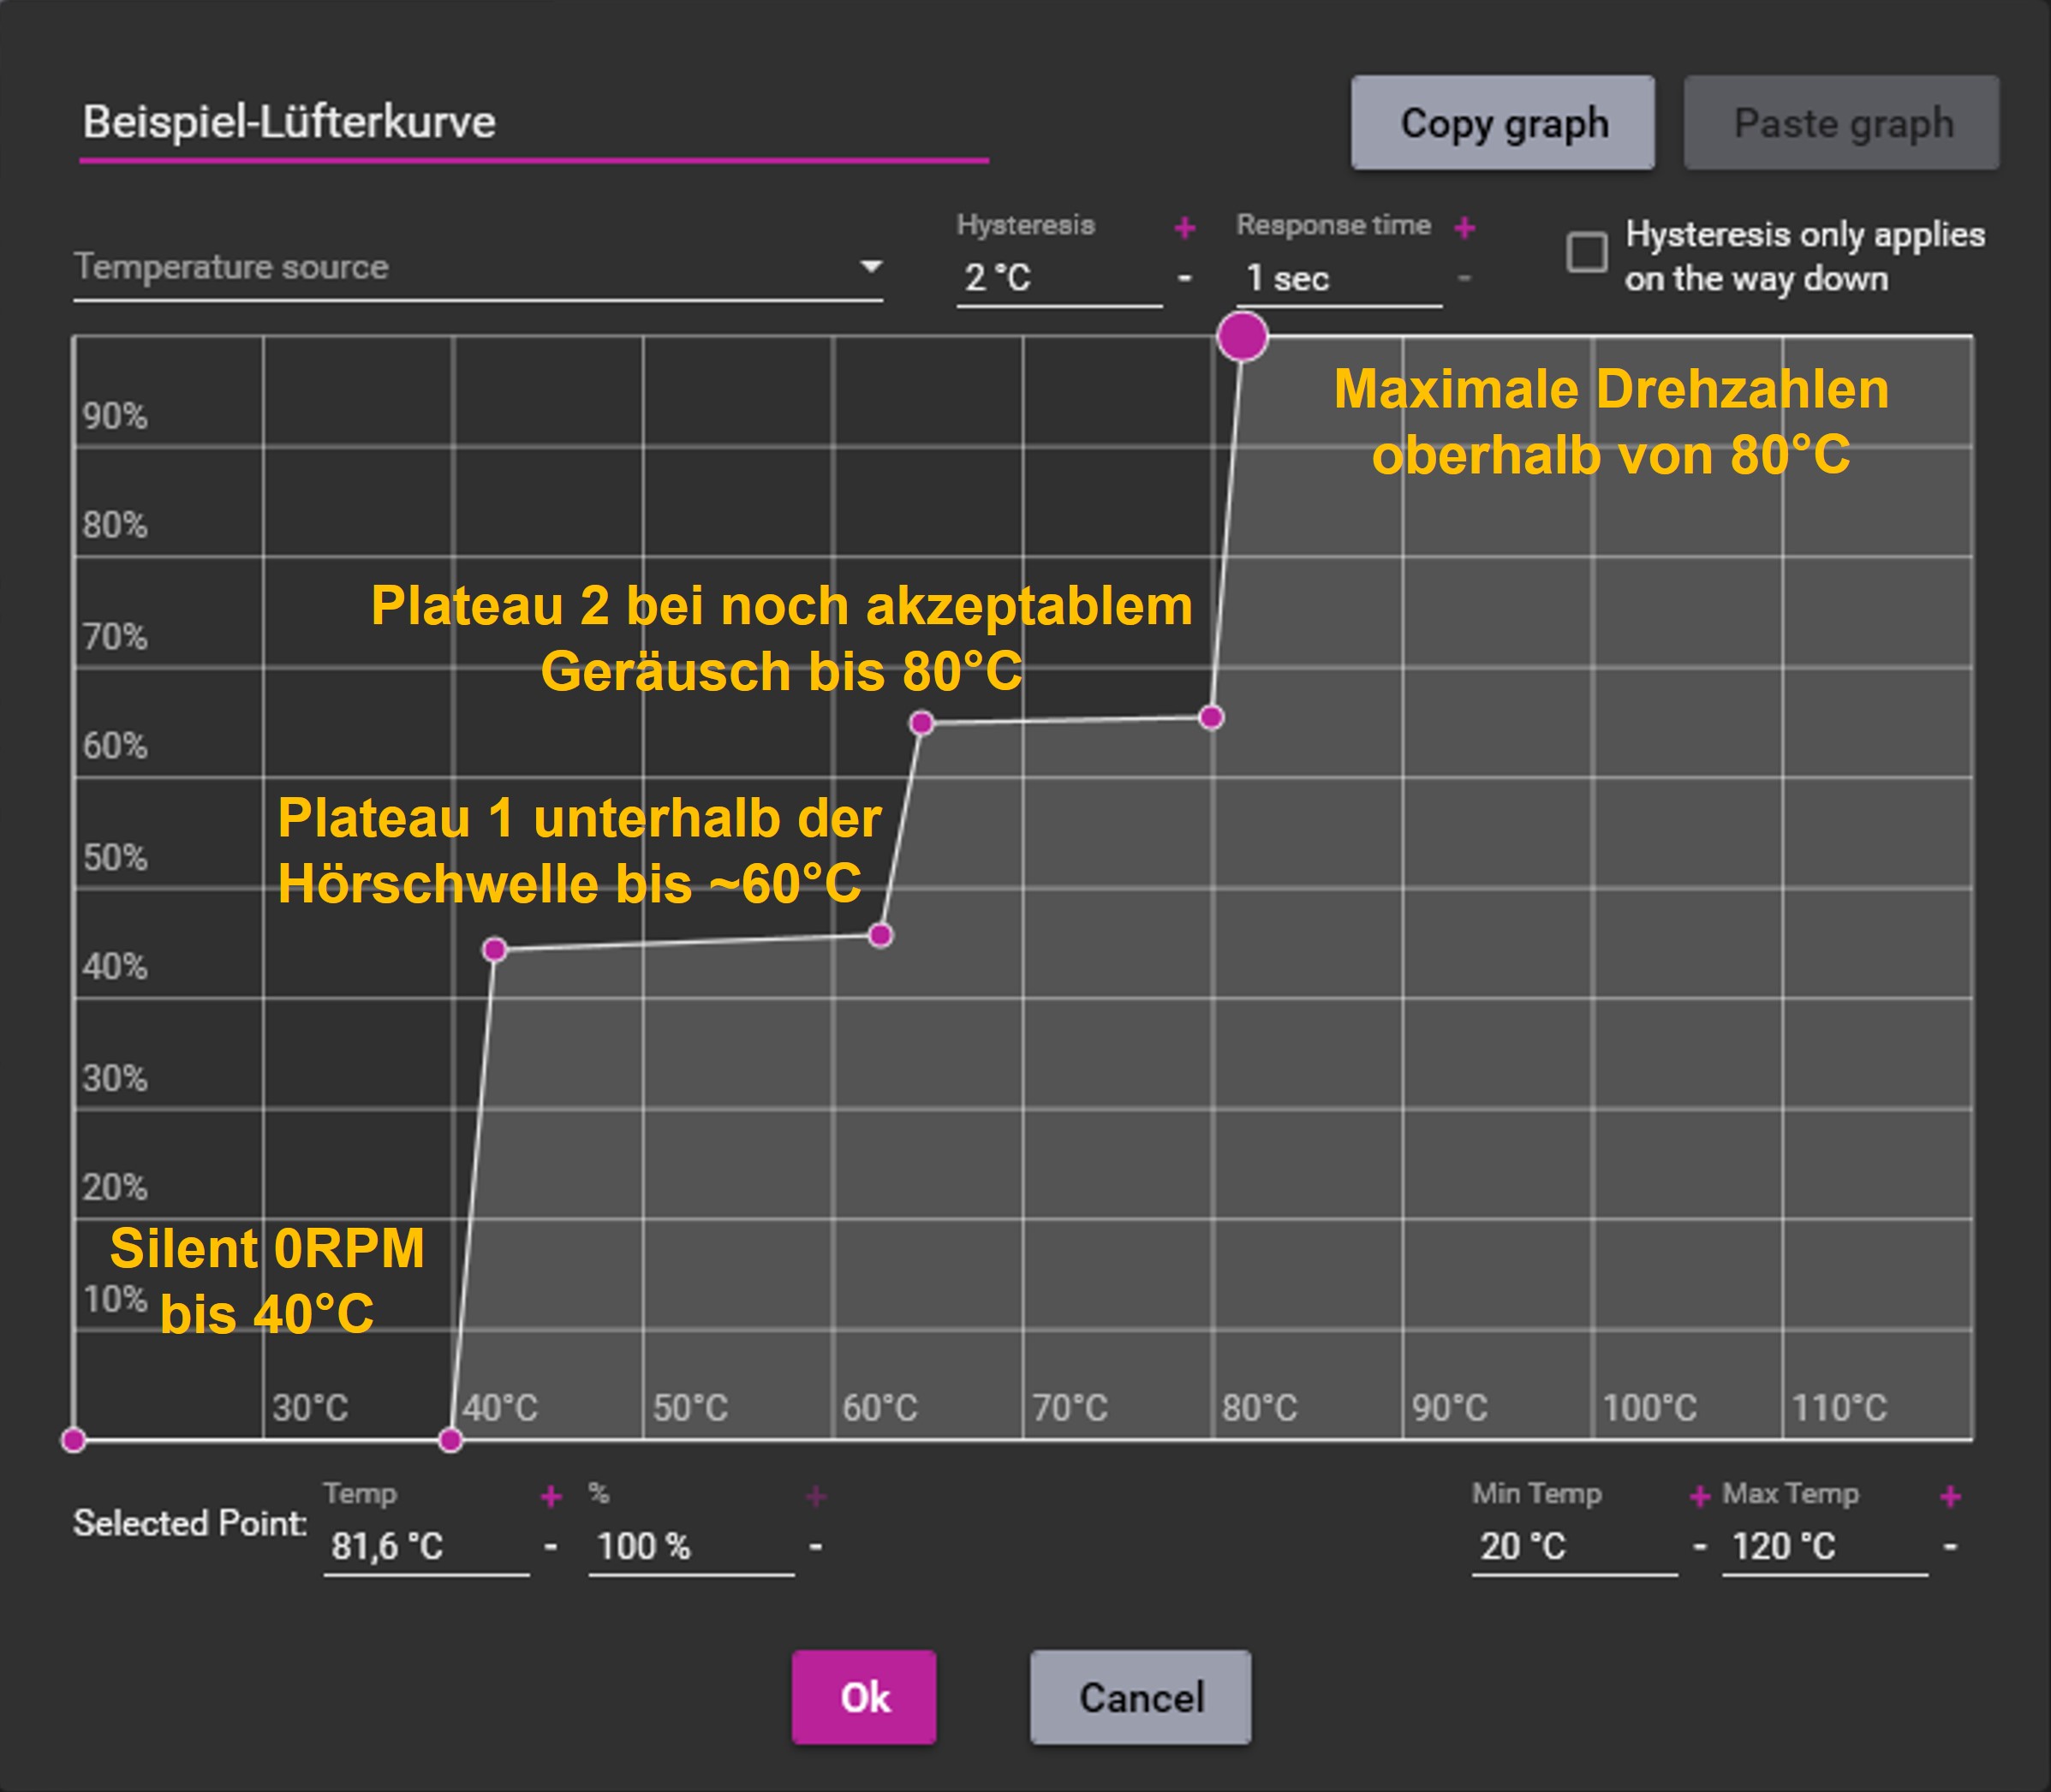
However, I have to mention one small thing quickly, because I’ve always read about different fan curves, sometimes linear, sometimes progressive or degressive, rarely sometimes with a plateau, but until now it wasn’t clear to me what makes the most sense. This is exactly what I will show you as a symbolic overview before we go deeper into the matter:

General ventilation concept of the housing, type of cooling, fan types
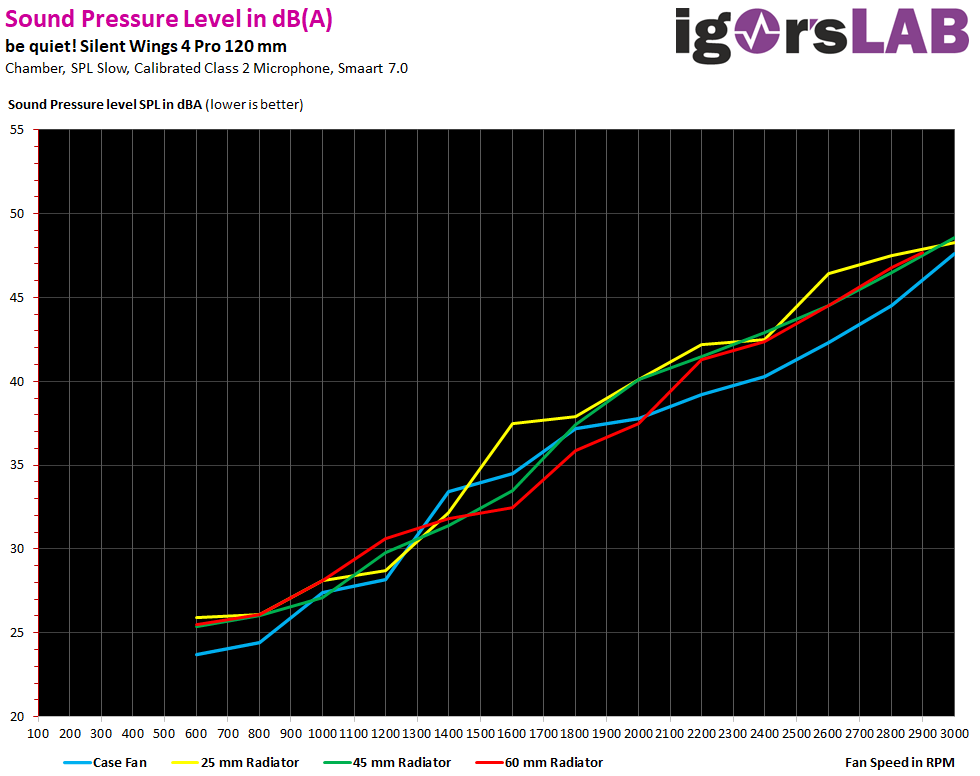
There is a seemingly endless number of models for PC fans. In terms of sizes, 120mm and 140mm are the usual diameters – in good housings, you can decide for yourself what to install. In this case, the larger the diameter of the fan, the better! The reason is that the larger fans can move more air with less noise. In addition, all fans generate a speed-dependent noise in their E-motors as well as due to the given rotor geometry, better/more expensive fans are usually quieter. How “good” a fan is can usually be found on the manufacturer’s page, you have to search for the value in db(A) here – and here on Igor’s Lab there are meanwhile many well-made fan tests from the writing colleagues.
Caution: small differences in dB(A) values sometimes already correspond to large audible differences (if a noise measured 10 dB(A) more than another noise, it is already perceived as twice as loud). And then, in addition to diameter and volume, you should also look at the maximum speed for fans – as a recommendation, I would consider anything up to about 1,500 RMP – higher speeds are usually too loud.
If you now have fans with even higher speeds, this is not a problem, because they do not have to run so far up in speed. Besides that, there are also two main types of fans, the PWM fans with 4-pin connectors and the others with 3-pin connectors. Technically, the PWM are a bit better, but with both types the PC can be ventilated equally well – here you do not have to worry much (if you are interested in the technical details just browse a bit here at Igor).
Own use case and requirements
If the case is good and the fans are well placed (see also October article by Igor), the next consideration is what your own use case is. I will show a few generic cases here, and in reality you will want to move somewhere between these different cases – probably also depending on what you are doing with the PC – quiet office work, gaming, benchmarking, rendering, etc.
- no Fan – as little fan activity as possible:
The fans should only run when necessary. This case is rather easy to implement –> Here you have to decide which maximum temperature you want to expose your components to (mainly CPU and GPU, but also RAM, hard disks, chipset and possibly various voltage converters). As a rule of thumb, I suggest running CPUs below 70°C and GPUs below 80°C (hotspot). The absolute upper limits can usually be found on the web on the manufacturer’s pages, but I would always advise against going that far up and always stay at least 5-10°C below the limit.However, it should be added here for reassurance that the usually hottest components, CPU and GPU, have many temperature sensors today and throttle themselves when the temperatures are too high – and thus do not normally die a heat death anymore. Accordingly, you then configure fans that do not rotate until this or your own temperature limit is reached. However, you shouldn’t do that with the CPU fan, but run it much earlier (actually always), since today’s CPUs make relatively high temperature jumps for a very short time, which a fan that only starts up then can’t catch properly and the CPU then quickly starts to throttle for a short time. And in general, hardware components simply have a shorter lifespan at high temperatures, so I would say as a very rough rule of thumb, anything above 60°C should not be seen as a design target (possibly as a compromise).
- Maximum ventilation:
The fans should run full, as the maximum cooling performance should be achieved without considering the noise level. This case is the easiest to implement –> Here simply turn up the fans as desired! But who wants that noise? - Low noise – hear as little as possible from the fans:
sFans should do their job as much as possible so that you hear nothing or as little as possible, but typically under reaching a target temperature. For me, this is the more complex case, which I describe below. I
How do you set the fans sensibly and what should a “good” fan curve look like?
Let’s first ask ourselves what we actually want to achieve.
- If possible Silent – fans should not run at all (0 fan/RPM), but with direct fans for CPU and GPU this is only of limited use.
- If necessary, fans should run in the non-audible range below the hearing threshold
- If fans have to be heard, then please not too loudly
- The desired temperature limit for the CPU is e.g. “<70°C”, for the GPU it is “<80°C”
And so you can then proceed logically (using the free Fan Control software for CPU and case fans as an example):
- I have to take into account which different fans I have installed
and which motherboard connector they hang on. Typically one (MB: CPU fan) would be mounted on the CPU cooler and one (MB: sys fan 1) would be mounted on the case blowing out the back. There are always more, but they don’t really matter. I want to have the CPU fan running permanently, the case fan should only switch on when necessary. If I have several case fans of the same model, I can treat them all identically, if they are different models (e.g. same size but different speeds), I should control them separately. If necessary, you have to open the case and take stock – if you open it, just leave it open for a short time! - Then I have to find out from what % of the speed the fans really run (on) safely.
The computer should be idle for the coming steps (hardly any load, hardly any noise, hardly any temperature). I use FanControl for this purpose – you don’t even have to use the program permanently, but I find it super practical for setting things up – with other programs it’s just analog. All existing fans should now appear at the top, partly named according to which mainboard connector they are plugged into. And the GPU’s fan(s) should at least be listed here as well.Implementation: I am now trying to find out from which value in % of the maximum speed the fan starts – in FanControl this would be possible with the manual control. I set the first fan to 0% and wait until it stops. It is possible that this standstill does not happen, because there are also fans that do not support the 0RPM mode at all – silent operation would not be possible with these. After that, I increase e.g. in 3% or 5% steps, always wait briefly, about 5 seconds and see when the fan starts (also like to look inside the case). If the fan now starts e.g. from 20%, I add something and define e.g. that I don’t need any intermediate steps for the fan between 0% and 25%, because it doesn’t run there. If you would do this trial and error from above, i.e. from higher % to lower %, then the fan will stop at a slightly lower value (e.g. 17%), because it needs a slightly higher starting torque from standstill (mass inertia, static friction vs. sliding friction). If I have several different models of fans installed, I do this process for each model individually. Afterwards, I already know the left part of the fan curve.
- Now I want to know but what speed in % I can hear the fan.
To do this, I close the PC case again, or rather I put it in the state I normally use it in (open, closed, behind the cabinet, etc.) – I also put all other noise-relevant environmental conditions in normal state. For most people this will mean silence, if someone ALWAYS listens to music, then turning on the music lends itself. Now I increase the Fan Speed [%] further in 3 to 5% steps – always wait about 5 sec – until I can hear the fan, let’s take 50% as an example. If I now subtract something from that – 5%, then I know that acoustically the fan won’t bother me up to 45% – so I have a possible next part of the fan curve, possibly that’s enough for me now. You could now go further and define a Fan Speed up to which you consider the volume audible but still acceptable, e.g. 65%. Again, different models have different hearing thresholds. - Next, I need to consider what temperatures matter to me.
For a CPU fan it’s easy, here only the always available CPU temperature matters (for me it doesn’t matter if you take the sensor of the motherboard or the one from the chip itself (Tctl/Tdie) – these are effectively two sensors that measure pretty much the same thing). For case fans, you can consider other temperature sensors besides the CPU temperature and you may have to experiment a bit to see what helps more. On my PC, neither SSD nor chipset get into critical temperature regions, so I’m only interested in CPU and GPU temperature.
Apply for CPU fan
If I have an already rather hot CPU and/or a small cooler and/or already have idle temperatures of 50°C or higher, then it is not recommended to switch off the CPU fan at all (i.e. set the fan speed to 0% at low temperatures). Otherwise, the CPU fan can be turned off sometimes. At relatively low CPU temperatures, the CPU cooler can’t do much anyway, because where the gradient between CPU and room temperature is low (e.g. room 22°C, CPU 32°C), there is hardly any heat exchange regardless of the fan speed – effectively, almost only passive cooling takes place, no matter what the fan does. For example, you could now start a CPU fan only from 40°C (or what you consider to be “correct”).
Apply for case fan
Case fans do not only play a role for the CPU, but initially also for the GPU or other components like RAM, SSD, chipset, etc. So here you should first know what else can get hot – usually the GPU, sometimes the RAM. And now it gets exciting: is the software for controlling the fans technically capable of monitoring the temperatures of the CPU and GPU and other critical components?
If this is not the case (e.g. with fan control via mainboard/BIOS), then you don’t have to think much further here and can either simply choose CPU or another temperature sensor for case fans that you consider relevant in your own case. The reason I use FanControl is that this software reads CPU and GPU temperature sensors and allows me to control fans according to the higher temperature.
Now when I include GPU temperature with case fans, I first need to know how the GPU fans are set up – some run continuously, others also use a 0 RPM mode, so they stop below a certain temperature. For GPUs with 0 RPM mode, I suggest not turning on a case fan until the GPU temperature is above its own fan-off temperature, since the effect of case fans on GPU temperature is somewhat more indirect than for the CPU.
With this information I can now already assemble a simple but still useful fan curve:
- If I want a fan to run permanently (e.g. CPU fan), I start the fan curve on the left at the % value where the fan is sure to run, e.g. 25% already where the temperature scale starts, usually 10 or 20°C.
- If I want a fan to start only from a certain temperature X of sensor Y (e.g. CPU), then I let this fan jump up to temperature X-1 to 0% and from X then e.g. to 25%. Thus, in the smallest possible adjustable temperature range (1°C – usually settings can be made for each individual degree Celsius, but not for even smaller temperature steps), the fan skips the speed range where voltage is applied to the electric motor, but it does not yet start, and the fan thus starts reliably when it should.
- A next guideline can now be the Fan Speed at which I just don’t hear the fan(s), e.g. 45%. Then, after starting the fans, I can let the curve (Fan Speed %) increase quickly up to this value and then first define a plateau (horizontal or relatively flat section) where the fan speed (almost) does not increase further for a certain time as the temperatures rise. Of course, this should happen in a temperature range that is not critical for the hardware, roughly in the range of 45°C to 65°C – depending on your own preference.
- You could now insert another such plateau, which is defined by a fan speed that you just want to endure, but also clearly requires cooling power – it’s really a matter of taste where a second plateau could be located.
- To the right of the first or more plateaus, the fan curve should then rise much faster again. There, I soon move towards the desired maximum speed (this can also be seen as a second/further plateau): from a target temperature X, I then let the fans run at a quite high speed (maybe 80% fan speed) or the maximum speed (100%) fan speed – both of which I will then hear clearly. For CPUs, 75-80°C are often taken as temperatures from which all fans should run at full load. For GPUs, you can go a few degrees higher – I would recommend 85-90°C.
- If my software allows it and I think it makes sense, I can now combine several temperatures and e.g. always take the higher value that applies to a fan. This can be useful because some programs put a lot of demand on the CPU and others put a lot of demand on the GPU – whenever either (or both) gets hot, I want extra support from the case fans blowing fresh air in and/or blowing hot air out.


153 Antworten
Kommentar
Lade neue Kommentare
Veteran
Moderator
Urgestein
Urgestein
Urgestein
Mitglied
Veteran
Urgestein
Urgestein
Urgestein
Veteran
Urgestein
Veteran
Urgestein
Veteran
Veteran
Urgestein
Veteran
Urgestein
Alle Kommentare lesen unter igor´sLAB Community →