Case Reviews

COOLER MASTER QUBE 500 Review – All in one: Benchtable, desktop and mid-tower to build yourself!

Installation report

Just out of interest, I simply had to test several of the possible setups of the QUBE 500 in this review. Unfortunately, there wasn’t enough time for all of them and I also didn’t realize until too late that using an SFX power supply might have been smarter, but let’s get started first.


Test Bench Mode

The first thing to test was of course the Test-Bench Mode!

The feet are simply clicked into place:

The power supply mount is only pushed into the guide and later fixed with a screw.

Cool: The front I/O can be unscrewed from the front panel and attached to the base plate. The spacers must be used here urgently, otherwise there is a risk of short-circuits!

However, a simple cover would not only have been visually advantageous at this point.

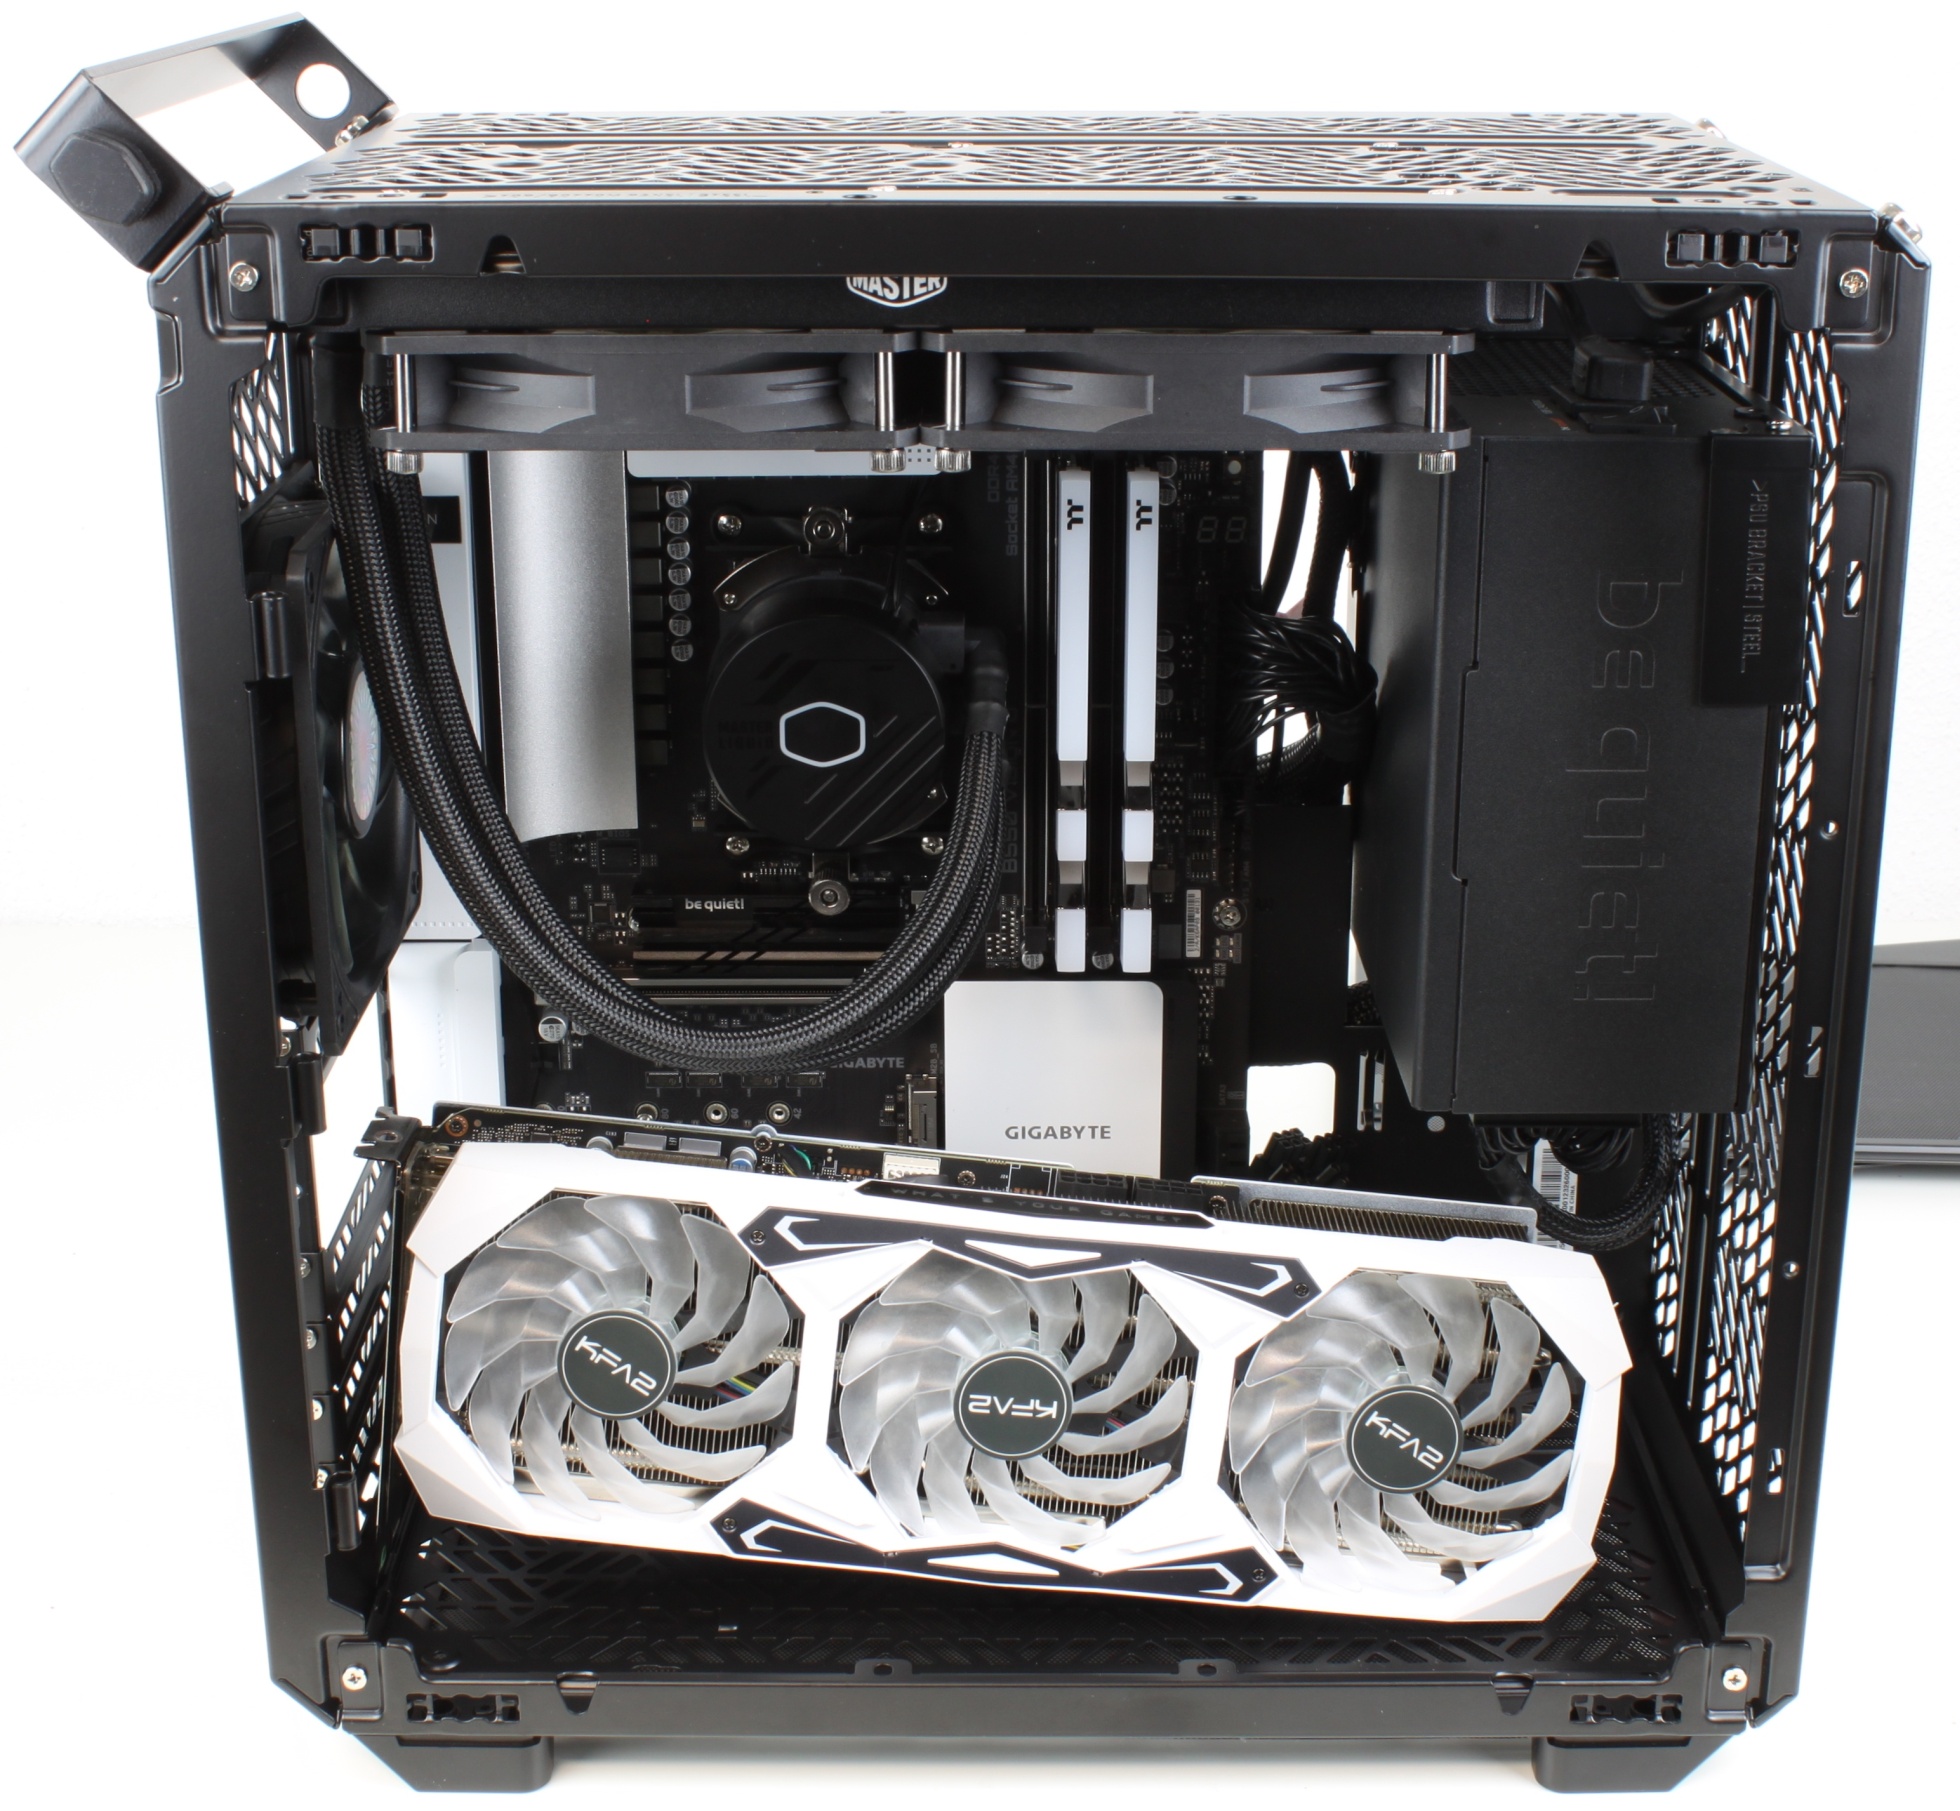
The motherboard is allowed to take its place. CPU, NVME and RAM were already installed beforehand, whereas the “subsequent” installation wouldn’t have been more difficult in this case now.

The PSU was mounted at the highest possible position so that the long graphics card would still fit into the primary PCIE slot in the end.

Fits!

However, the QUBE 500 in this minimal configuration does not offer a mounting option for the graphics card, which therefore tilts a bit and rests on the heatsink of the chipset on the motherboard. Also, the AIO cannot be screwed anywhere, which is why I installed the large Dark Rock 4 from BeQuiet! for the test run.

Because the installation situation of the graphics card seemed too wobbly, I also screwed on the back panel. Apart from the graphics card, no other parts had to be removed.

This way, everything already makes a much more stable impression!

Test run – system works perfectly. I didn’t find the temperatures of the open setup that representative, which is why I didn’t perform any tests in this configuration.


HAF XB Mode

Now I wanted to know. Does the system have to be disassembled again, or can the other components just be bolted on to rebuild the case? The power supply cables for the graphics card had to be removed from the support surface for the front panel, of course, as well as the front I/O.

And indeed, all side panels could then be attached without further ado. Once the construction is complete, the stability of the case is not inferior to a regular case!

Due to the symmetrical construction, both the steel and the glass side panel can be used as a lid.


Regular Mid-Tower

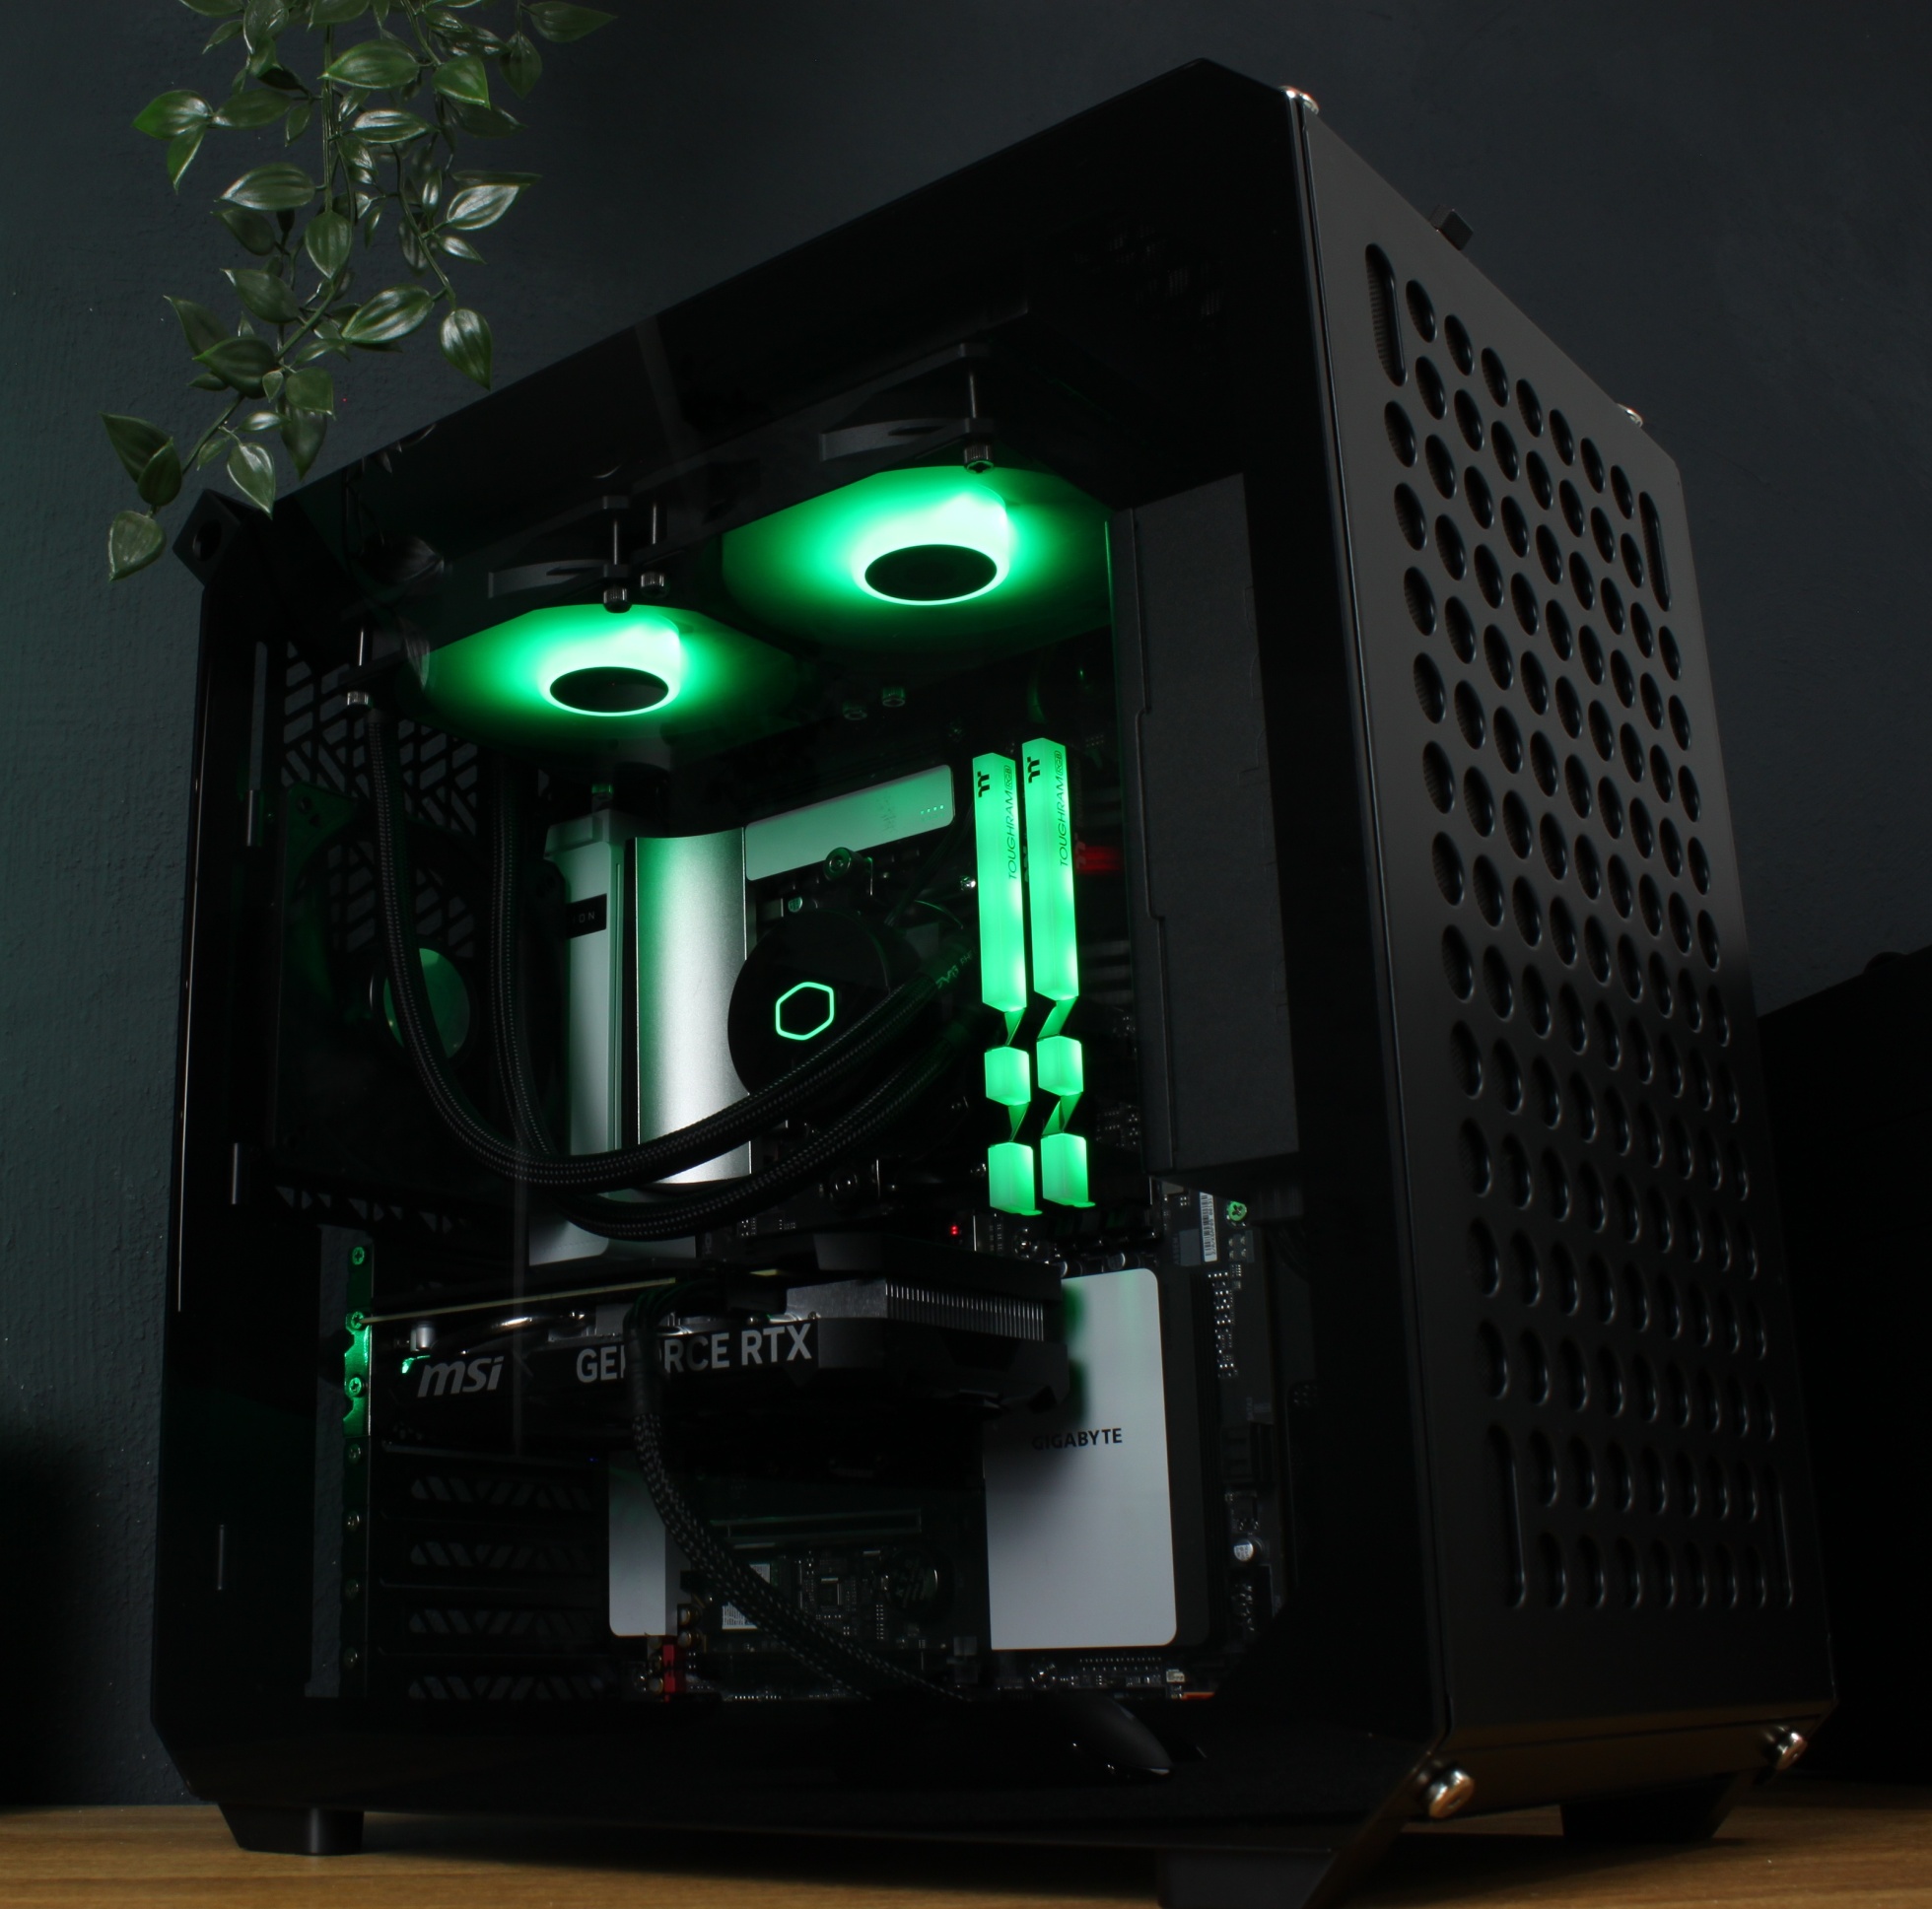
We change the position of the feet from the base to the bottom part and in no time we have built a regular mid-tower out of the lying case. The fat CPU cooler has enough space up to the side panel, the graphics card can breathe freely, and plenty of fans could still be mounted under the PSU and in the bottom for fresh air.

Now, of course, the installation options for the AIO had to be tested.

This mode would have been ideal for the combination of a large power supply and a long graphics card, because everything would have fit at once. However, only the open side panel can be used as a cover, because the AIO wouldn’t get any air through the glass panel.

The lower position can be tight for wide graphics cards, otherwise the same applies as for the upper position.

Positioning the AIO in the bottom would have sucked in fresh air, but then the hoses and the graphics card would have gotten in the way. So I decided to mount the AIO in the lid. It probably would have just fit, but I wanted to be on the safe side and put the PSU one floor lower. To do this, simply remove the front with a few screws, loosen the PSU screw, unhook the PSU and hook it back in one notch further down, fix it in place and screw the front back on.

Only after installing the AIO did I notice that the freshly painted 3070 Ti would now not fit horizontally or vertically because of the large PSU. Crap!

Because I was too tight on time, I installed the small 4060 without further ado.

Also for cable management was accordingly little time left and also the photo with the folding ruler had to give way to the lack of time. Therefore, here is the info: behind the motherboard are 29-32mm space for cable management and thus the QUBE 500 shows itself benevolent, if you have to save some time at this point or are just lazy.

Close the lid, done!

Test run successful:


Kommentar

Lade neue Kommentare

RedF

Urgestein

4,679 Kommentare 2,559 Likes

Hat was, wäre vieleicht was für die Kids : )

Antwort Gefällt mir

_
_roman_

Mitglied

86 Kommentare 21 Likes

Ein Lob an den Textersteller.

Auf Seite Eins ist für mich klar, wie was usw.
Die beiden Alternativen - die scheinbar ein ähnliches Cooler Master Produkt auf der homepage hatten vor kurzem, haben elendig versagt.

Die Fotos sind auch um viele besser. Klare Fotos mit dem Blick auf das Wesentliche.

Wie ist die Blechstärke von den einzelnen Teile?

Ich sehe das Baukastenprinzip eher als Vorteil - beim Zusammenbau - und dass man die Möglichkeit hat an die einzelnen Teile ranzukommen.

Warum schafft es kein Hersteller - BeQuiet / Fractal Design / Jonsbo / HP / ASUS / Lenovo bei Gehäuse eine Zugentlastung beim IO-Panel? Ist doch üblich bei Schuko-Stecker bzw. vergiest man dann die Kabel zur Zugentlastung.

Das Teil hat dieselben Probleme wie ich es mit dem Jonsbo D41 erlebt habe, wohin mit dem Netzteil und den Netzteilkabel.
Die fehlende Einrastmöglichkeit des Kaltgerätesteckers im Gehäse beim Netzteil sehe ich genauso wie beim Jonsbo D41 als nachteilig an.

Antwort Gefällt mir

DigitalBlizzard

Urgestein

2,113 Kommentare 995 Likes

Sehr schöner Artikel, gelungen, gottseidank ist Gehäuse Geschmack ja bekanntlich geschmackssache :LOL:

Also die Flexibilität, auch die lustigen Farben inklusive Türkis etc sind lustig, das Konzept ist für den IKEA Fan und Bastler sicher auch eine coole Sache.

Mein erste Assoziation war allerdings Fischertechnik Metall Baukasten

Für User die auch mal gerne an der Hardware basteln und sich einen "Werkstattrechner" hinstellen wollen, sicher megacool, aber so richtig warm werde ich mit dem Produkt leider nicht

View image at the forums

Ich würde mir von CM aber viel eher eine Neuauflage des CM Stacker 830 wünschen, modernisiert, gerne wieder mit Schlitten, vielen Optionen für Lüfter und Radiatoren und 5.25er Slots für z.B. Ausgleichsbehälter und Displays, gerne in der Qualität, dickem Alu, nur halt frischer.

View image at the forums

Der Cosmos ist und bleibt ja auch ne coole Kiste, aber auch schon gefühlt 8 Jahre alt und eben kein Stacker

Also CoolerMaster, wenn ihr das lest, Stacker 830 Refresh 2024, Mesh und Glas Option, silber, schwarz und weiß, Mainboardschlitten, 180 gedrehte Einbauoption für das Mainboard, so dass er variabler wird ( Quasi ATX-BTX )

Was ich nicht verstehe, warum ist im Artikel eine Verlinkung des Namens CooleMaster auf den MF Shop mit DECIMflex Staubfiltern?

Antwort 2 Likes

Klicke zum Ausklappem
onyman

Veteran

238 Kommentare 126 Likes

Mal was anderes. Super! 👍

Es fehlt m.E. eine Infos zu Ersatzteilen. Man kann beim Hersteller doch bestimmt Einzelteile (andere Farben, geschlossener Deckel, Glasdeckel, Blechseitenwand, anderes I/O-Panel ... etc. pp.) erwerben?
Die Seite mit den Zusatzteilen beim Hersteller führt leider wieder auf die Ursprungsseite.

Antwort Gefällt mir

DigitalBlizzard

Urgestein

2,113 Kommentare 995 Likes

Wird noch nicht im Handel sein, aber soweit ich weiß, kannste das Teil auch Bunt machen, weiß Türkis usw.

Antwort Gefällt mir

DigitalBlizzard

Urgestein

2,113 Kommentare 995 Likes

Also so wie es aussieht, sind maximal die Teile im Ersatzteilbereich erhältlich, es gibt nur drei editionen, Black, white und Macaron ( Rosa oder Türkis ) Willst z.B. schwarz mit Türkis kombinieren musst entweder sehen ob Du die Front etc als Spare Part bekommst, oder musst 2 Flatpacks kaufen und untereinander mischen, die einzelnen Komponenten sind wohl nicht zu Einzelkauf im Handel vorgesehen.

Antwort Gefällt mir

ApolloX

Urgestein

1,676 Kommentare 951 Likes

Cool, 1. dass man aus der Benchtable ein Gehäuse bauen kann und 2. dass es eher günstig ist. Aber für ne Wasserkühlung ist es dann schon auch recht klein.

Antwort Gefällt mir

M
Mudsee

Mitglied

34 Kommentare 7 Likes

Ich besitze das Cooler Master HAF XB Evo und ich mag das Gehäuse. Kompakt gute Durchlüftung, Platz für große Lüfter und hohe CPU Kühler usw. So was die das die Stromkabel der Grafikkarte mit dem Deckel kollidieren gibt es da nicht. Und die Tragegriffe sind auch praktisch. Und ich mag es wenn die Grafikkarte, Der Kühler stehend auf dem Board sind. So was die Schwerkraft und spezielle Stützen sind dann nicht nötig da die Lastenverteilung ganz anders ist. Gerade bei so 1KG+ Kühler.

Auch das ich 2 Optische Laufwerke drin habe und Wechselslot für 3,5 Hdd.

Bin auf das gekommen von einem Stacker 810 und in dem Berreich muss man Coolermaster zugesehen bauen die gute Gehäuse. Robust, Stabil usw

So ist das irgendwie so ein kleiner Nachfolger vom HAF XB

Daher finde ich das Gehäuse Schick und praktisch da es auch bis E-ATX unterstützt.

2 Sachen die mich stören sind Der Fehlende Reset Kopf und das man kein optisches Laufwerk verbauen kann. Ja ich weiß wer verbaut noch so was...Ich weil ich auch gerne meine Musik auf CD kaufe und dann sichere und auch noch paar alte Datenträger und Spiele habe. Bin da altmodisch:)

Klar geht das auch über USB ist aber schon wieder was extra. Wo rumsteht:)
Was ich auch schade finde habe mal geschaut ob es kaufbar ist und von den 90€ sind die Anbeote bit 140€ +-10€ weit entfernt

Antwort 2 Likes

Klicke zum Ausklappem
K
KalleWirsch

Veteran

187 Kommentare 91 Likes

Danke für den Test,

Das sieht irgenwie nach IKEA Prinzip aus und ist ein sehr interessanter Ansatz. Very nice.
Sehr cool ist auch, dass man bei Bedarf die IO-blende nach oben oder die Seite bauen kann.

Damit ist das für mich der ideale Kandidat um das mit allen möglichen Custom-Gehäuse Bastelprojekten zu kombinieren, oder als Einbauwariante in einen cShrank oder ähnliches.

Ich schau immer nach interessanten Gehäusen und habe große Freude dran zu sehen was Leute so bauen.

Ähnlich wie bei @Mudsee kommen meine Gehäuse immer mit der Anforderung optische Laufwerke und einen externen Kartenleser/USB Port einzubauen. Ich hab vor ca. 1 Jahr ein ähnlich großes gekauft (Chieftec Gaming Cube).

Viel Spaß noch mit dem Teil.

Antwort Gefällt mir

R
RandomUsername

Neuling

2 Kommentare 1 Likes

Hallo,
Sehr interessanter Test! Könnt ihr bitte Fotos machen von dem Netzteil im Boden? Ich habe ein Mikro-ATX Board und möchte wissen, wie viel Platz dann übrig bleibt.
Grüße, Random

Antwort Gefällt mir

Alexander Brose

Moderator

825 Kommentare 579 Likes

Hilft dir dieses Bild vielleicht weiter?

Schaffe das zeitlich aktuell nicht, den Karton aus dem Lager zu holen, das Gehäuse wieder zusammenzubauen und ein Netzteil zu montieren.

View image at the forums

Grüße!

Antwort 3 Likes

R
RandomUsername

Neuling

2 Kommentare 1 Likes

Danke, das hilft schon! Ich hatte auch den Plan, ein RMx Shift Netzteil zu verbauen. Sollte theoretisch klappen, oder? Notfalls muss halt der Dremel ran! :D

Antwort 1 Like

Danke für die Spende


Du fandest, der Beitrag war interessant und möchtest uns unterstützen? Klasse!

Hier erfährst Du, wie: Hier spenden.

Hier kannst Du per PayPal spenden.

About the author

Alexander Brose

Werbung

Werbung