You’ve reinstalled your Windows, given an extra hard password so Cheyenne-Chantal can’t snoop on your system when you’re not at home. And then this: the good one has been annoying you for minutes with a Netflix movie that she absolutely has to watch now, here and right and you have a sudden blackout. Because, stupidly, this password was probably too complicated to remember. Or the note with the cryptic, 25-digit letter, numbers, and special character combination has once again fallen victim to the hangover.
And now? Everyone knows and everyone hates it. Hundreds of websites with hundreds of login data. For security reasons, these should also be different! But don’t worry, in this post I’ll show you how to recover your Windows password in under 10 minutes and without a reset or. -can be set! Incidentally, I would like to point out that this manual is not intended to enter Cheyenne-Chantal’s computer in return. Because you don’t do that. Promised?
By the way, the following help for your own PC only works with offline accounts. On the other hand, you can easily reset an online account linked to your own Microsoft account at Microsoft (click link). This is even easier. But since many users prefer a local account for some reason, then exactly what I described so dramatically at the beginning can happen.
This approach is, of course, not new and similar instructions have been on the web for years. But almost all of them either lack the hints of possible typing pitfalls or they haven’t been tested with the current builds of Windws 10. I tested the versions 1803 and the upcoming 1809 (pre-release) here, where it also worked without complaint for both. This creates security (for the helpless user, but unfortunately not for the system).
We need something to boot
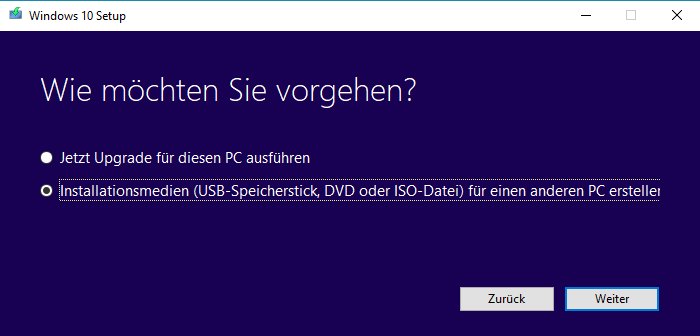
To go further, you need a Windows DVD (old-school) or a bootable USB stick (better) on which you can play your Windows with the Windows MediaCreationTool. Because one thing is important: You have to start Windows in such a way that you can enter the repair or recovery menus.

Creating a bootable USB stick is very easy, you just have to follow the instructions of the program and have a stick with at least 8GB of free space. The rest is really housewives safe.
Sequence description step by step
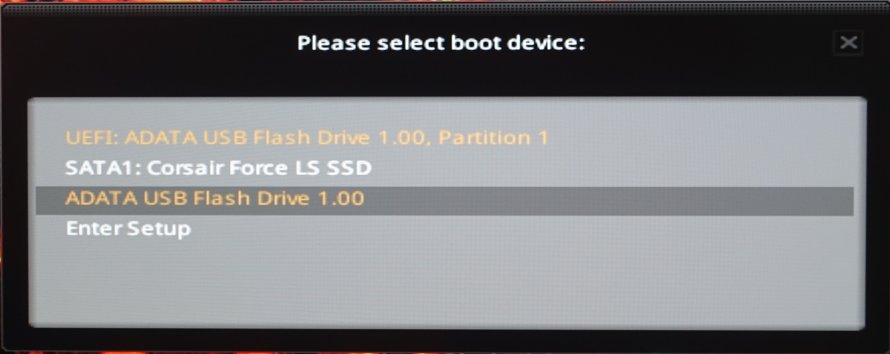
First, you need to change the boot order to start from the Windows setup. To do this, shut down your computer and press the F11 or F12 key when restarting (boot key may vary depending on the manufacturer). Now select your bootable disk and continue. If possible, avoid starting the stick in UEFI mode.

If this was successful, confirm the language selection of the setup program once with Next and go to the menu item “Computer Repair Options” (small, below) in the next window.

Then you select the troubleshooting

Next, you’ll need the prompt:

Now you need to find the drive where your Windows is installed. This does not necessarily have to be C: at this point (although it is usually so). For several existing data carriers, the order may vary! With the command dir (+ Enter) you can display the directory content. So first change to the root of the data carrier with e.g. C: (+ Enter. After that, you’ll need to switch to The System32-Veset of Windows and replace the utilman.exe file with cmd.exe. The complete process looks like this:
c: (drive letter dew Windows disk)you (Windows folders must be visible)cd Windows/System32dir Utilman.exe (Check if the file exists)rename utilman.exe utilman.old (rename the original file as a backup)copy cmd.exe utilman.exe (Replace with cmd.exe)exit (close input window)
The trick is that you can only use the full command set as an administrator with the cmd.exe, while utilman.exe represents the restricted and cropped version, which the desired version cannot. Why hasMicrosoft not closed this silly gap in local accounts to date? This question is certainly answered with pleasure by any local police department. This is at the same incomprehensibility level as the possible misuse of the Trusted Installer to get full control of the system. But this is another different issue.

So, almost done! Now all we have to do is change the password. To do this, we now remove the boot disk and then boot the computer as usual. On the login screen, you now select the icon for easier operation at the bottom right. The command prompt appears again, in which the following commands must now be executed:
With “net user” you can display the existing users and with “net user” al[username]so the respective settings of the desired user (see picture below). The password (new) is now more than simple:
net use[Benutzername]r * (confirm with Enter)
Hax0r1111 (enter and confirm your own password)
The asterisk stands for password assignment, the entered password is NOT displayed.

This completes the process and allows you to log back in completely relaxed.
Microsoft Windows 10 Pro 32Bit/64Bit, DSP/SB, ESD (multilingual) (PC)
 | Lagernd, Lieferzeit: Sofort (Automatischer Versand 24/7 per E-Mail) | 29,80 €*Stand: 26.07.24 09:25 |
 | sofort verfügbar | 29,80 €*Stand: 26.07.24 16:40 |
 | Sofort als Download verfügbar | 39,95 €*Stand: 27.07.24 00:33 |
Ken Burkert is an intern at gotIT! Tech Media GmbH and deals with all security-relevant topics related to IT (but not only).


