


If you write rather flapsily, with the RX Vega everything would be a little different, then you are not even so wrong. In addition to the interesting technology around the interposer and the HBM2 memory used, there are of course also new technological challenges in the way, which I already mentioned last year in my article "Confusion around three different packages at the Radeon RX Vega of AMD" had reported in great detail. But the fact that this very topic is catching up again in another form surprised me a little.
But always nice in turn. During the analysis of 18 Radeon RX Vega (some models I even had several times, also for post-tests), I noticed some things, which I could discuss similarly in advance with various industry contacts. Thus, the correct selection and application method of the thermal paste and the screwing of the coolers including the contact pressure were always an issue, including the viscosity of the pastes used.
The Crux with the ominous hotspot
Since problems and inexplicable falls were often caused by occasional heat jams, I disassembled and screwed many of the cards back together, measured them, changed the bolting order and changed various methods for applying the thermal paste. Tested. Including the quantity used, by the way, because this too will still play a major role. But let's start with a bug to illustrate the problem.
The fan control of all cards responds primarily to the value, which can also be obtained from the Wattman and e.g. GPU-Z as GPU temperature. But I had several cards that shone through emergency shutdowns despite apparently good (because low) GPU temperature values (sometimes even in the idle at the fan stop). But where is the cause of this phenomenon? To do this, I once recorded the measured values of such a map in a diagram.
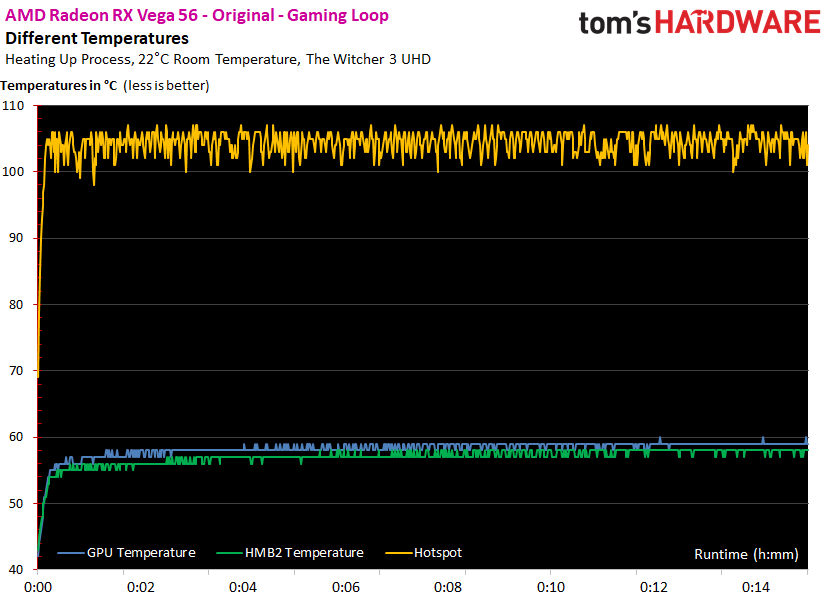
In addition to the GPU and HBM2 temperature, there is also a sensor value for the ominous "hotspot", wherever you have to look for it. I suspect it is a measuring point between the interposer and the package, more towards the two HBM2 stacks. The special assembly of the packages creates a so-called underfill, so the interposer is quite hollow. If the contact pressure is not optimally present in all places, partial overheating can occur, which is only indirectly reflected by the GPU temperature.
In the graphic above, I was able to measure up to 106°C at the hotspot, in the stress test even up to 110°C and the dreaded emergency shutdown. This can even get you in the idle, because the fans don't start at all with some custom cards. Some manufacturers, because the manufacturing tolerances were too high, have lifted the fan stop in experimental beta BIOSes and practiced the fewest symptom healing. Of course, such a solution is not a real solution.
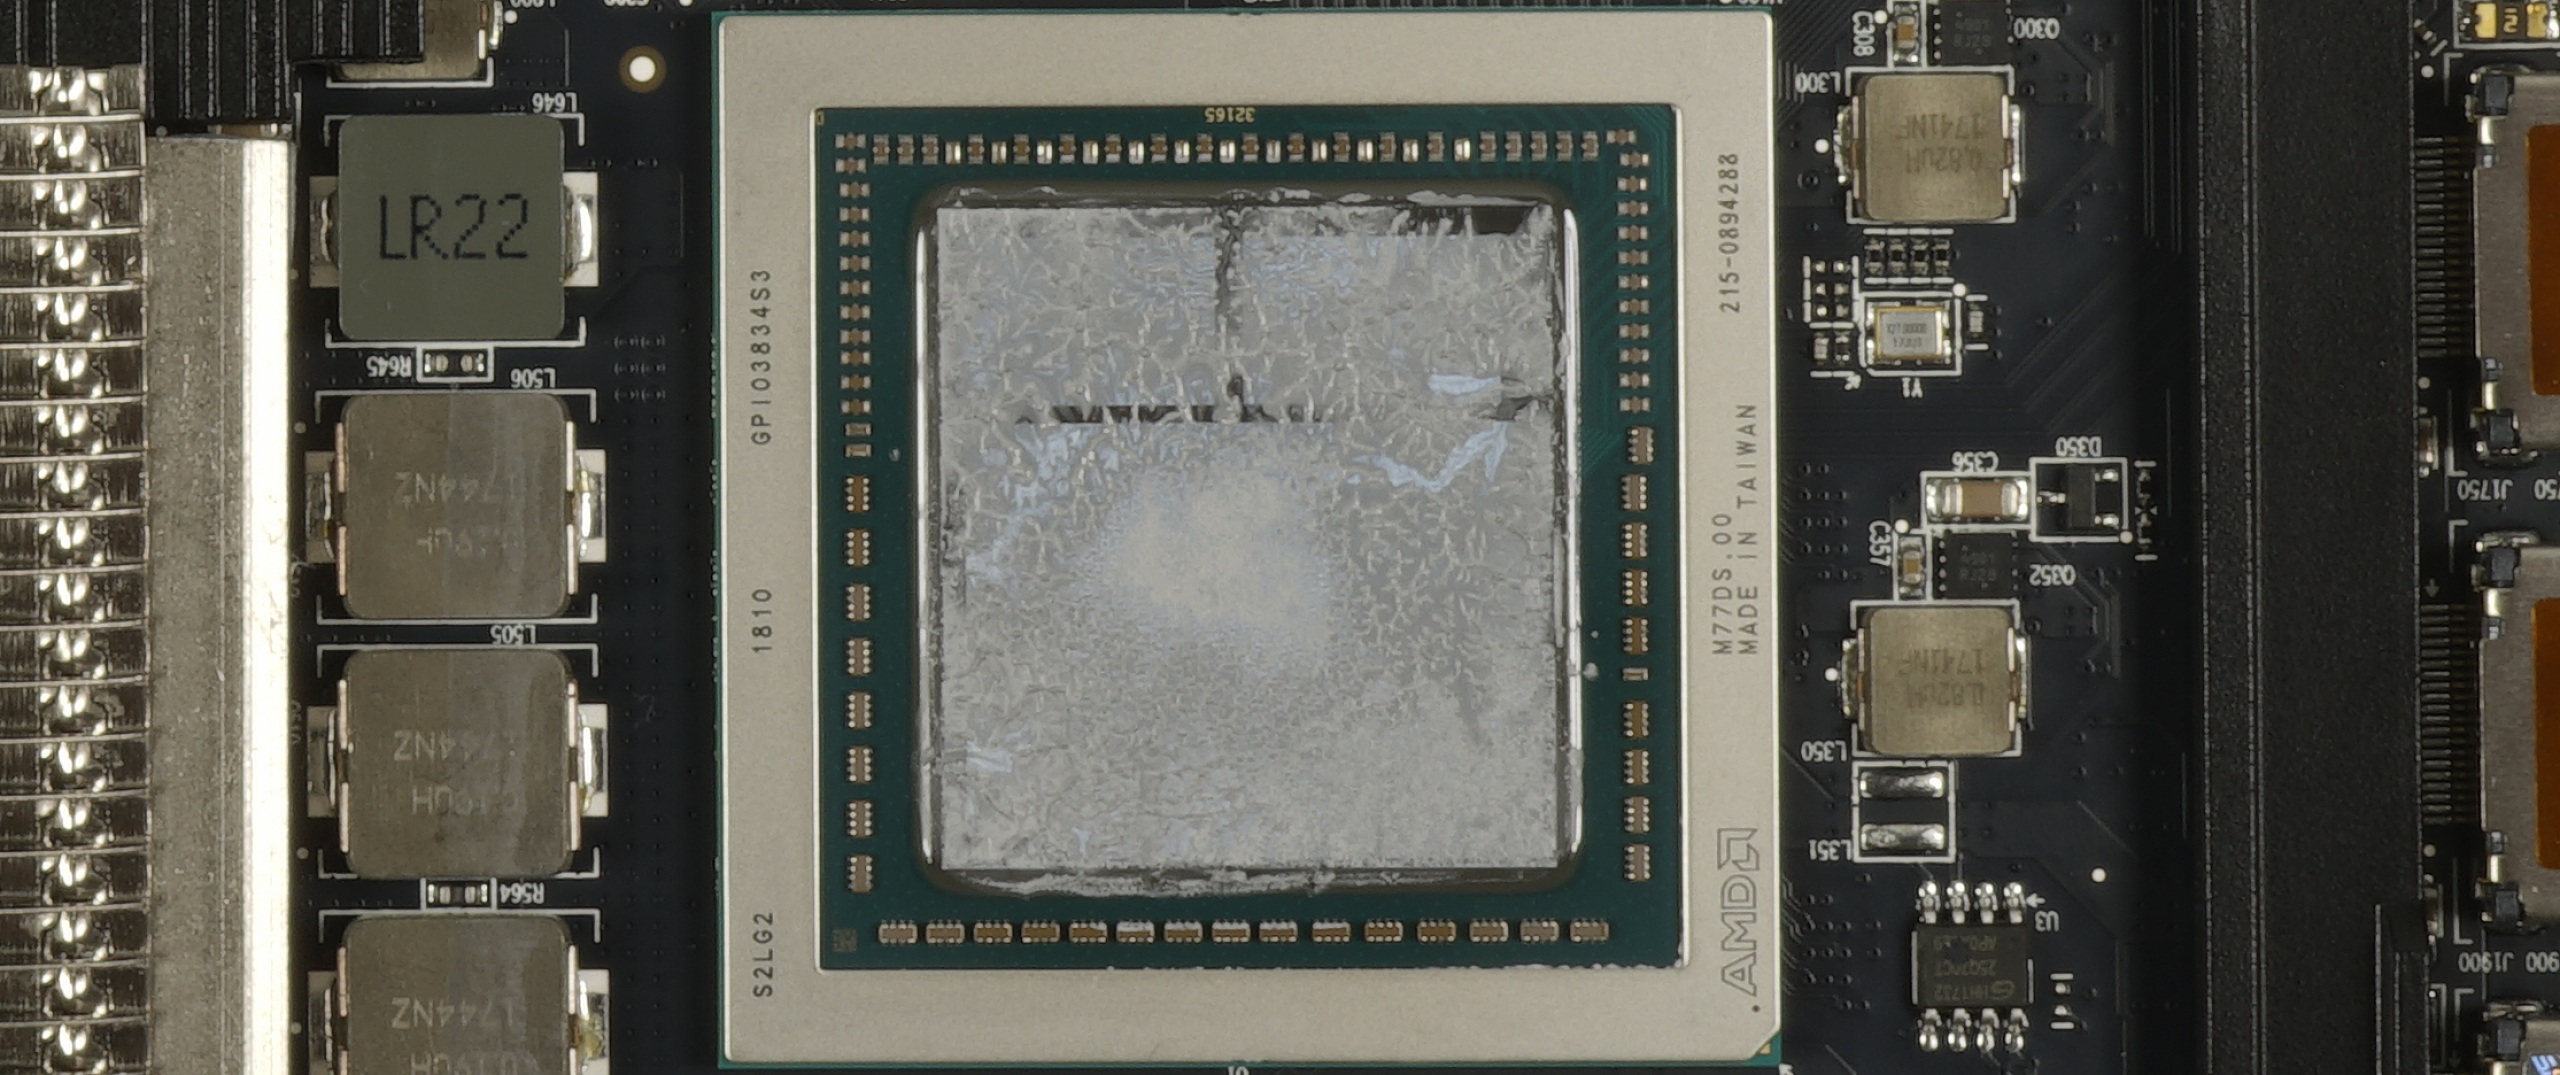
The following image of an industrially produced map shows how an actually homogeneous layer can "tear open" and some areas in fact no longer get proper contact with the cooler, although both the quantity and the type of thermal paste (application at the cooler OEM) are actually perfectly fine (who remembers, we had a short test on this recently). Factors such as the purity of surfaces, but also the human factor, play a decisive role in final assembly.
The optimal application of the right paste
In the industry, also due to the very different packages and the underfill problem, the RX Vega relies on rather viscous pastes with a much thicker layer and higher contact pressures in order to squeeze out the superfluous paste on the side and to to better compensate for height differences. I have experimented with many pastes, from thin to very viscous, and ended up where the manufacturers tried their luck.
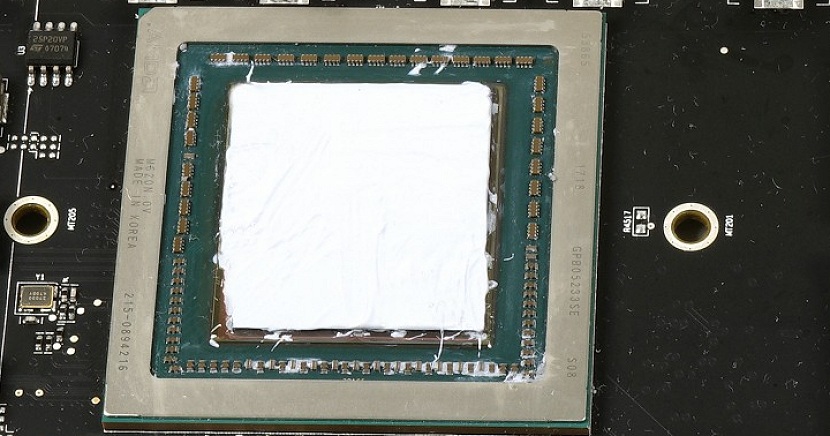
One should realize a full-surface and completely opaque spread with a rather viscous paste. This is not easy, because tough paste cannot be distributed evenly and without tearing up again. But you shouldn't completely sit around. What really helps, however, is to heat the paste to at least 50°C. Then even the most stubborn paste slips like a willing foal. If you want to be cheap, take the Gelid GC Extreme. If you want to print more coal (for maybe a Kelvin lower temperatures), you can also use the cryonaut from Thermal Grizzly. Both pastes are about the same viscous.
The next step is no less important! The PCB is placed as horizontally as possible on the cooler during assembly from above and one should avoid a bending and premature touching with individual corners or surfaces as much as possible. In addition, no pressure may be exerted yet, the tightening is yet to come and has it in itself. Normally, the screws in the factory are tightened diagonally over cross in one operation. A torque attachment of the screwdrivers ensures the right contact pressure.
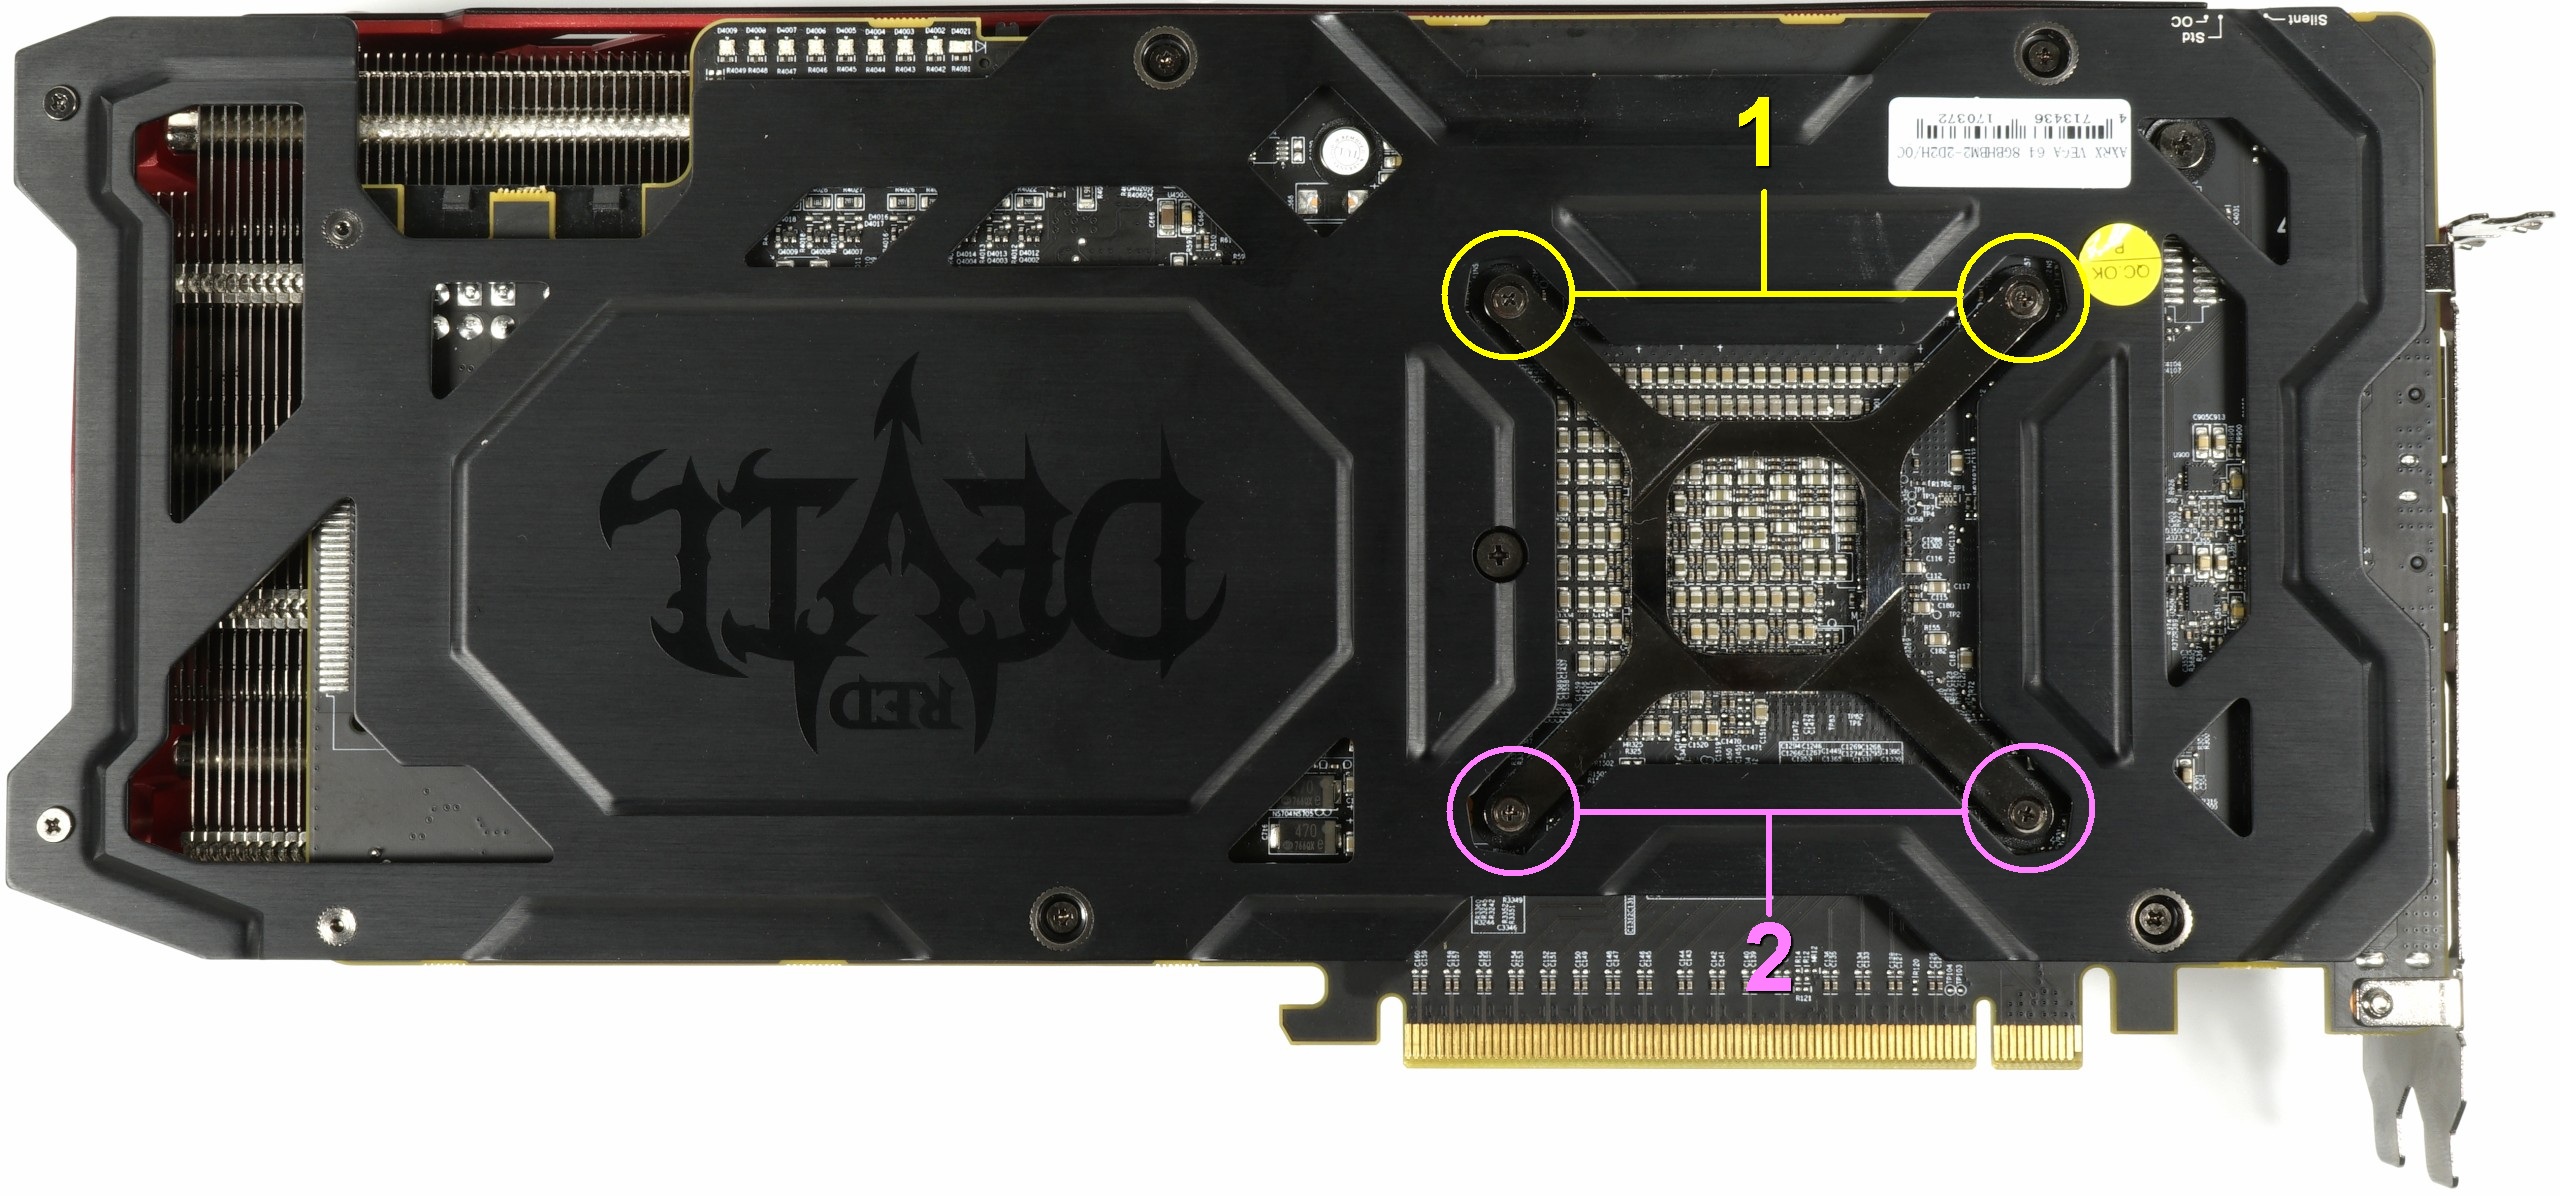
Not so with the RX Vega. The assembly is now carried out in several steps at the factory at most companies. Let's look at the picture below, because this is exactly what any user who works on the radiator can easily understand. The GPU is located on the package vertically above, the HBM2 with the hotspot rather below. This is precisely why you first tighten the two upper screws (yellow) alternately until you feel a slight resistance. Afterwards, repeat the whole thing alternately for the two lower screws (violet)
Only then are the two upper screws tightened alternately hand-fixed, then analogously only the two lower screws. I then always incorporate the cards first and complete a short warm-up process up to a maximum of 65 or 70°C. Now the PC is forcibly switched off (so as not to let the coolers run back) and the four screws are tightened in the above order also correctly tightly (but do not overturn with force!). Windows 10 can do such an off-switch-off process and you have an optimal result.
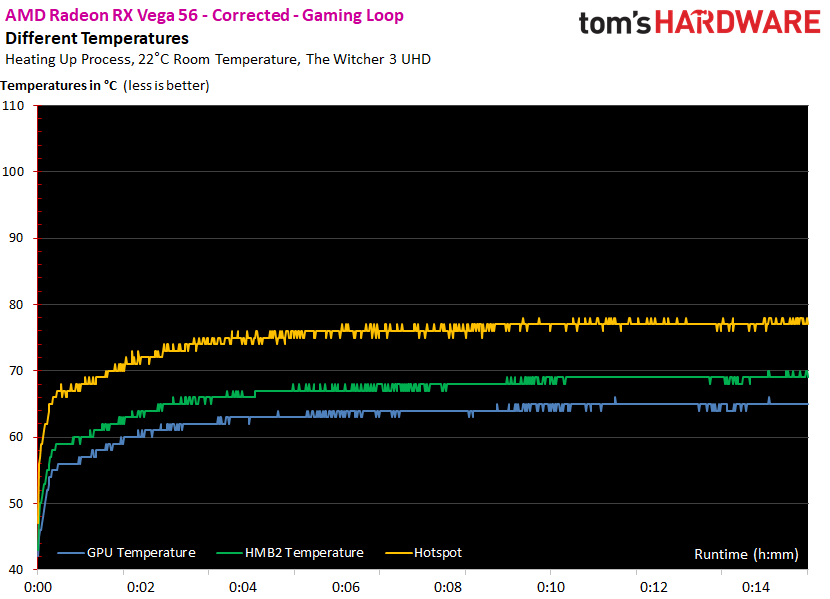
The result is really striking, because the diagram below shows the same map, just with different assembly! The fans rotate significantly lower (hence the slightly higher GPU temperatures), the clock speed is approx. 80 MHz higher and the hotspot with its 78°C is almost 20°C below the first measured horror value! Even in the stress test, the 80 mark is not exceeded, so that it is already 30°C difference. Small paste, great effect!
Summary and conclusion
If you want to do yourself a favor, please forget the blob, dash and X methods on the RX Vega. The huge, rugged package and the very different technology with the Interposer demands a much more differentiated solution. What I have described here and today has now proved its worth, because some of the manufacturers have already followed these proposals for the order of bolting. And certainly not because it would be a welcome change for the assembly line employees. The RMA departments will definitely thank it. 😉


Kommentieren