Curiositea
Mitglied
- Mitglied seit
- Okt 29, 2020
- Beiträge
- 21
- Bewertungspunkte
- 15
- Punkte
- 3
Mounting a EKWB Reference 7900XTX Waterblock to a XFX Speedster 7900XTX Merc 310 GPU
Hey everybody how‘s it going? – Just kidding, im not Louis Rossmann.
But i am going to tell you, how to mount a waterblock onto your XFX 7900XTX Merc310 graphics card.
If you are here, that tells me you are probably looking for a waterblock for your new precious monster of a GPU, but im afraid i have to tell you that there isn‘t one available yet. There are rumors that Alphacool wants to produce one, but so far, we XFX customers are being left stranded here.
But fear not, for there is a solution, although it’s a bit janky and you might not get the full visual experience EKWB intended you to get.
But first:
DISCLAIMER:
I am not recommending you perform this if you are not 100% sure of what you are doing here! Any kind of changes, like removing the cooler, will void your warranty! There is a chance that you could damage or destroy your GPU die, the PCB or other parts in the process. Perform this at your own risk – you have been warned! I am not liable for any damages or defects that may arise from this guide! Read the entire guide first!
What you need
First things first lets make sure you have everything you need beforehand:
-The Waterblock: https://www.ekwb.com/shop/ek-quantum-vector2-rx-7900-xtx-d-rgb-nickel-plexi EAN: 3831109902691 (You can probably also use the full metal version, but the acrylic version will make it easier for you)
-The XFX Merc 310 7900XTX GPU (duh!)
-A dremel or a CNC milling machine (anything goes as long as it‘s safe and gets the job done – you‘ll see what you need it for)
-Unlike me, you should have some skill in using a dremel or a cnc machine. If not, ask someone to help you.
-A little imagination, because I forgot to take useful pictures throughout this entire operation, despite me already knowing that I would write a guide. Ill try to show everything al clearly as possible.
Getting started:
Alrighty, with that out of the way, lets get started. I am going to assume that you already have some experience in watercooling, if not you should probably get some information on the general topic beforehand. Well start with the removing the XFX Cooler from the Card. Make sure you keep the screws, as you might wanna reassemble the card at some point. Start with removing the screws with the red circles around them. For the screws with the purple circles, these are loaded with a spring, the keep the cooler pressed against the die, unscrew these with care, crosswise and only a bit at a time, so as not to put too much pressure on one side of the die area.

Source: Igorslab ( https://www.igorslab.de/xfx-radeon-...en-hands-on-test-durstig-und-fix-mit-5-mal-x/ )
If you have removed these, you should now be able to remove the backplate. It might stick to the PCB quite a bit due to the thermal pads used by XFX. Do not use a screwdriver or something like that to pull the backplate off, as that might damage the PCB. You can however, you the small plastic spatula that came with your EKWB waterblock, to gently and carefully (patience!) pry the backplate off. It might take a minute or two, as the adhesion can be very strong.
Once the backplate has come off, you will need to remove the all of the screws going through the PCB. The Cooler should now come off easily. Note where the thermal pads are located, especially the small ones, as a few SMDs differ from the reference PCB.
Clean the die area and remove any leftover thermal pads from the PCB. Dont forget to remove the I/O plate, it has 2 screws through the PCB and 4 small screws right above the HDMI/DP ports (We will need those again).
The Waterblock
Now, for the waterblock. You will have to mistreat it a little. There are 2 key areas that will hinder the reference waterblock from fitting onto our XFX PCB.
The end of the waterblock contains a “addon” so to speak (red rectangle). This will sadly interfere with the capacitors located right below the third PCIe 8-Pin power plug. It comes off pretty easy and you can pull the LED strip (without the aluminum bracket) through the hole without any issues, so the RGB functionality won’t be lost.

The more problematic part will be the purple circle. This are would directly interfere with the third 8-Pin connector. There are 3 specific areas of interest here.

Measuring our cut-out Area
To give you an Idea about what area we have to get rid of, I created an overlayed image of the reference PCB and the XFX PCB.

Its not perfect but it should show the area (upper right corner) where the XFX PCB differs from the Reference PCB.
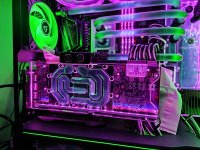
Best approach for me was to put the waterblock on a table with the acrylic side downwards and put the PCB (gently) on top of it, with the Die-side facing downwards too. This will reveal that you would have to cut away the acrylic 2cm deep and right until 2mm to the edge. You can make a rounded corner so that you could fit the the acetal standout back on (tho this would require cutting some parts of the acetal standout away). If you’re done with the cutting, it should look something like this (but I hope you did a better job than I did):

You can use some sandpaper and try to make the cut area for smooth, with finer and finer sandpaper it will become clearer and clearer.
Part 1/2 (due to the amount of pictures i can attach)
Hey everybody how‘s it going? – Just kidding, im not Louis Rossmann.
But i am going to tell you, how to mount a waterblock onto your XFX 7900XTX Merc310 graphics card.
If you are here, that tells me you are probably looking for a waterblock for your new precious monster of a GPU, but im afraid i have to tell you that there isn‘t one available yet. There are rumors that Alphacool wants to produce one, but so far, we XFX customers are being left stranded here.
But fear not, for there is a solution, although it’s a bit janky and you might not get the full visual experience EKWB intended you to get.
But first:
DISCLAIMER:
I am not recommending you perform this if you are not 100% sure of what you are doing here! Any kind of changes, like removing the cooler, will void your warranty! There is a chance that you could damage or destroy your GPU die, the PCB or other parts in the process. Perform this at your own risk – you have been warned! I am not liable for any damages or defects that may arise from this guide! Read the entire guide first!
What you need
First things first lets make sure you have everything you need beforehand:
-The Waterblock: https://www.ekwb.com/shop/ek-quantum-vector2-rx-7900-xtx-d-rgb-nickel-plexi EAN: 3831109902691 (You can probably also use the full metal version, but the acrylic version will make it easier for you)
-The XFX Merc 310 7900XTX GPU (duh!)
-A dremel or a CNC milling machine (anything goes as long as it‘s safe and gets the job done – you‘ll see what you need it for)
-Unlike me, you should have some skill in using a dremel or a cnc machine. If not, ask someone to help you.
-A little imagination, because I forgot to take useful pictures throughout this entire operation, despite me already knowing that I would write a guide. Ill try to show everything al clearly as possible.
Getting started:
Alrighty, with that out of the way, lets get started. I am going to assume that you already have some experience in watercooling, if not you should probably get some information on the general topic beforehand. Well start with the removing the XFX Cooler from the Card. Make sure you keep the screws, as you might wanna reassemble the card at some point. Start with removing the screws with the red circles around them. For the screws with the purple circles, these are loaded with a spring, the keep the cooler pressed against the die, unscrew these with care, crosswise and only a bit at a time, so as not to put too much pressure on one side of the die area.
Source: Igorslab ( https://www.igorslab.de/xfx-radeon-...en-hands-on-test-durstig-und-fix-mit-5-mal-x/ )
If you have removed these, you should now be able to remove the backplate. It might stick to the PCB quite a bit due to the thermal pads used by XFX. Do not use a screwdriver or something like that to pull the backplate off, as that might damage the PCB. You can however, you the small plastic spatula that came with your EKWB waterblock, to gently and carefully (patience!) pry the backplate off. It might take a minute or two, as the adhesion can be very strong.
Once the backplate has come off, you will need to remove the all of the screws going through the PCB. The Cooler should now come off easily. Note where the thermal pads are located, especially the small ones, as a few SMDs differ from the reference PCB.
Clean the die area and remove any leftover thermal pads from the PCB. Dont forget to remove the I/O plate, it has 2 screws through the PCB and 4 small screws right above the HDMI/DP ports (We will need those again).
The Waterblock
Now, for the waterblock. You will have to mistreat it a little. There are 2 key areas that will hinder the reference waterblock from fitting onto our XFX PCB.
The end of the waterblock contains a “addon” so to speak (red rectangle). This will sadly interfere with the capacitors located right below the third PCIe 8-Pin power plug. It comes off pretty easy and you can pull the LED strip (without the aluminum bracket) through the hole without any issues, so the RGB functionality won’t be lost.
The more problematic part will be the purple circle. This are would directly interfere with the third 8-Pin connector. There are 3 specific areas of interest here.
- The Red circle: this is the easiest problem, it’s a threaded standoff. This can be easily screwed out with pliers or something alike.
- The Blue circle: quite a bit harder, literally. It’s the backplate. This can sawed off, or removed with a Dremel, but more on that later.
- The purple circle: The acrylic frontplate. This might be the hardest part to get right, as its very easy to damage the acrylic or screw up here in some other way. But, I should probably say that this part is actually optional and I did it for aesthetic reasons (and because I didn’t realize that I didn’t have to cut it away at the time)
Measuring our cut-out Area
To give you an Idea about what area we have to get rid of, I created an overlayed image of the reference PCB and the XFX PCB.
Its not perfect but it should show the area (upper right corner) where the XFX PCB differs from the Reference PCB.
Best approach for me was to put the waterblock on a table with the acrylic side downwards and put the PCB (gently) on top of it, with the Die-side facing downwards too. This will reveal that you would have to cut away the acrylic 2cm deep and right until 2mm to the edge. You can make a rounded corner so that you could fit the the acetal standout back on (tho this would require cutting some parts of the acetal standout away). If you’re done with the cutting, it should look something like this (but I hope you did a better job than I did):
You can use some sandpaper and try to make the cut area for smooth, with finer and finer sandpaper it will become clearer and clearer.
Part 1/2 (due to the amount of pictures i can attach)


 And how are the Temperatures with the this block?