


The right cooling is important!
One thing in advance: AMD dispenses with thermal paste between Die and IHS at the Ryzen Threadripper, but relies on the good old lot. This will open up completely new perspectives for us later on in the case of overclocking. That's why we want to dedicate ourselves to our cooling. AMD has delivered the press samples with an AiO compact water cooling system from Thermaltake, which has a flat 360 radiator and therefore also works with three connected 120 mm fans.
 Here you almost need a pair of sunglasses
That all this together with the motherboard and the RGB-topped memory looks something like an Asian Christmas tree copy – as a gift. It has also worked, at least in large parts. What does not work, however, is the original coating with thermal paste on this Asetek pump. That is simply not enough. The 180 watts achieved in load operation, even without overclocking, as well as the relatively large area of the heatspreader require a slightly different technique. Instead of a blob in the middle, we applied an elongated sausage made of thermal paste and pressed the heat sink slightly back and forth with our hand before we finally screwed it.
Installation of own water coolers
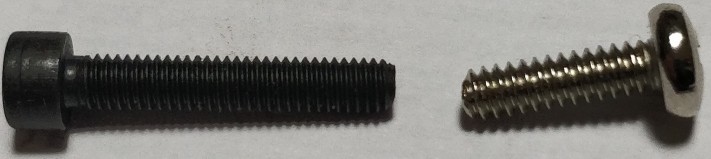
In the article "Socket SP3 for Threadripper – Cooler Compatibility and Exclusive Detailed Drawings" we explained in detail how AMD has now changed the socket design. One of the important points for us here is also the screwing, because with the used metric M3.5 screws a rather unusual intermediate size with fine thread is used, which you do not get in this form in the normal construction market. The difference can be seen very clearly when comparing our purchase (left) and the screw of an original AM4 system:
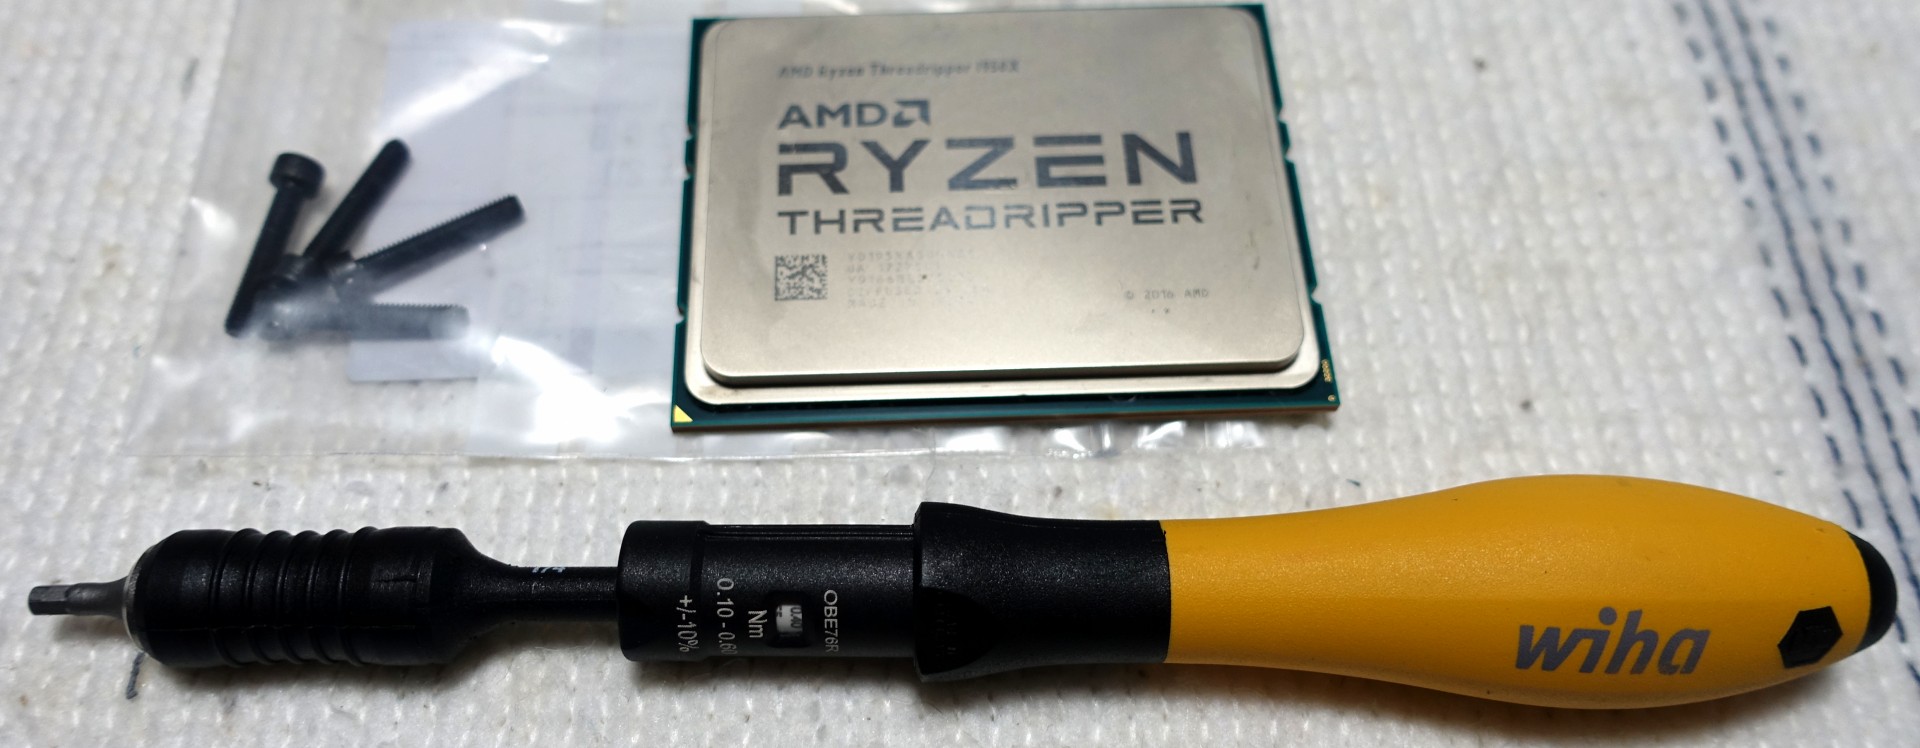
Simply delivering brackets that are simply adapted to the size will certainly not be a solution, because it also depends on new and suitable screws. Since the threaded sleeves of the base are not continuous (i.e. open at the back), it is also necessary to pay attention to the length. The 20 mm we use is too long for direct screwing, so that we have experimentally resorted to suitable washers. Here would be approx. 15 mm have been better, but the thickness of the bracket also plays a big role.
The next, even more important question came after the right contact pressure. We used a special, finely graded torque screwdriver and the M3.5 screws with hexagon (H2.5). First of all, we put everything on at 0.1 Nm medium-firm. From approx. 0.25 Nm we could not see any improvement in cooling performance, so we left it at that. Because it also makes no sense to expose the base to any bending samples or to cold-form the brackets by force. At approx. 0.35 Nm we would also see the limit of the maximum meaningful.
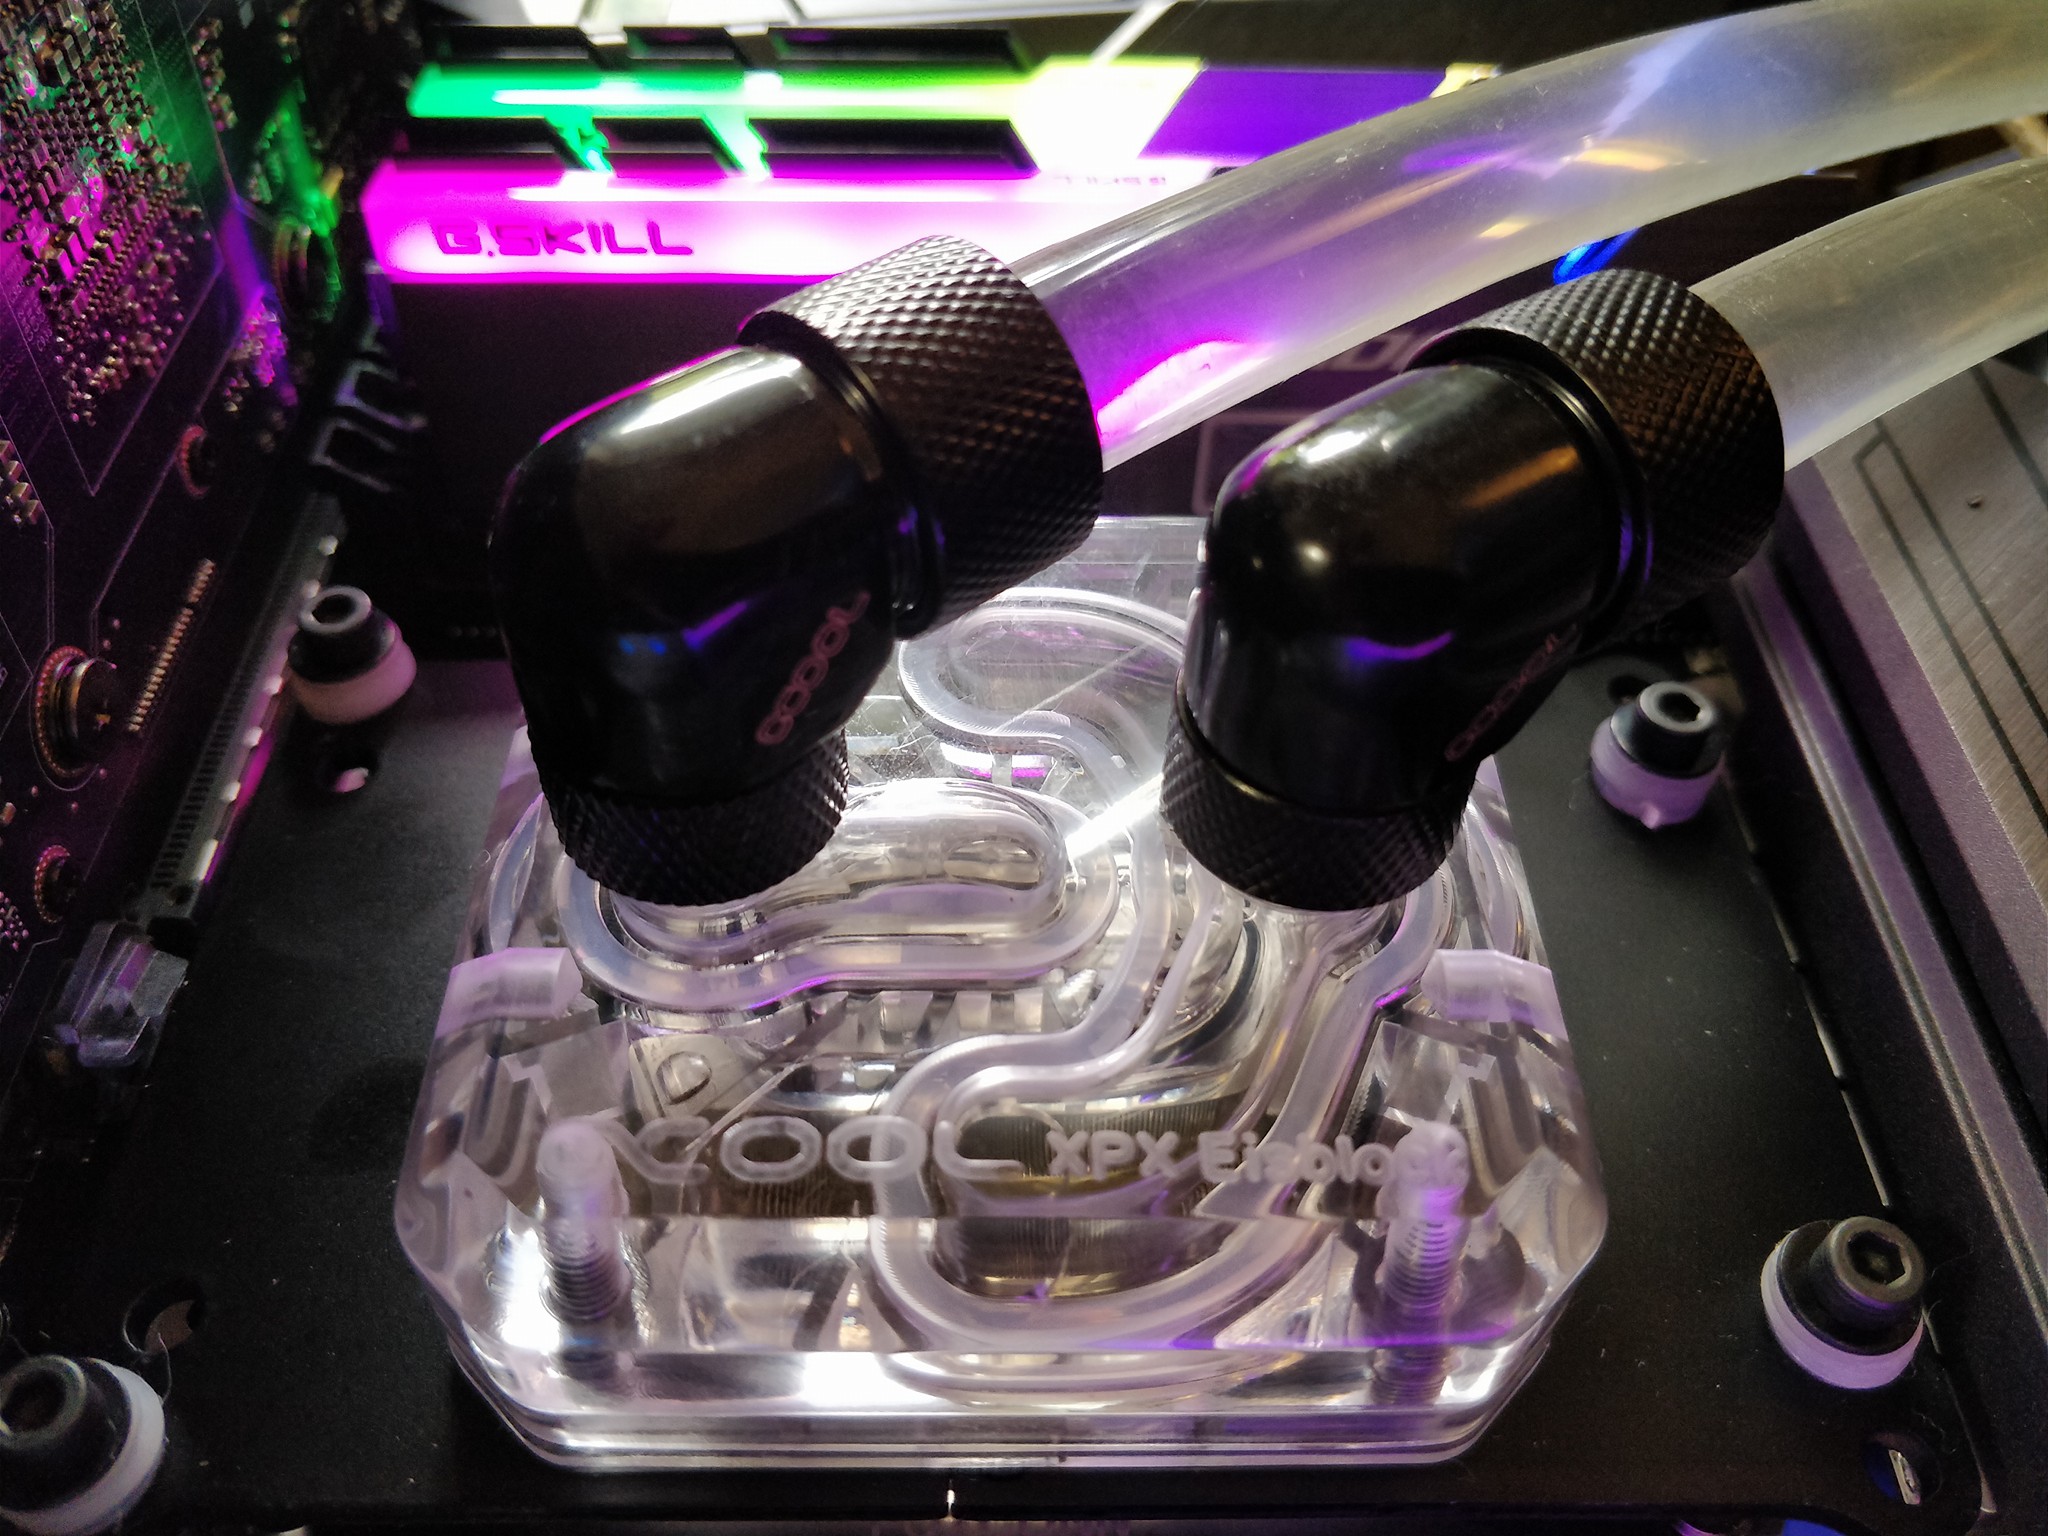
The finished cooling solution with an Alphacool XPX and the brackets suitable for the SP3 socket will look like the one shown below. The polyamide washers serve as spacers and replace the springs, the top steel washer prevents the cylinder head from being turned into the significantly softer material.
Overclocking
Of course, we have also tried what is really stress-free and safe with normal means. While we were able to overclock the AMD Ryzen Threadripper 1950X at 1.35 volts to stable 3.9 GHz, the 1920X even went up to 4.1 GHz. However, both overclocking steps were no longer feasible with the simple AiO compact water cooling, because during rendering both CPUs then easily exceeded the 250 watt limit (more on this later)
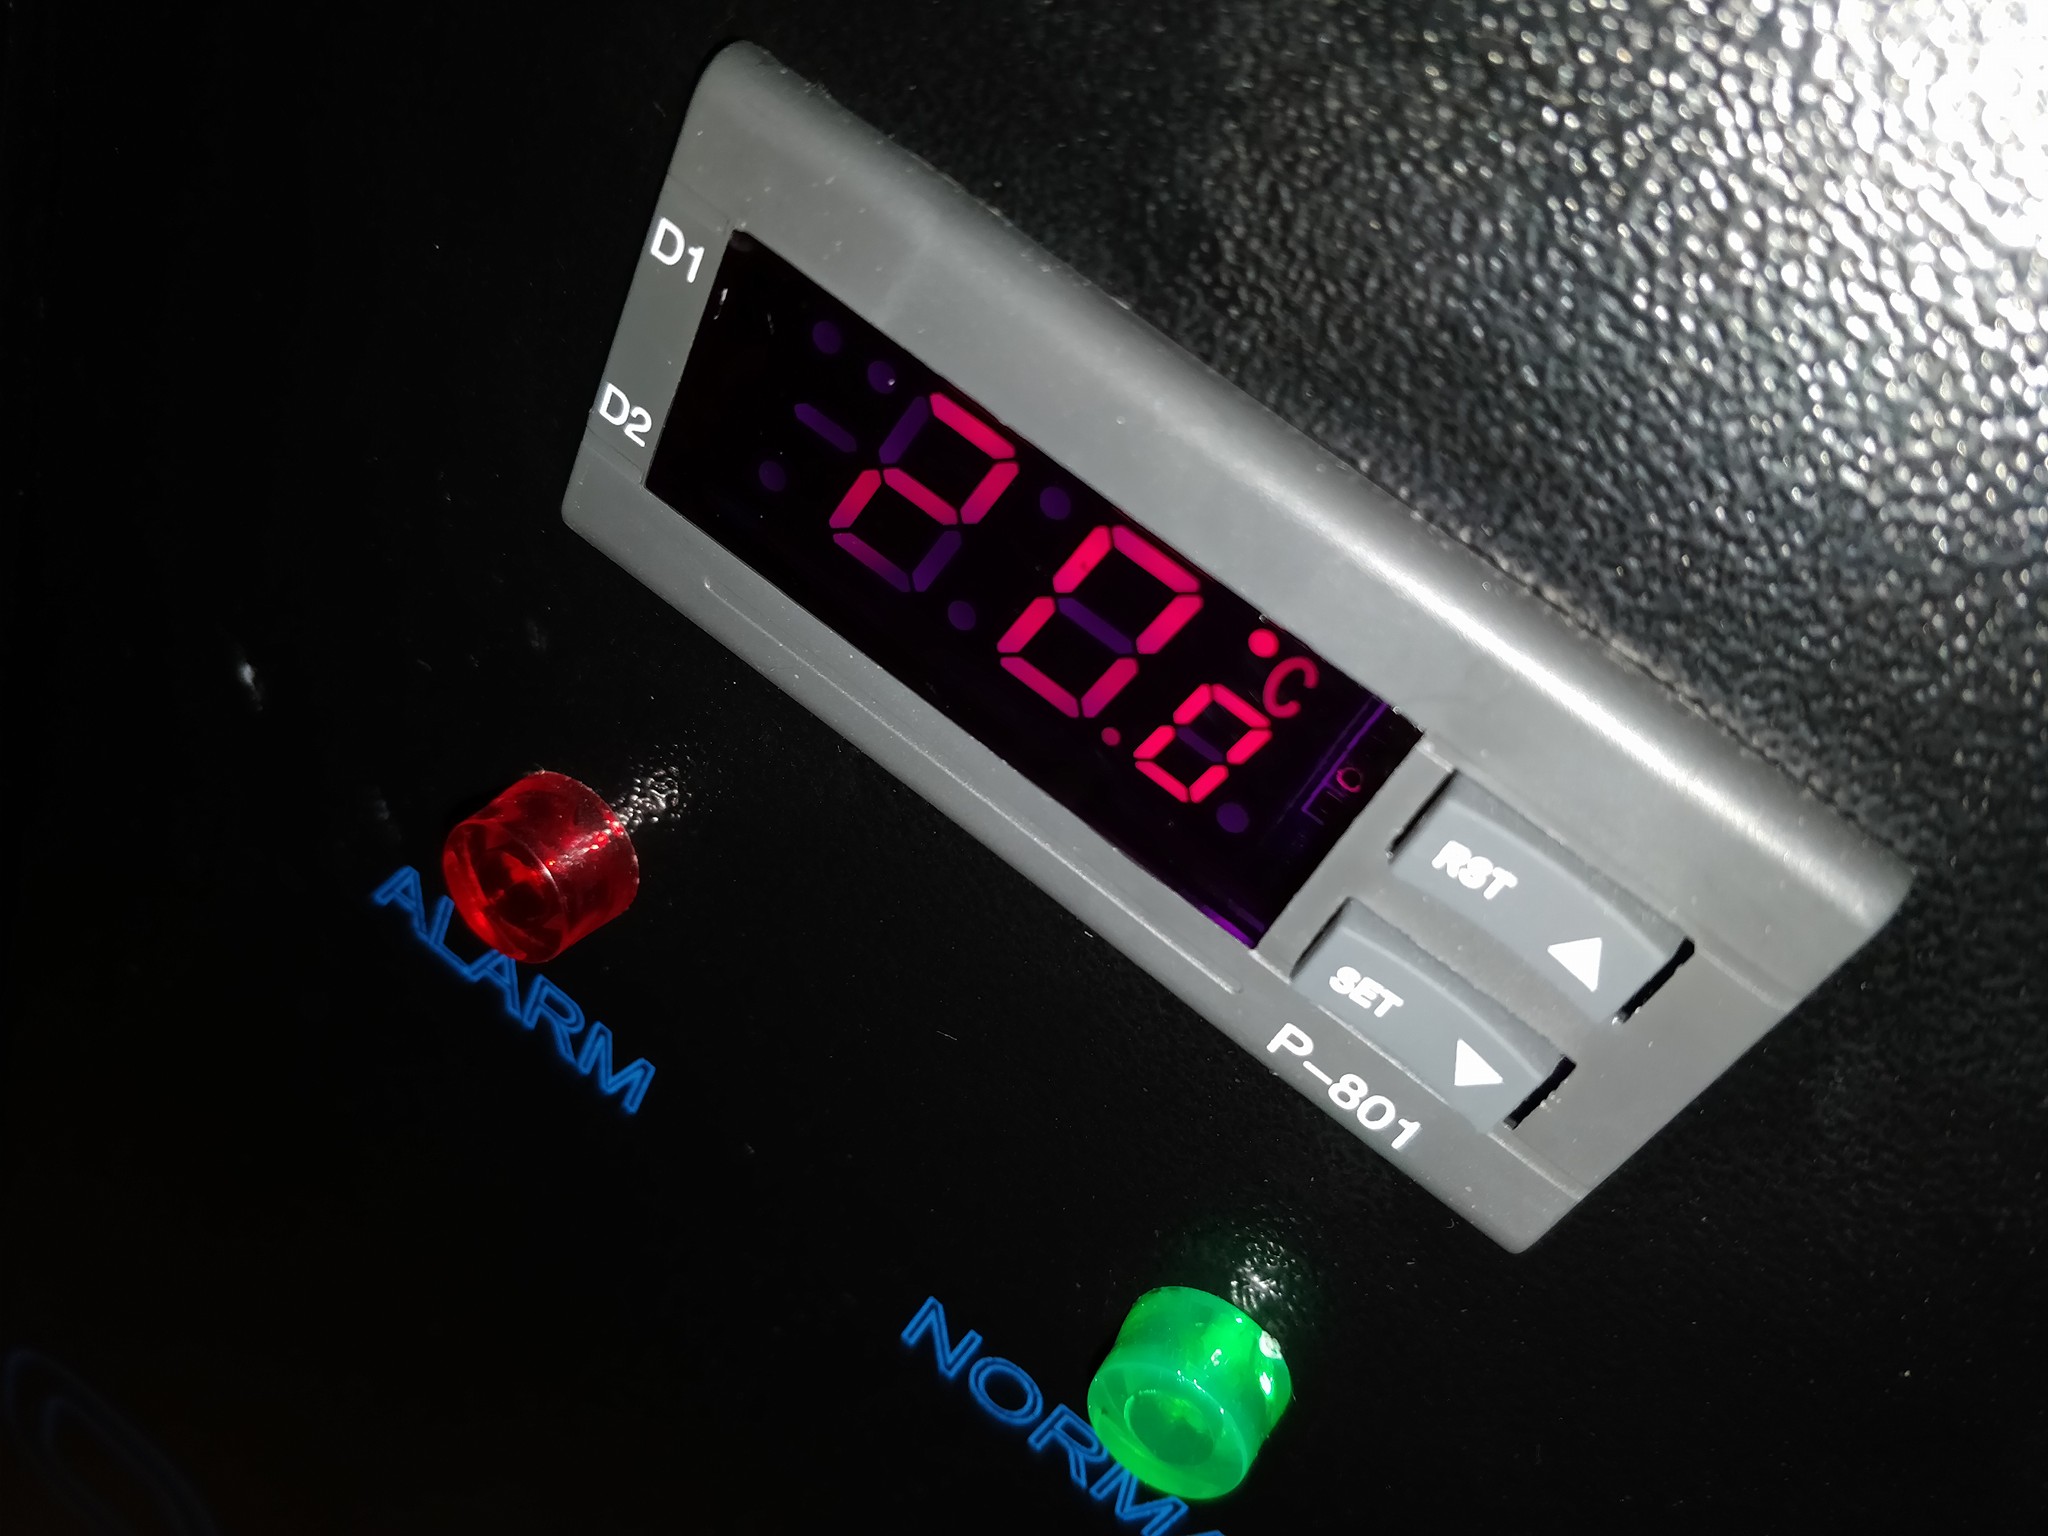
Of course, we also use our Chiller again for the most exact possible comparison, as these measured values can have at least one real constant in the ambient conditions: the constant water temperature of approx. 20°C, which can be maintained even if far more than 300 watts of waste heat have to be dissipated to the cooling medium later. However, a normal water cooling would probably have been sufficient for everyday use, because thanks to the soldered heatspreader, the thermal challenges were significantly lower than with the Intel Core i9-7900X.
With the Chiller at 1.45 volts for the 1920X even 4.2 GHz and at 1.5 volts 4.3 GHz were possible, but this has definitely nothing to do with everyday suitability. The same applies to the 4 GHz with the Ryzen Threadripper 1950X, which also became too thirsty with 1.45 volts. It must also be added that even the Chiller has quickly reached the limits of coolability, or temperatures simply became too high. Therefore, we will not exceed the 3.9 GHz limits for the Ryzen Threadripper 1950X and the 4.1 GHz for the Ryzen Threadripper 1920X in all benchmarks.
Maximum temperatures at the factory clock
AMD reports a drenter of 27°C to the Tctl values, which are supposed to correspond to the mean value of the core temperatures. We can at least partially follow this up if we now look at the temperature difference between Tctl and Tdie, i.e. the chip temperature. Therefore, and because the large cooler makes virtually any own measurement on the heat spreader impossible, this time we have thankfully dispensed with the delta measurements as with the Ryzen 7, 5 and 3.
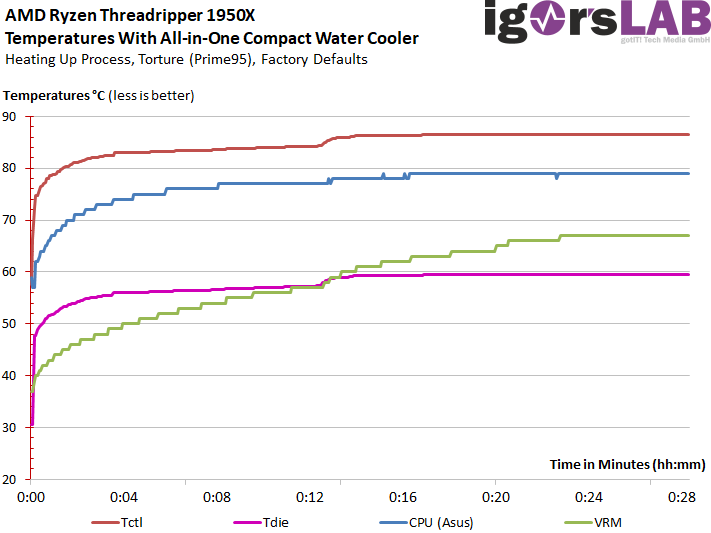
First, we test both CPUs with the compact water cooling provided by AMD. Without spoiling the power consumption measurements on the next page, we must precede that the motherboard settings slow both processors down to exactly 179 to 180 watts. This wart was, not even for a short time, to exceed with normal settings. Since the Ryzen Threadripper X1920 competes with fewer cores, but with a significantly higher clock, both power consumption values are almost identical. Let's first consider the temperate course for the larger of the two:
With the Ryzen Threadripper 1920X, the curves look almost identical, if there weren't some insignificant jumps more with Tdie and Tctl. Since the load is the same, the whole thing doesn't really surprise us.
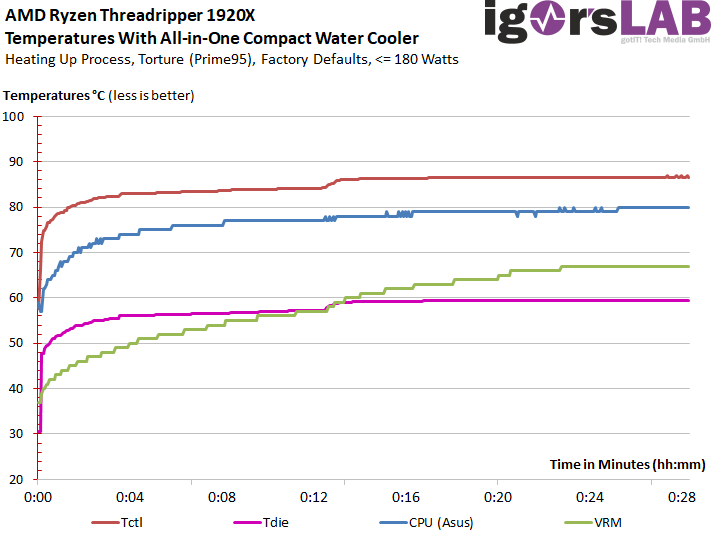
What HWInfo64 returns as a CPU temperature from the separate sensor loop for the Asus board is between 6 and 12 Kelvin lower than Tctl and has a slightly flatter rise. The voltage converter temperatures are in the deep green range at just under 60°C without further cooling.
Maximum temperatures in case of overclocking
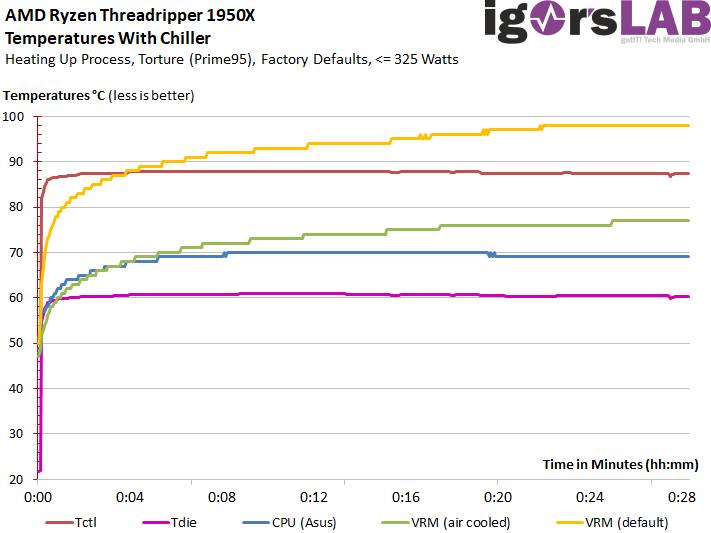
Let us now turn to what we have just described as a border area. Since we operate far above the sweet spot due to the high voltages we need for stable operation, the power consumption explodes here as well. However, since we are well beyond the 300 watt limit here, the cooling has to put a lot away and we rely exclusively on the chiller. A counter-test with a normal water cooling in the extreme case showed a approx. 10-15 Kelvin higher temperature at Tctl and Tdie, which is still justifiable.
The overclocked Ryzen Threadripper 1950X grabs approx. 320 to 325 watts, which ensures a pleasing 87°C of the Chiller. That's really little if you keep the offset in mind and also look at Tdie. The more than 60°C show the great advantage of solder over thermal paste, e.g. Intel used on the Core i9-7900X, and what would have been possible with this CPU, would not have pinched Intel and installed a suspected thermal emergency brake.
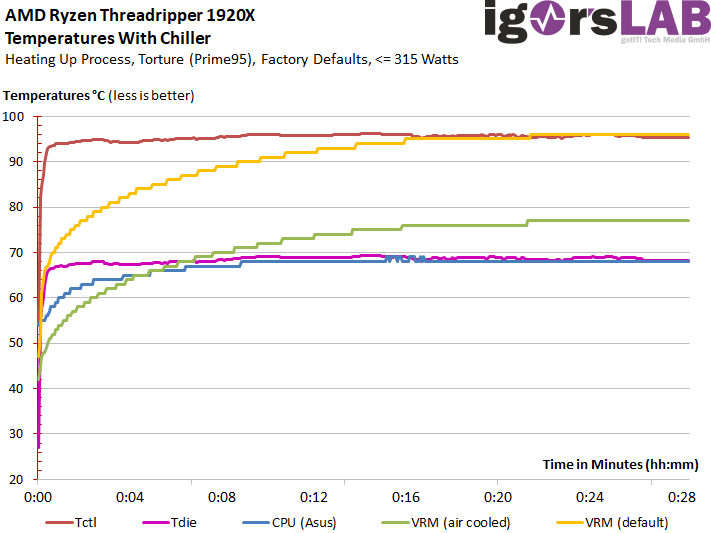
Even if the power consumption of the Ryzen Threadripper is slightly lower (well, around 10 watts are almost nothing in these power ranges), the Tctl value is significantly higher. This is not surprising, because the power consumption per core is actually increasing. Tdie and what Asus finds are now in some whatis. The difference between Tctl and Tdie is again at the well-known 26 to 27 Kelvin, which is quite a good thing.
Voltage transformer temperatures
Who will of course do a separate test with different loads and also different X399 motherboards, just as we planned for Skylake-X and the socket X299. In general, the Asus X399 ROG Zenith can be extremely attested that the voltage converter temperatures remain well above 300 watts of power consumption of the package and without additional air support below 100°C.
Asus has set the temperature limit for throttling to 105°C. However, the two curves of the temperatures during overclocking (see above) prove quite impressively that a small draught can never do any harm. The fan installed above the I/O shield is almost ineffective, but unnecessarily noisy. This gimmick could have been given to oneanother.
- 1 - Einführung und Testsystem
- 2 - Game vs. Creator Mode: Was ist was?
- 3 - VRMark, 3DMark Fire Strike, Time Spy, API Overhead
- 4 - Civilization VI (DX12)
- 5 - Warhammer 40K: Dawn of War III (DX11)
- 6 - Grand Theft Auto V (DX11)
- 7 - Hitman 2016 (DX12)
- 8 - Ashes of the Singularity: Escalation (DX12)
- 9 - Battlefield 1 (DX11)
- 10 - Middle-earth: Shadow of Mordor (DX11)
- 11 - Project Cars (DX12)
- 12 - Far Cry Primal (DX11)
- 13 - Rise of the Tomb Raider (DX11)
- 14 - The Witcher 3: Wild Hunt (DX11)
- 15 - DTP, Office, Multimedia und Kompression
- 16 - Workstation 2D- und 3D-Performance
- 17 - CPU-Computing und Rendering
- 18 - Wissenschaftlich-technische Berechnungen und HPC
- 19 - Übertaktung, Kühlung und Temperaturen
- 20 - Leistungsaufnahme
- 21 - Zusammenfassung und Fazit


Kommentieren