


How I work with LDAT
The LDAT system includes, as mentioned above) an external light sensor that is securely attached to the front of the monitor. This is done with a practical elastic band. In addition, the modified mouse from page one has been added. The top side of the LDAT sensor has two pins for connection to the modified mouse, through which the click event is detected, and a status LED that changes color to indicate the current operating mode. The back of the LDAT sensor device contains a luminance sensor that measures the change in brightness on the screen.

Placing the LDAT device on the screen is quite simple. To position the luminance sensor over an area of the screen that shows a change in luminance or movement (animation) when the left mouse button is pressed (e.g. Muzzle flash). LDAT then compares the time difference between the exact moment of the mouse click and the moment when the light on the screen changes. The LDAT software displays your latency measurements in real time and can perform and average multiple measurements, displaying a histogram with a Gaussian curve. Some things, like click sequences, can be triggered automatically. Here, the signal from the LDAT controller moves back to the mouse.
Measurements with LDAT
Of course you won’t primarily look at the very last millisecond in normal RPGs, but rather in fast shooters. A Battle Royale with thick latencies? even expensive in-app purchases won’t help there, because it’s always just the system that gets sick. The nice thing about LDAT is that it works with any hardware, no matter which CPU or GPU. The first step you should always take is to connect the mouse to the high-speed USB, which on AMD systems should be connected to the CPU if possible. In addition, unneeded applications can be closed in the background and active USB devices that could be squeezed in between during polling are removed.

With Nvidia graphics cards, there is also the possibility of reducing the software latencies in the driver settings. Here, you should activate “Ultra” if necessary, if your own graphics card isn’t the fastest (from a GeForce RTX 2070 Super downwards). This can be useful (but not necessary for very fast cards). Moreover, one can of course also avoid all picture deterioration improvements or scaling methods on the monitor and use a device with a high refresh rate (from 144 Hz, better 240 Hz) and low response time on the monitor itself, but this only makes sense if these frame rates are reached.
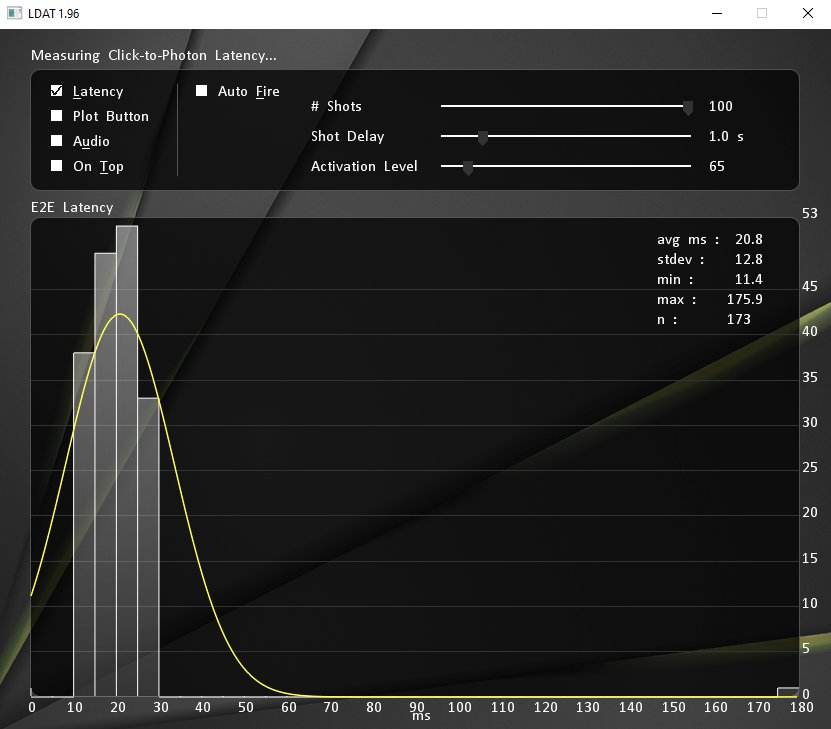
The first picture shows a measurement with a GeForce RTX 2080 Ti and a DirectX11-based simulation program as full screen. The click-to-pixel latency averages 20.8 ms, whereby the best value was 11.4 ms. The standard deviation (stdev) is 12.8 ms. However, the measurement result is also affected by a recurring outlier, which is probably also due to my program, which does not run with the highest priority, otherwise the average would be significantly lower. But you can live with that quite well.
Remember what I wrote about the windowed mode when I listed the individual latency blocks on the previous page? When I run such a test program as a window, the behavior changes abruptly! Here I simply did some quick work myself, created a viewport and attached a rectangle consisting of two triangles directly in front of the camera in the frameset of the very simple scene. If you click, the rectangle becomes white, otherwise it is black. In the exclusive full screen, the values are then again in the range of what I could measure above. As the graphic load is negligible here, these latencies are also very similar on a Radeon RX 5500XT.

The next thing I measured is a real game, but with a rather slow graphics card in the form of the GeForce RTX 2060 (without Super). Now, Far Cry New Dawn is not new, but it’s not very demanding in terms of hardware and I wanted to see what could happen to a game that is not explicitly mentioned in NVIDIA’s recommendations. The LDAT software can also combine several measurements in an elegant way, so that I measured here at medium quality settings and in Full-HD. G-Sync was also activated. We see two ranges, one with the driver setting “Ultra” and one without the driver’s latency improvement. So the difference is clearly visible!

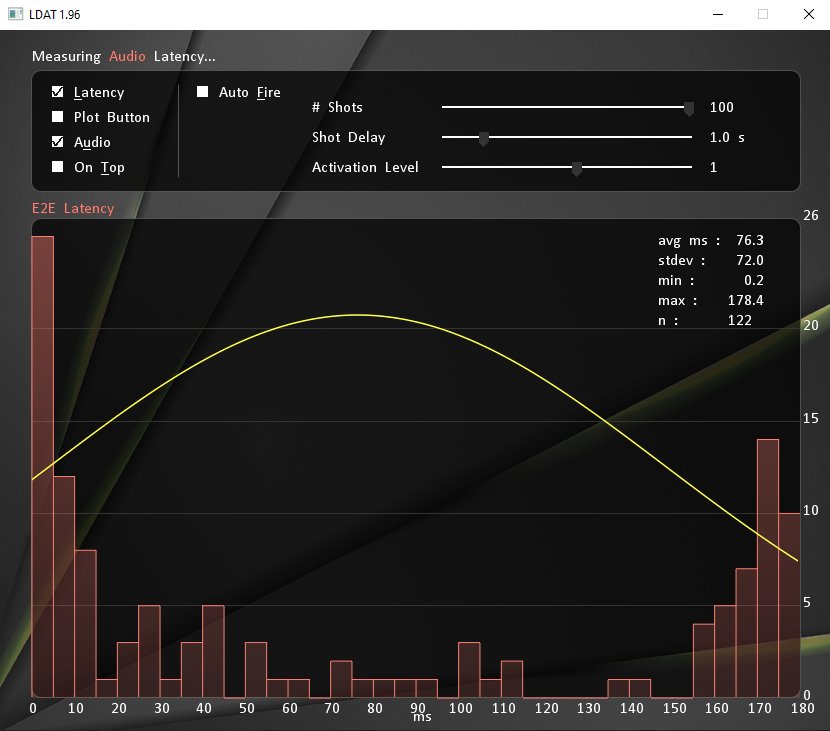
And if someone didn’t hear the shot, it could be due to the latency. The audio measurement shows that the sound output in this game is more like a magic bag. I selected the graphics output via the graphics card and connected the monitor output to LDAT. I took the measurements with the low latencies outdoors, the results with the average and higher values were taken from a closed building. So you can see very well that the whole sound game is often quite far away from the real time and amn is already dead before you hear yourself.
Summary and conclusion
Today’s presentation is of course only a small excerpt of what you can do with LDAT, if you have time, desire and a plan. Of course, the whole thing still has the touch of an exclusive small series, but it could well come onto the market. Anyway, it works and everything was running quite stable. How and when I then build it into the metrics I have to see, but it opens up really interesting possibilities for measuring the largest latency blocks in the known scheme.


Kommentieren