


This time, Nvidia has increased strongly with the cooler, because the clock losses are not as dramatic as in the last generation. Nevertheless, the boost clock could be significantly higher if the GPU were to run cooler. AS always, IT is a trade-off between temperature, noise and performance. Only that this time the balance has been a little better. However, the renunciation of the DHE principle is clearly audible on the other hand, whereby the clock rates are surprisingly similar with the different installation variants!
The differences in the boost clock rates between the open measuring structure and the closed housing are practically non-existent, which is already a good sign. Whether and how you have to buy this at higher fan speeds, we read in the next chapter. First of all, it's all about the beat. For this purpose, I have summarized all the start and end data nicely clearly in a table:
| Start/end value RTX 2080 |
Start/end value RTX 2080 Ti |
|
|---|---|---|
| Open Benchtable | ||
| GPU Temperatures |
34 / 75 °C | 35 / 77 °C |
| GPU clock | 1905 / 1815 MHz | 1815 / 1665 MHz |
| Ambient temperature | 22 °C | 22 °C |
| Closed Case | ||
| GPU Temperatures |
35 / 75 °C | 35 / 80 °C |
| GPU clock | 1905 / 1800 MHz | 1815 / 1650 MHz |
| Air temperature in the housing | 25°C | 43°C |
Overclocking with the 1-click tool
With the introduction of the RTX series, Nvidia is promoting its own overclocking algorithm and is now doing everything it can to prevent individual overclocking with an API/DLL package that partners such as EVGA and MSI can integrate into their utilities. Instead of jumping back and forth, testing part of the frequency/voltage curve at once and adjusting it to the stability of different workloads, Nvidia's scanner performs a special arithmetic routine in its own process.
The metric analyzes and remembers mathematical errors before crashing. This also means that the algorithm can easily recover itself when such a crash occurs. This in turn gives the tuning software the opportunity to increase the voltage and try the same frequency again. As soon as the scanner reaches its maximum voltage setting and encounters a last error, a new frequency/voltage curve is calculated based on the known results.
This worked quite well with several cards in practice and was of course a little below what I myself got in over an hour of tedious searching and restart. But you can certainly live comfortably with it, even if it could go a little higher. Only whether this is really stable in all situations of life, let's leave it uncommented in the room. But there is definitely more to it than that.
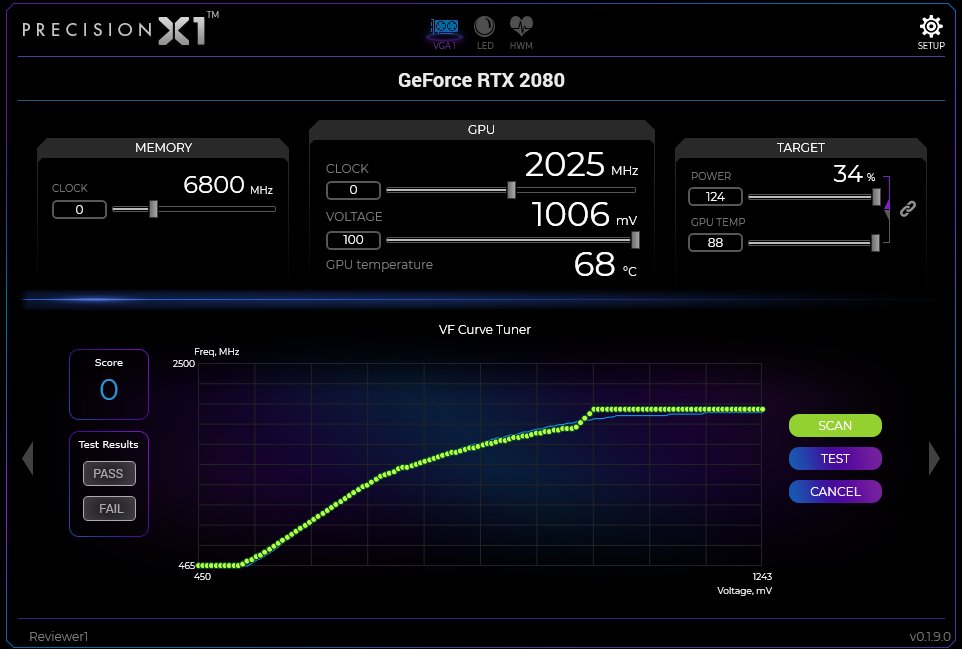
With the sample of our GeForce RTX 2080, the tool still managed 2025 MHz (which then ran clean), but this was over 100 MHz below what was shown on the presentation. unfortunately, there are also big gaps in the GPU lottery. It will be interesting to see what other cards create under equal conditions from the stand.
The tested GeForce RTX 2080 Ti came warmed up without further adjusting the fan curve from its 1665 MHz in open construction to stable 1935 MHz on average with the tool. In the closed case it was still 1860 MHz. Considering that you could stay water-cooled below 40°C, the boost would be a small grenade for such a large chip.
But I will also write a suitable follow-up, because the coolers are already here and the chiller is screaming for fire.
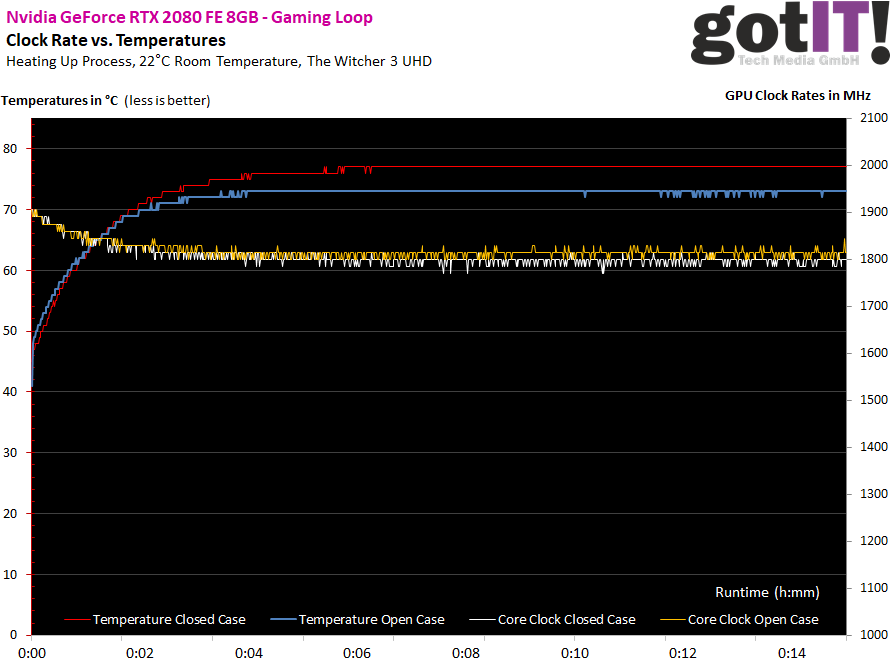
Temperatures and clock: GeForce RTX 2080 FE
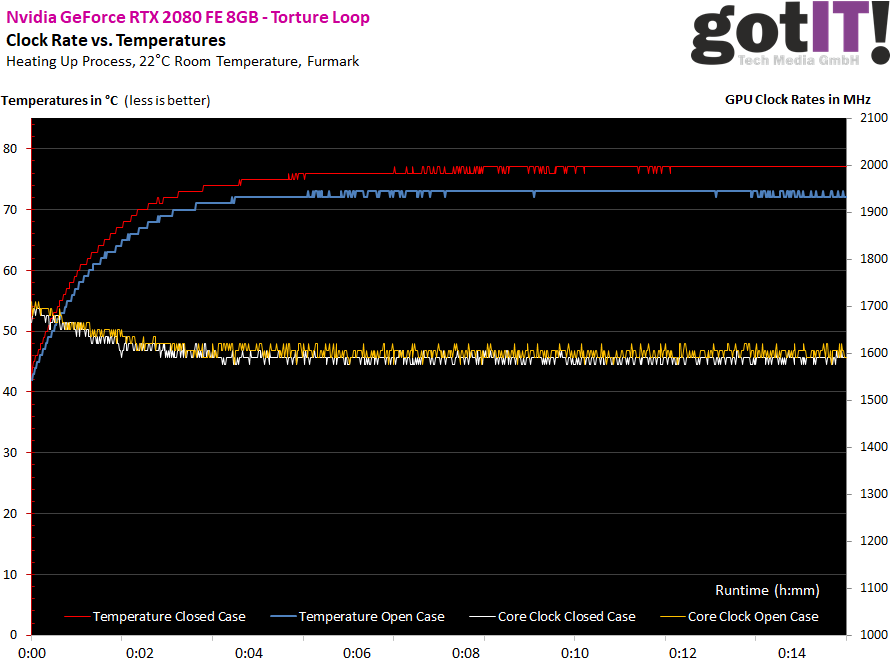
For a better illustration, I now show the respective courses by looking at our timeline of a total of 15 minutes each for the warm-up time. Interesting is the difference of the heating between the open structure and the closed housing, which we will come back to again in a moment. However, the clock rates remain surprisingly the same. The Torture Loop doesn't look much different, because open and closed constructions hardly differ.
Now let's look at the whole thing with the high-resolution infrared camera for the gaming loop and the stress test both in the open body and in the closed housing. The differences in the board temperature are sometimes very clear, but it stays cool below the GPU socket. We'll see why it's good that Nvidia is now really extensively including the backplate in the cooling, according to all our recommendations, but obviously hasn't done any measurement at this point. The pad there is completely superfluous and almost counterproductive.
Infrared measurement in the gaming loop
Infrared measurement in the Torture Loop
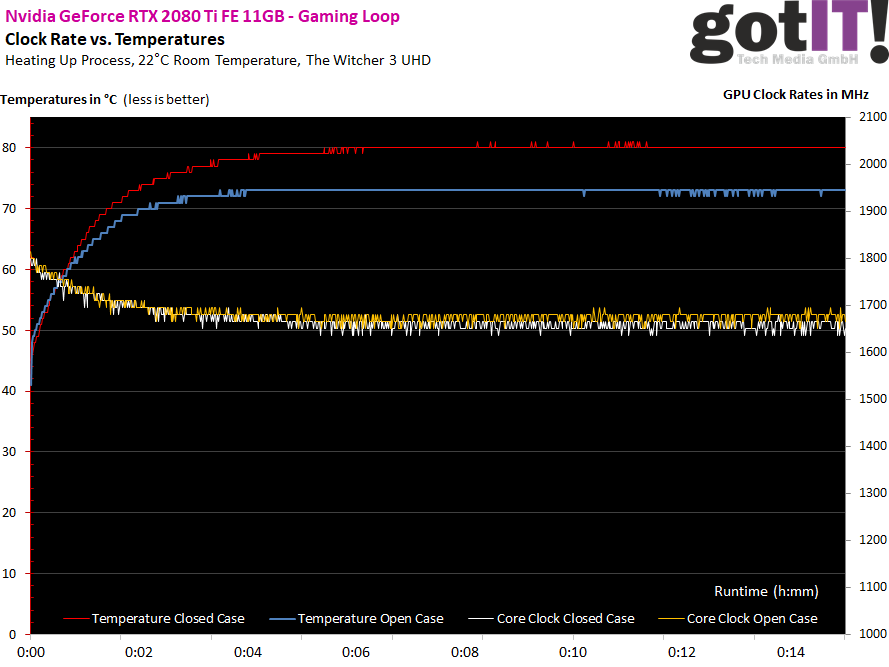
Temperatures and clock GeForce RTX 2080 Ti FE
And now again the respective gradients, considering our timeline of a total of 15 minutes each for the warm-up time for the other card. Another interesting thing is the difference in heating between the open structure and the closed housing, which we will come back to again in a moment. However, once again the clock rates remain surprisingly the same. The Torture Loop doesn't look much different, because open and closed constructions hardly differ.

Let's look at the whole thing again with the high-resolution infrared camera for the gaming loop and the stress test both in the open structure and in the closed housing. The differences in the board temperature are also very clear, but it remains relatively cool below the GPU socket. Here, too, the statement with the thermal guide pad applies, which I will show in a time.
Infrared measurement in the gaming loop
Infrared measurement in the Torture Loop
- 1 - Einführung, Unboxing, Daten
- 2 - RTX 2080 Ti - Platinenanalyse
- 3 - RTX 2080 - Platinenanalyse
- 4 - Raytracing in Echtzeit
- 5 - Deep Learning Super Sampling (DLSS)
- 6 - High Dynamic Range (HDR)
- 7 - Ashes of the Singularity: Escalation (DX12)
- 8 - Battlefield 1 (DX12)
- 9 - Destiny 2 (DX11)
- 10 - Doom (Vulkan)
- 11 - Tom Clancy’s The Division (DX12)
- 12 - Far Cry 5 (DX11)
- 13 - Forza Motorsport 7 (DX12)
- 14 - Tom Clancy’s Ghost Recon (DX11)
- 15 - Grand Theft Auto V (DX11)
- 16 - Metro: Last Light Redux (DX11)
- 17 - Rise of the Tomb Raider (DX12)
- 18 - The Witcher 3 (DX11)
- 19 - World of Warcraft: Battle for Azeroth (DX12)
- 20 - Leistungsaufnahme
- 21 - Takt, OC, Temperaturen, Infrarot
- 22 - Kühlerdetails und Lautstärke
- 23 - Zusammenfassung und Fazit


Kommentieren