


Use CTR
1. Overview – Monitoring and parameters
CTR can be started like any other program with a mouse click and then opens its GUI. We are always greeted here with the obligatory disclaimer that overclocking the CPU is no longer part of the manufacturer’s specification and thus any damage is not covered by the warranty. This is normal and the usual canon with any form of overclocking, but for various reasons CTR must always display this warning once at startup.
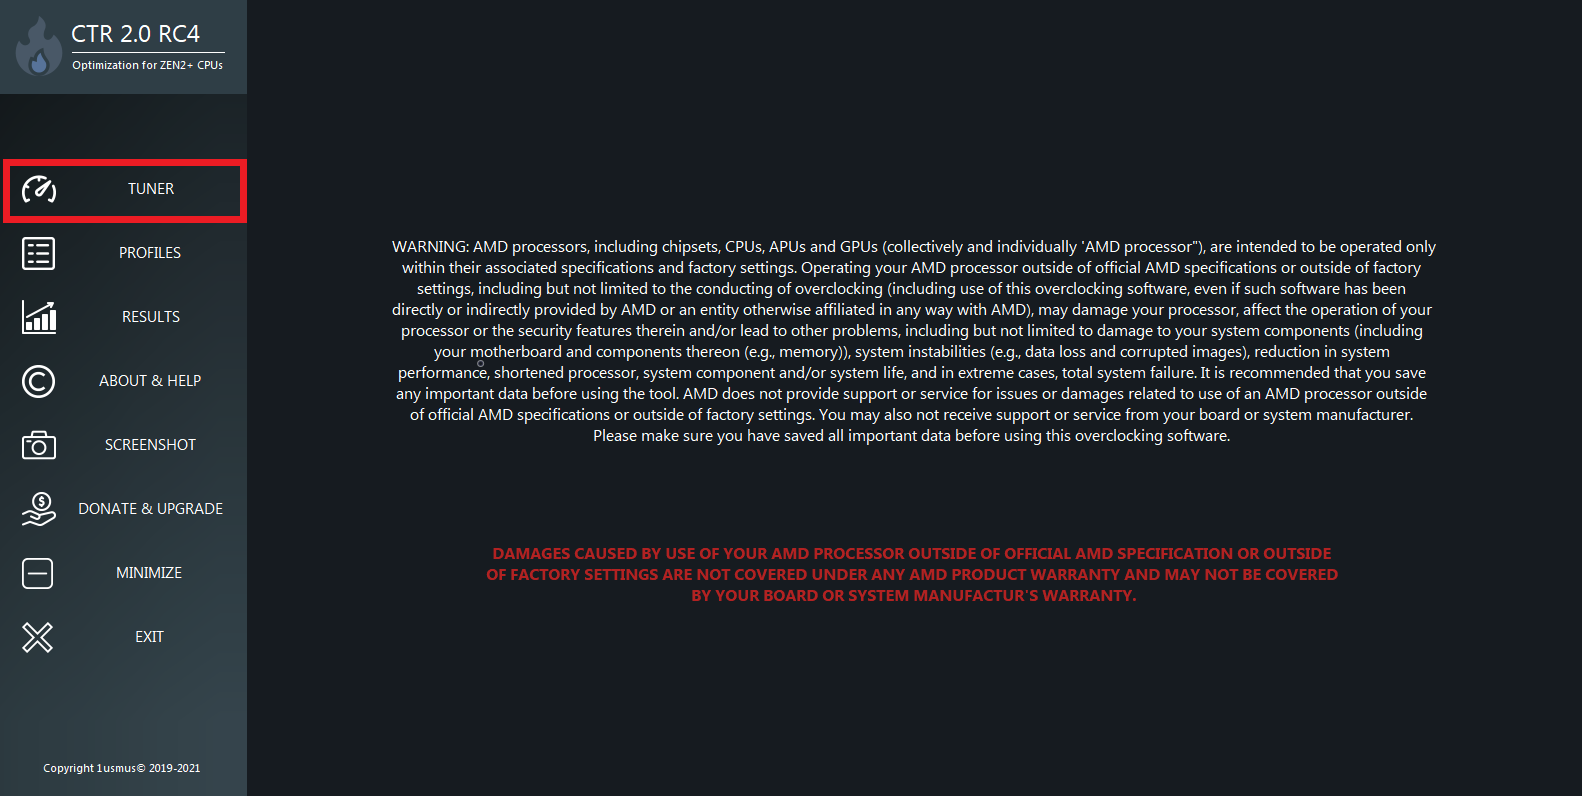
If you have any doubts or panic now, you can relax and read on first, without doing anything, and ask questions in the forum if necessary. The most important tab we will spend most of our time with is “Tuner”, which was still called “Main” from previous versions and which we will switch to in a moment.
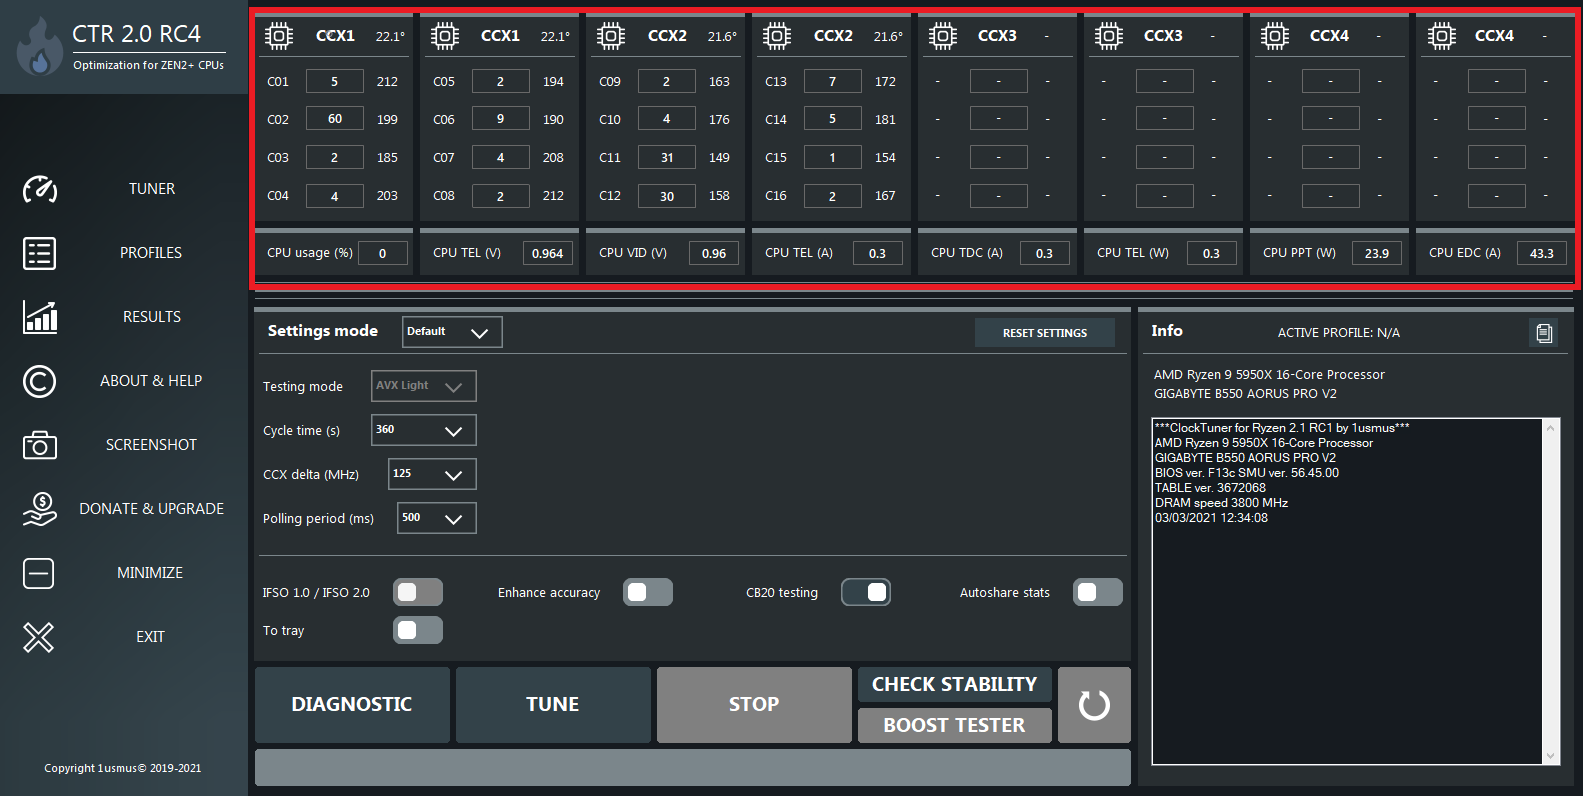
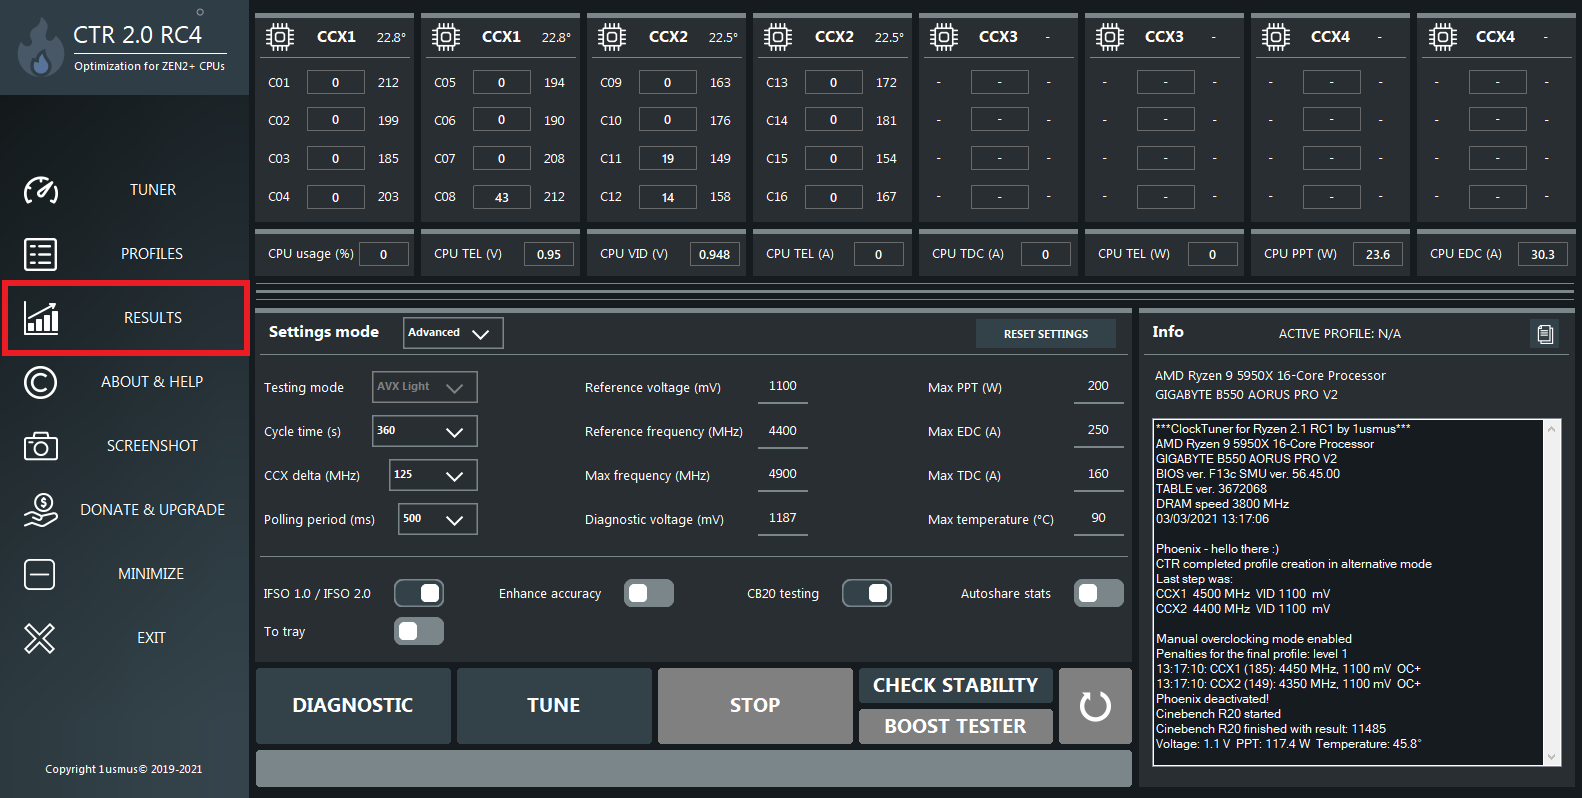
In the upper area we find again the monitoring section, which shows us the current state of our CPU. Below that we find the settings and buttons for operating the CTR on the left and a log output on the right. The breakdown of energy efficiency from old versions has been dropped due to lack of usability.
The monitoring segment above is again divided into data of the individual CCXs, above, and data of the entire CPU, below. For each CCX, its data is grouped in a box with a light grey top edge, where we can see the CCX ID as the heading and the currently measured temperature to the right. Below are the 4 cores per CCX segment, divided into lines, each from left to right with their ID, their currently applied clock, and the CPPC tag. The latter is an artificial quality indicator that is measured and stored by AMD during production. Theoretically, the cores with the highest number in the CPPC tag should be able to achieve the highest clock speeds at a given voltage.
The boxes below the CCXs contain telemetry data for the entire CPU. “CPU usage (%)” shows the CPU usage. “CPU TEL (V)” and “CPU VID (V)” are both values for voltage, the latter being the voltage that the CPU requests from the VRM, and the former being the voltage that the CPU measures as incoming to itself. The difference between these two values is called voltage drop, or Vdroop for short, which we try to keep as minimal as possible with the LLC setting mentioned above. From here on, “voltage” refers to the CPU VID (V), unless explicitly described otherwise.
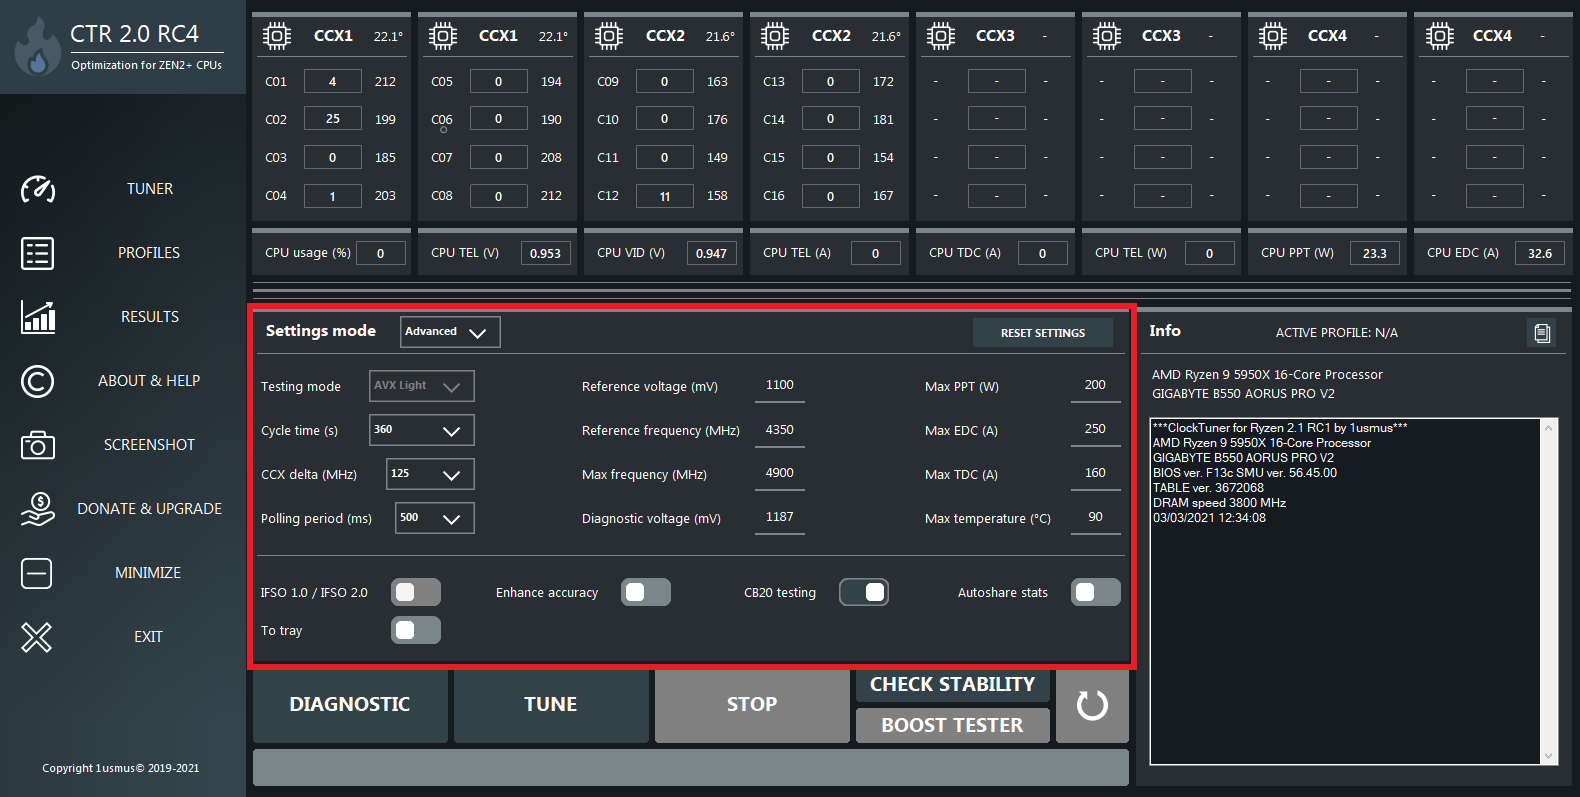
At the beginning we switch from Settings mode “Default” to “Advanced” – if not already done – to get all settings displayed and to use the full potential of the tool.
Speaking of settings, here are in addition to the known from the previous version some added. So let’s take a quick look at all the settings before we start the actual tuning.
Already known from the previous release may be the first 12 settings, which define the basic parameters for the operation of the CTR and the CPU:
- Testing mode: is the type of stress test used to check the CPU for errors during tuning. Currently there is only “AVX Light” available, which should be sufficient for most users and usecases. Other modes are still under development, but we can already perform these tests manually if needed. More about this on the next page.
- Cylce time (s): specifies how long the stress tests should run in total at each clock/voltage step. Basically, the longer the cycle time, the more accurate the result. This is especially true for large air coolers or water coolers that take a long time to reach their maximum temperature. However, the default value of 360 s works fine and I did not have to change it.
- CCX delta (MHz): indicates the size of the frequency steps from test to test. The recommended value varies according to the type of CPU:
- Ryzen 5 : 25 MHz
- Ryzen 7 : 25 MHz
- Ryzen 9 : 75-175 MHz for X suffix processors and 100-150 MHz for XT suffix processors
- Threadripper : 75 – 100 MHz
- Polling period (ms): the interval between updates of the monitoring output
- Reference voltage (mV): the voltage for which CTR should determine the maximum stable clock for each CCX during tuning
- Reference frequency (MHz): the tuning start value for determining the maximum stable clock from which to increase with the CCX delta
- Max frequency (MHz): the maximum value of the clock that is attempted to be reached stably during tuning
- Max PPT (W): the maximum power the CPU is allowed to consume, during tuning and operation
- Max EDC (A): the maximum current that the VRMs must absorb in the form of load peaks, during tuning and operation
- Max TDC (A): the maximum current allowed to flow through the CPU, during tuning and operation
- Max temperature (°C): the maximum temperature the CPU is allowed to reach during tuning (in operation there is a hard limit of 90°C)
- IFSO 1.0 / IFSO 2.0: Mode for more accurate diagnostics of CPU quality, but only works on Ryzen 9 and Threadripper CPUs and works after a diagnostic run
- Autoload profile with OS: activates the last active profile at the next start of CTR
- Enhance accuracy: This allows the test mode to be switched to smaller voltage steps and more demanding stress tests. However, the default setting “deactivated” is recommended.
- To tray: starts CTR automatically at system startup
- CB20 testing: generates “before” and “after” results with the benchmark tool Cinebench R20 to directly measure the performance gain of clock tuning
- Autoshare stats: automatically transfers the statistics of the tested CPU after tuning to the CTR database, which is accessible in the benchmark tab
- CTR Hybrid OC: activates dynamic switching of OC mode between PBO (P0), P1 and P2 depending on CPU or CCXs load
That’s actually really a lot of parameters that I just explained in this bullet point wall of text. But today’s CPUs are complex marvels of state-of-the-art technology and we have to dig deep to get the maximum performance out of our CPU in every situation. But CTR does a solid job and displays all parameters clearly and at a glance. The CTR’s unconventional UX design works well, especially with the new features in version 2! All these settings can be customized for different CPUs, coolers, motherboards and other parameters. In most cases, however, the default settings or the recommendations of CTR after the diagnostic run already work very well.
2. Diagnostic – Quality test of the CPU
The following steps are based on a Ryzen 9 5950X and a Gigabyte B550 Aorus Pro V2 motherboard. With other hardware, the displayed and determined values may of course differ, but the principle remains the same. First of all we should set “To tray” to active, because on the one hand CTR always starts automatically with the system and thus simplifies the usage, on the other hand the “Phoenix” mode becomes active. This appropriately named mode allows CTR to automatically pick up where it left off in the event of a system crash during a diagnostic or tuning run after a system reboot. This means that there are no more interruptions that require manual intervention, as was the case with version 1.
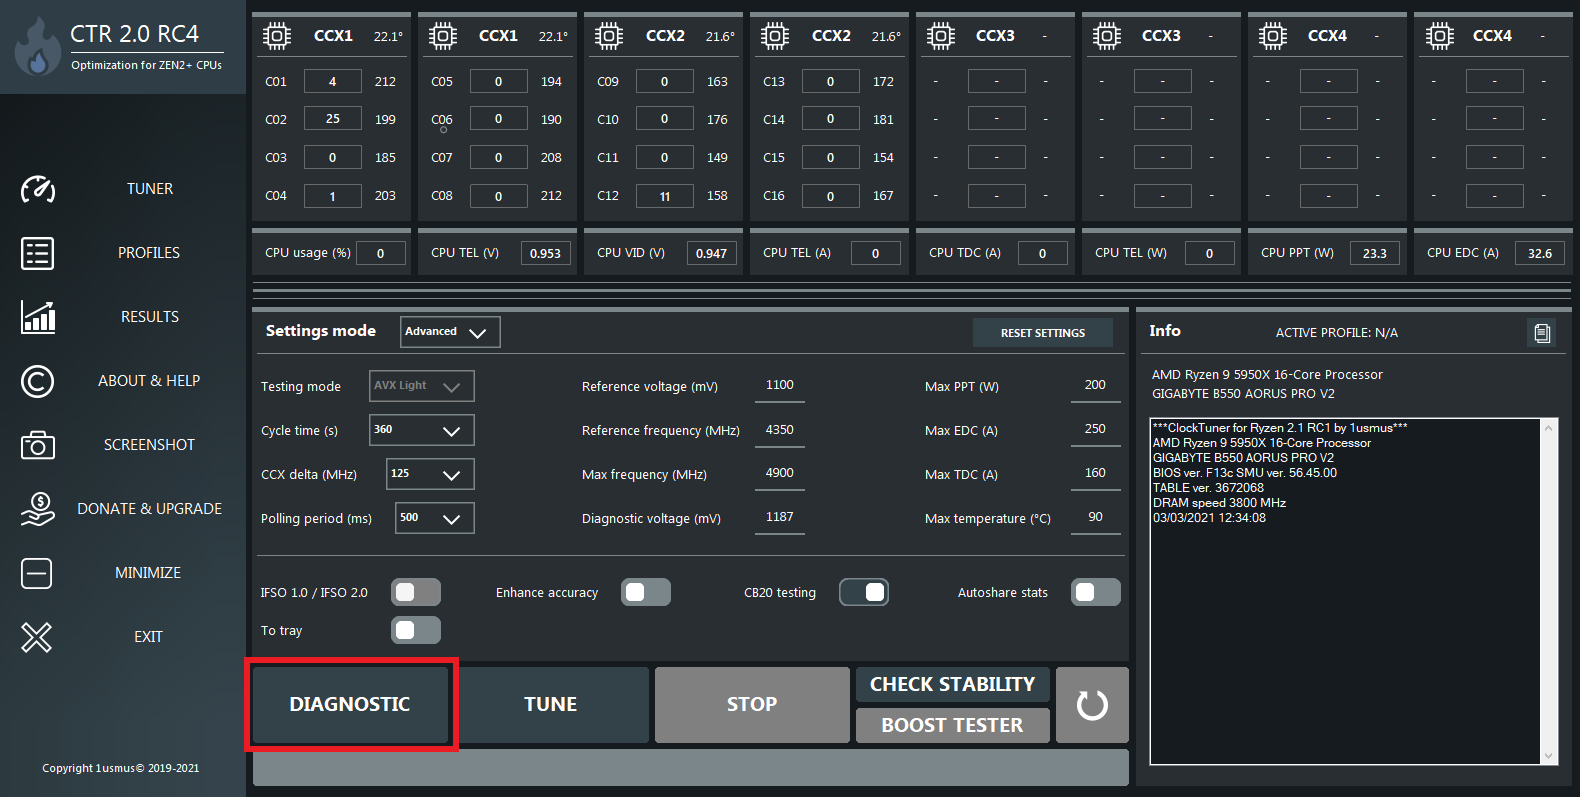
So we activate the function and click on “Diagnostic” to have the quality of our CPU determined. For this purpose, CTR sets a fixed clock rate for all CCX and decreases the voltage from the diagnostic voltage in steps of 6mV until the system becomes unstable. The lower the voltage can be lowered without the system becoming unstable, the more quality and thus overclocking potential the CPU has.
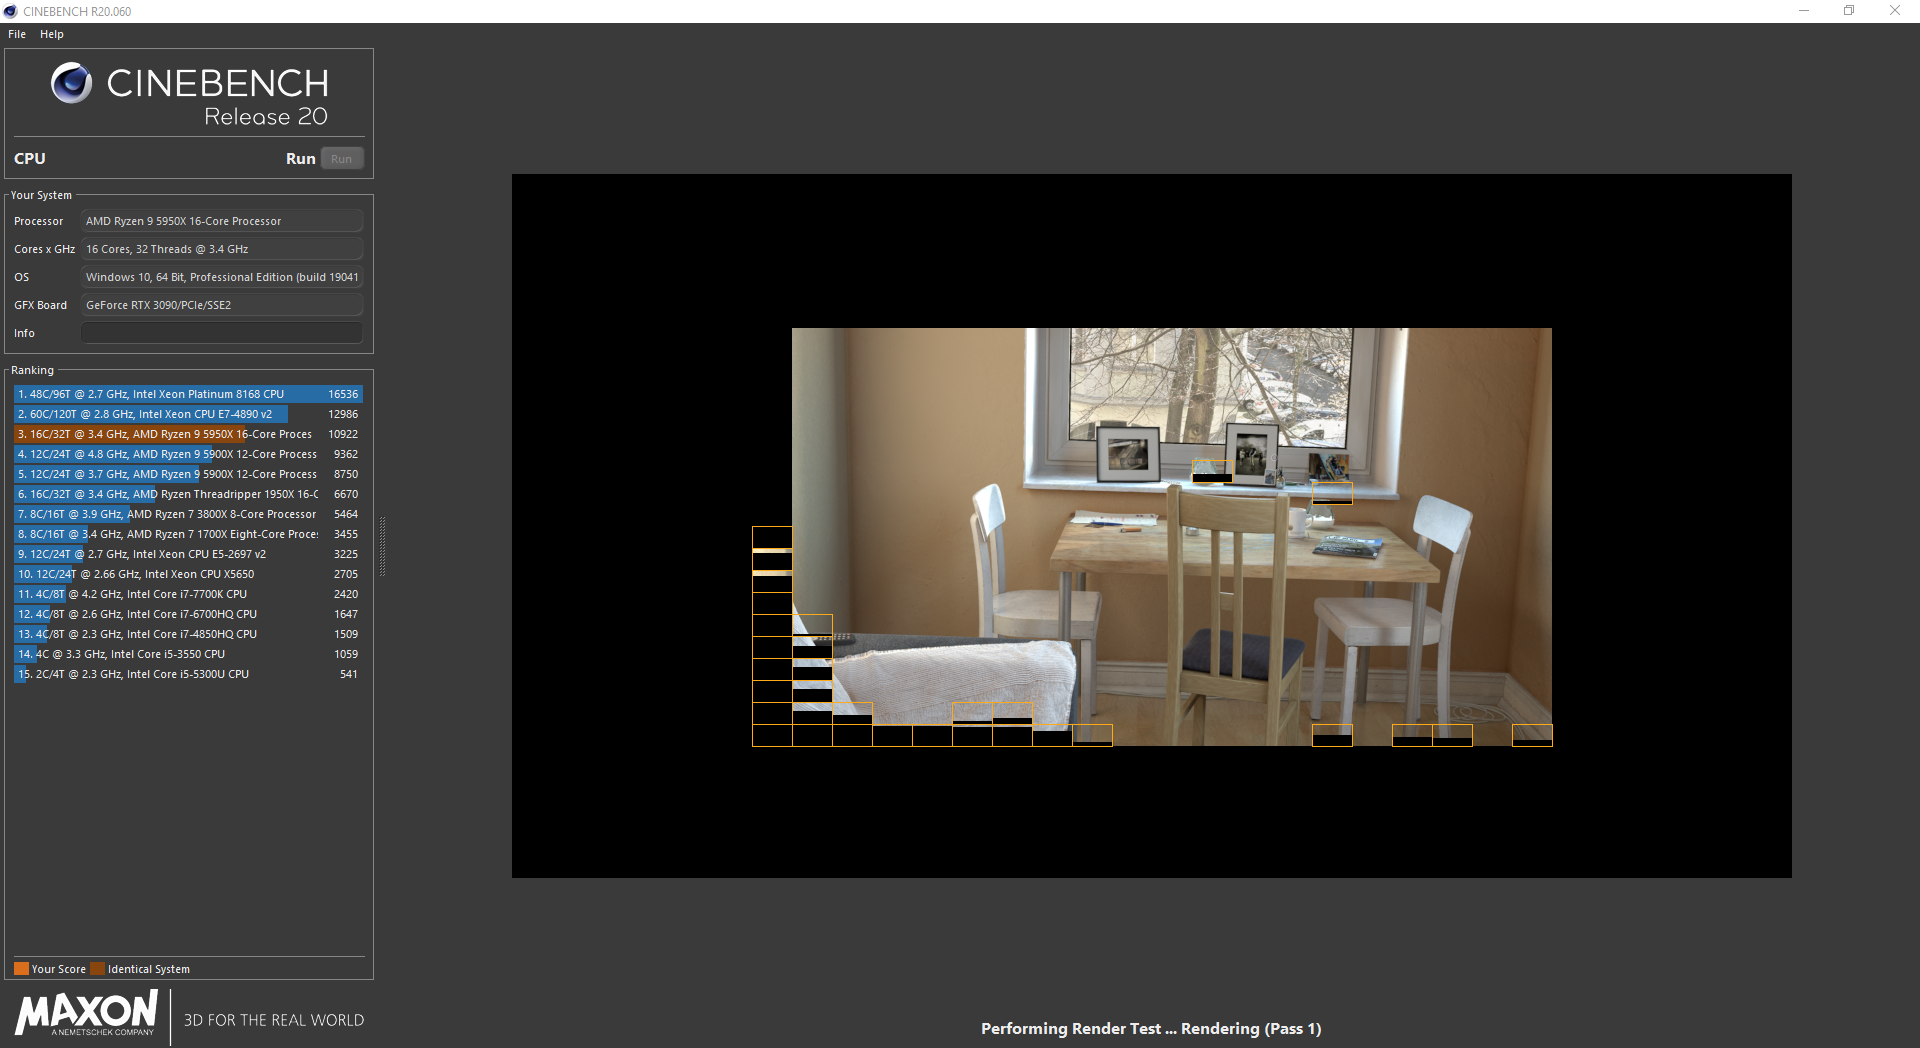
A new feature of CTR 2 is that the base power is already determined at the beginning of the diagnostic run. For this, a Cinebench R20 multi-core run is used again, like in CTR 1. For those who wonder why not Cinebench R23: The difference to R20 is only in the user interface, the presets and the weighting of the result. However, the underlying calculations and the load on the CPU are identical between R20 and R23.
In the log output we now see on the one hand that the Phoenix mode just mentioned has been activated, and the basic result of the CB20 run. Afterwards CTR starts a measurement of the “Silicon FIT” at my CPU to be able to optimize the tuning steps later. As mentioned at the beginning, this feature is only supported on Ryzen 9 and Threadripper CPUs. Then the actual quality measurement starts, which takes about 15-45 minutes depending on the CPU.
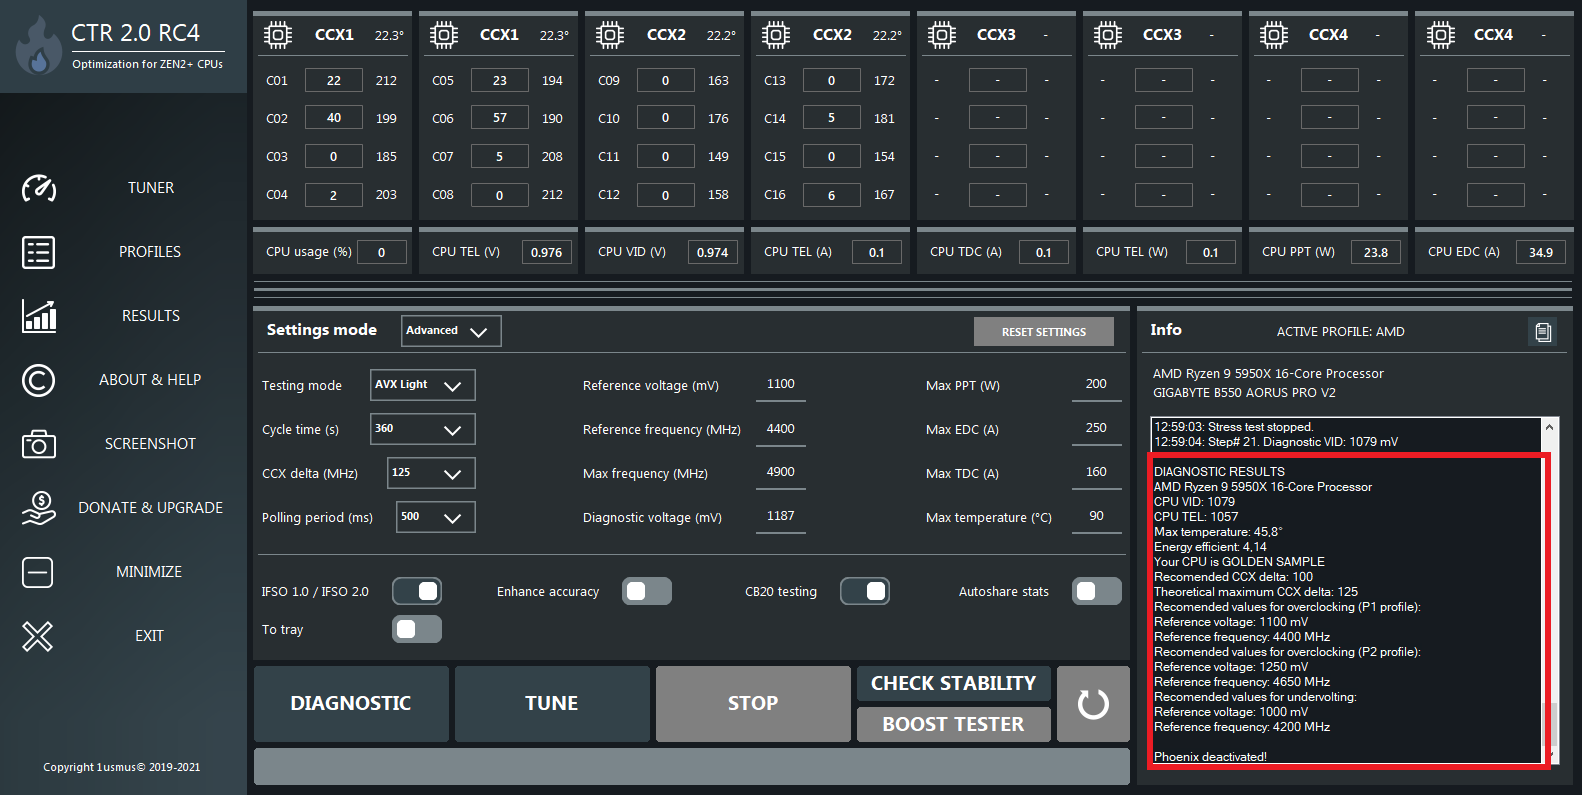
As a result of the diagnostic run we now get various indicators for the quality of the CPU in the log. In this case CTR rates the CPU as “GOLDEN SAMPLE” with an energy efficiency factor of 4.14. We also get various recommendations for possible tuning settings: values for a rather conservative OC at constant power consumption (P1), values for a maximum OC at increased power consumption (P2) and values for constant performance at reduced power consumption (Undervolt). We should screenshot or write down these values to be able to do further tuning runs for other profiles later if necessary.
3. Tune – Tuning according to parameters
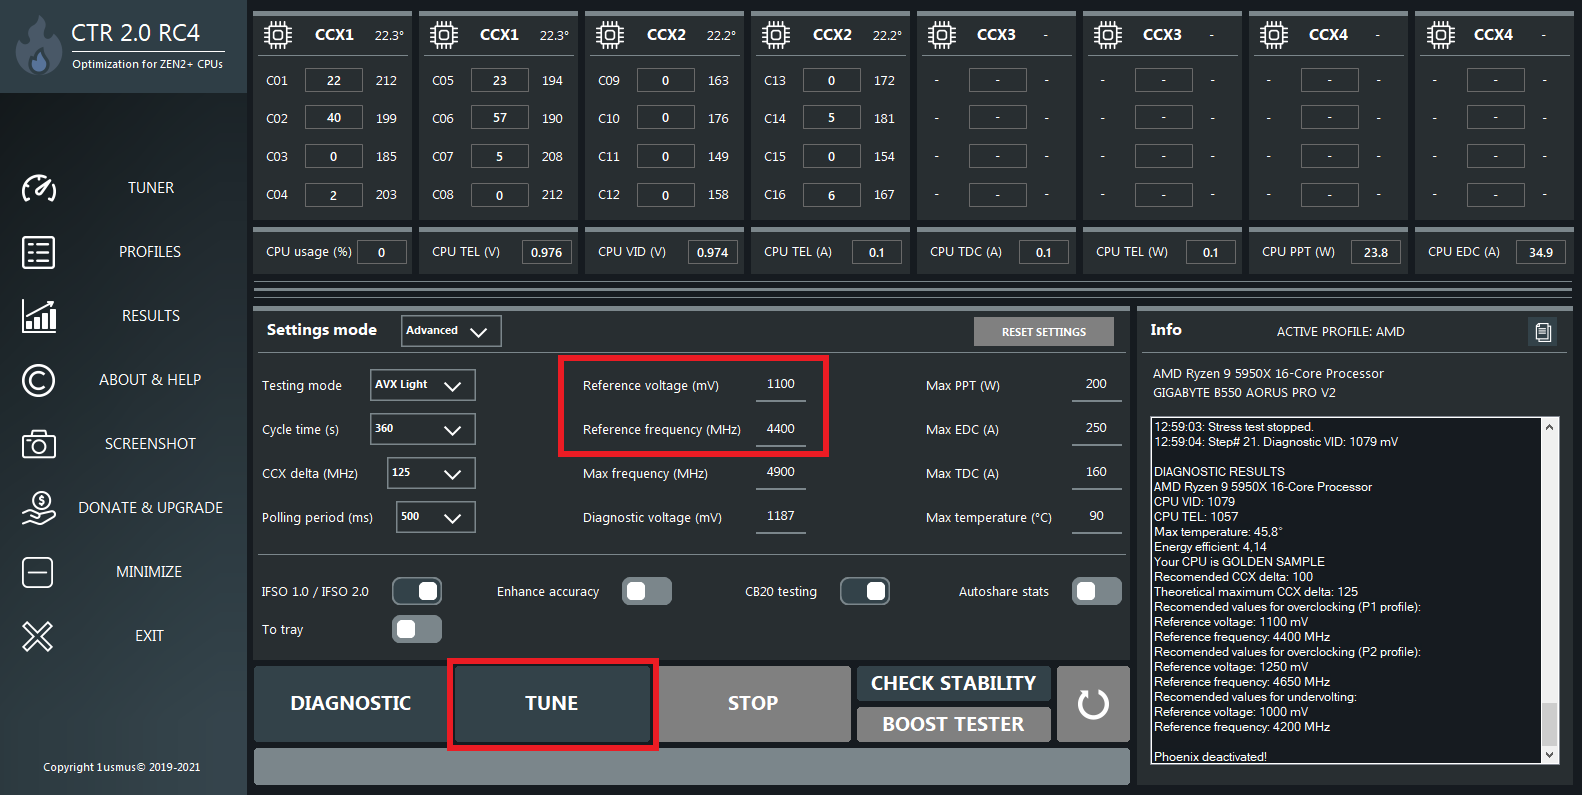
CTR has already entered the recommended values for P1 at Reference voltage and Reference frequency and also the IFSO mode was automatically activated for my CPU. I follow the recommendations and just click on “Tune”. Now begins the search for the maximum stable clock per CCX for the given voltage, in my case of 1100 mV. This process usually takes 15-45 minutes again, depending on the CPU and the set parameters.
For the given voltage, the clock rate is first set to the Reference frequency, stability tests are performed with Prime95 and if successful, the clock rate per CCX is then increased. This procedure is repeated until the system crashes or, at best, an error is already detected during the stress test, as happened in my case. The CCX in which the error occurred is reset one clock level and the remaining CCXs continue to be tested until threads from all CCXs have either crashed or thrown errors.
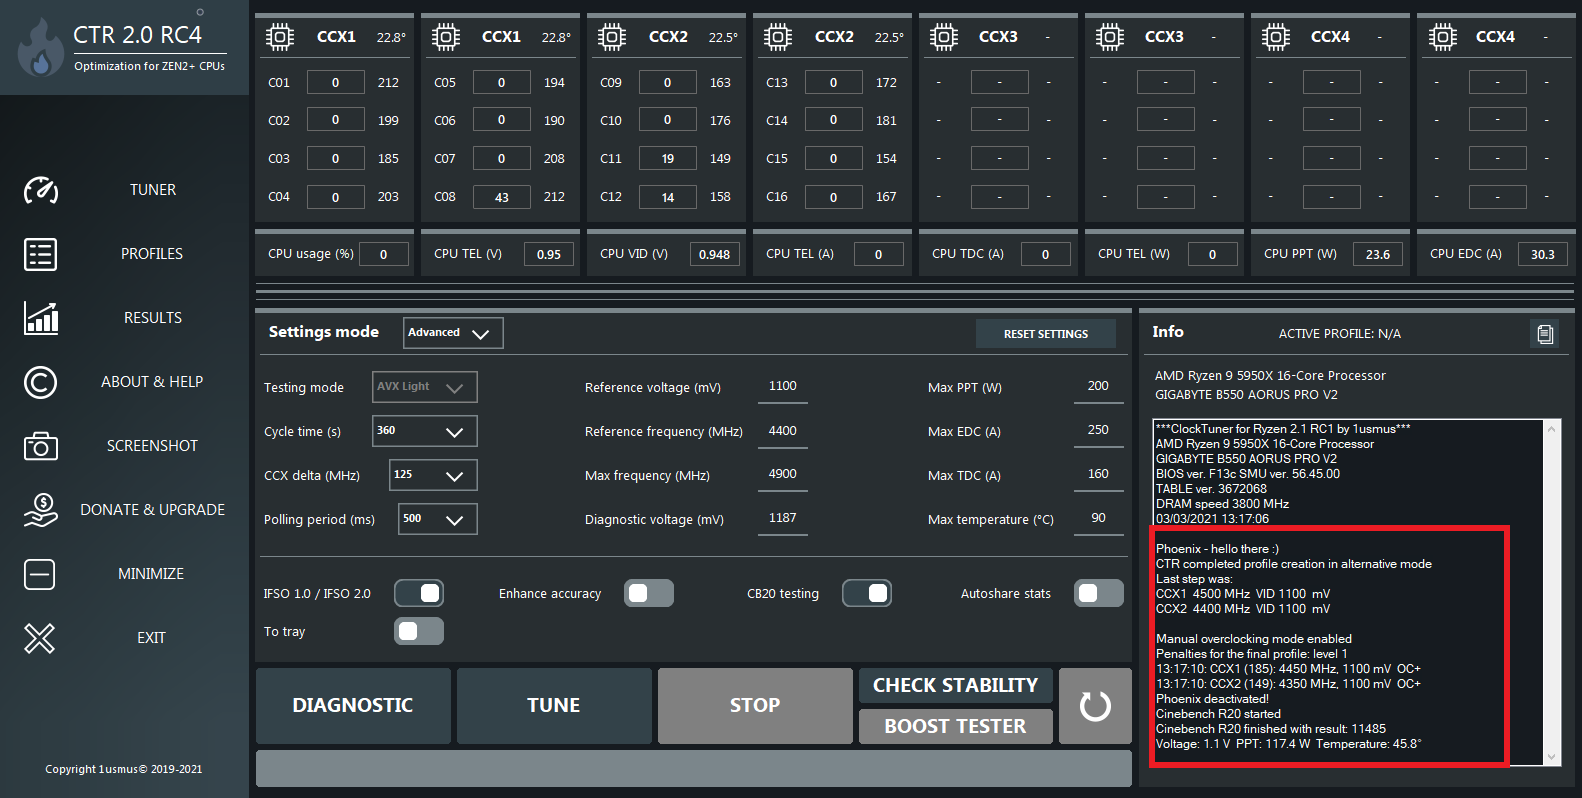
And here already the new Phoenix mode pays off, because at a stress test of the tuning step of 4500 or 4400 MHz at 1100 mV the system crashed. This is also reported by CTR in the log and consequently delivers the conservative recommendation of 4450 and 4350 MHz for the CCX and 1100 mV voltage. CTR also started a Cinebench run with these settings to show us the performance increase.
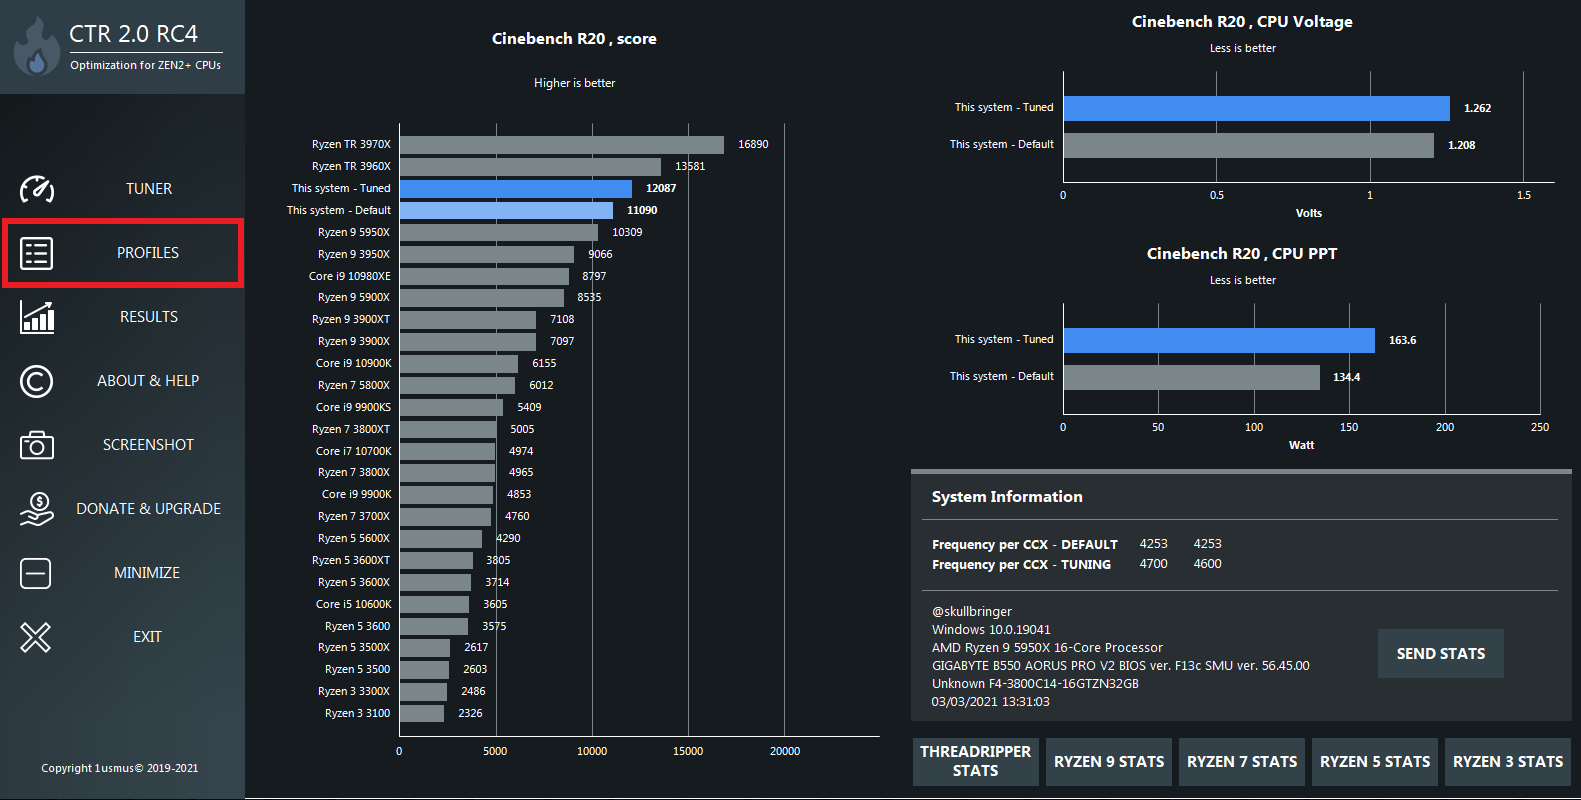
If we now switch to the “Results” tab, we also get the before and after comparison displayed in fancy charts. CTR measured a performance difference of 11090 to 11485 points in the CB20 and thus a gain of 3.6%, whereby CPU voltage and power consumption were slightly lowered. For friends of efficiency, this is already a decent achievement. Optionally, we can use “Send Stats” to send these results to the CTR database for other users to compare.

If we want to store these values in a profile for later use, we switch to the “Profiles” tab.
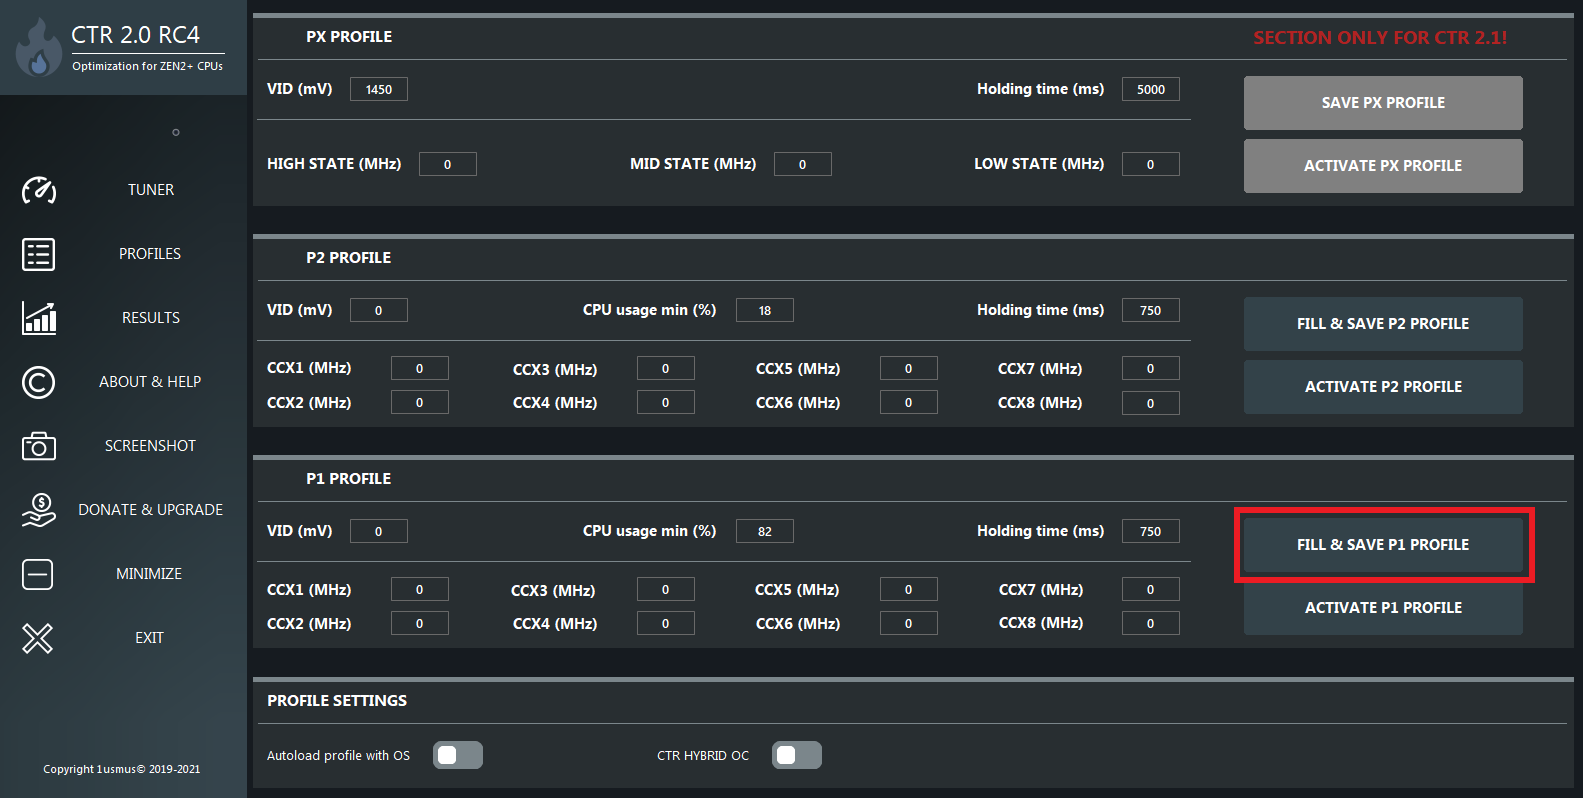
The new Profile Management opens, the upper third of which is already intended for CTR 2.1 and does not yet work in the current version. We focus on the lower two thirds of the menu, where the two profiles P1 and P2 can be managed. Now click 2 times on “Fill & Save P1 Profile” to automatically adopt the values you have just tested.
As we can see, the values have been entered and can only be saved with “Save P1 Profile”. Alternatively, we can manually adjust the VID and clock rate values of the CCX here if necessary. With “Activate P1 Profile” we could now apply the profile and be done, assuming we only want a static OC profile like in the previous version. But the new version offers so much more functionality with the Hybrid OC, among other things, that I don’t want to leave unshown.
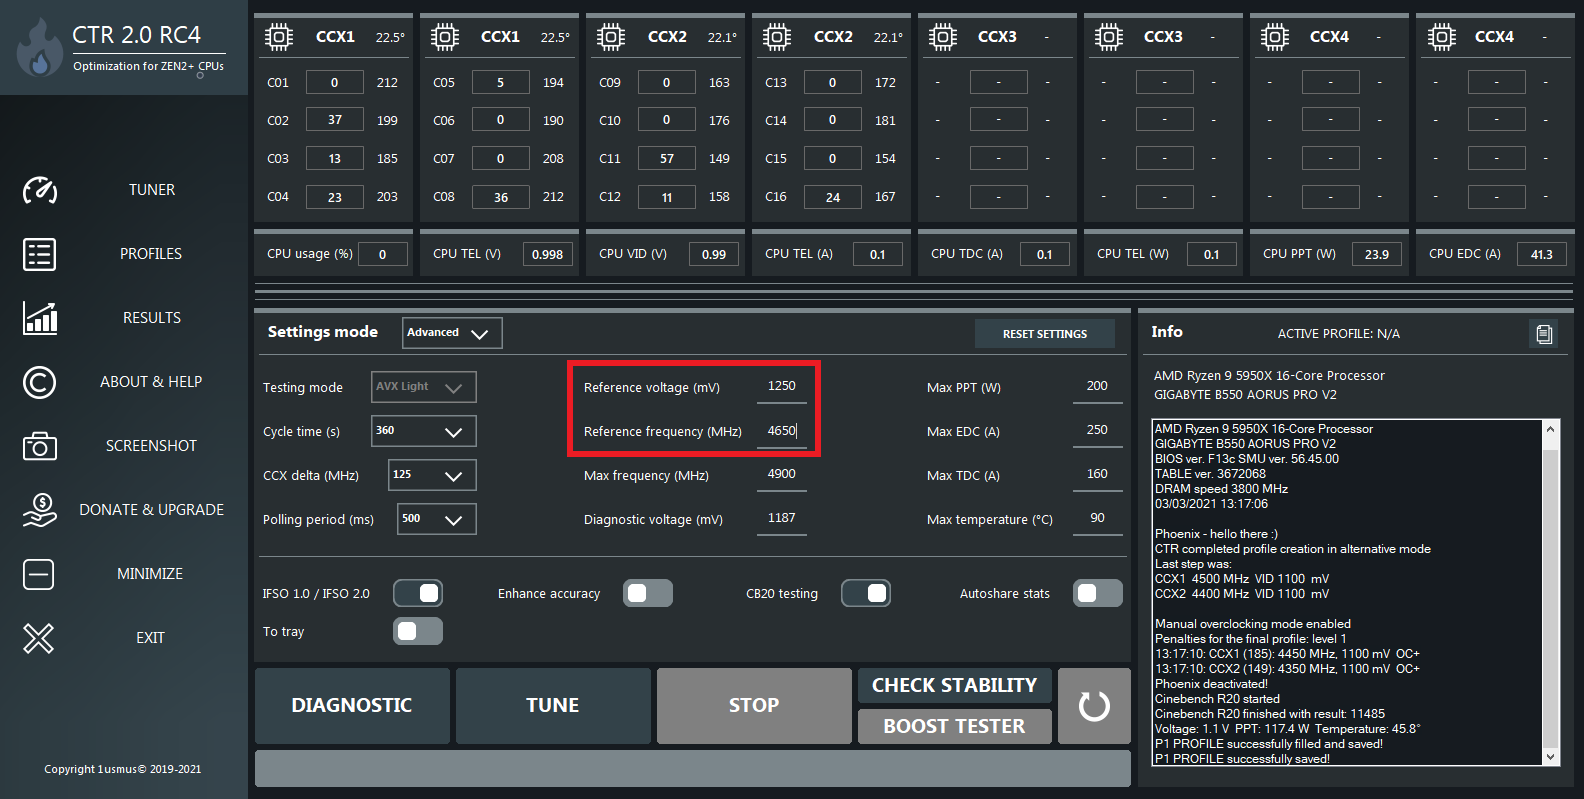
In addition to the P1 profile, CTR also output values for a more aggressive P2 profile with higher clock and voltage after diagnostics. This profile is intended for scenarios in which the CPU is only partially utilized and therefore does not reach the PPT limit of power consumption despite the higher parameters for voltage and clock. P2 could thus be called a “gaming” profile, since in games full load is almost never reached on the CPU and a higher clock rate often results in higher FPS. So we enter the recommended values for P2 – 1250 mV Reference voltage and 4650 MHz Reference frequency – and click on “Tune” again.
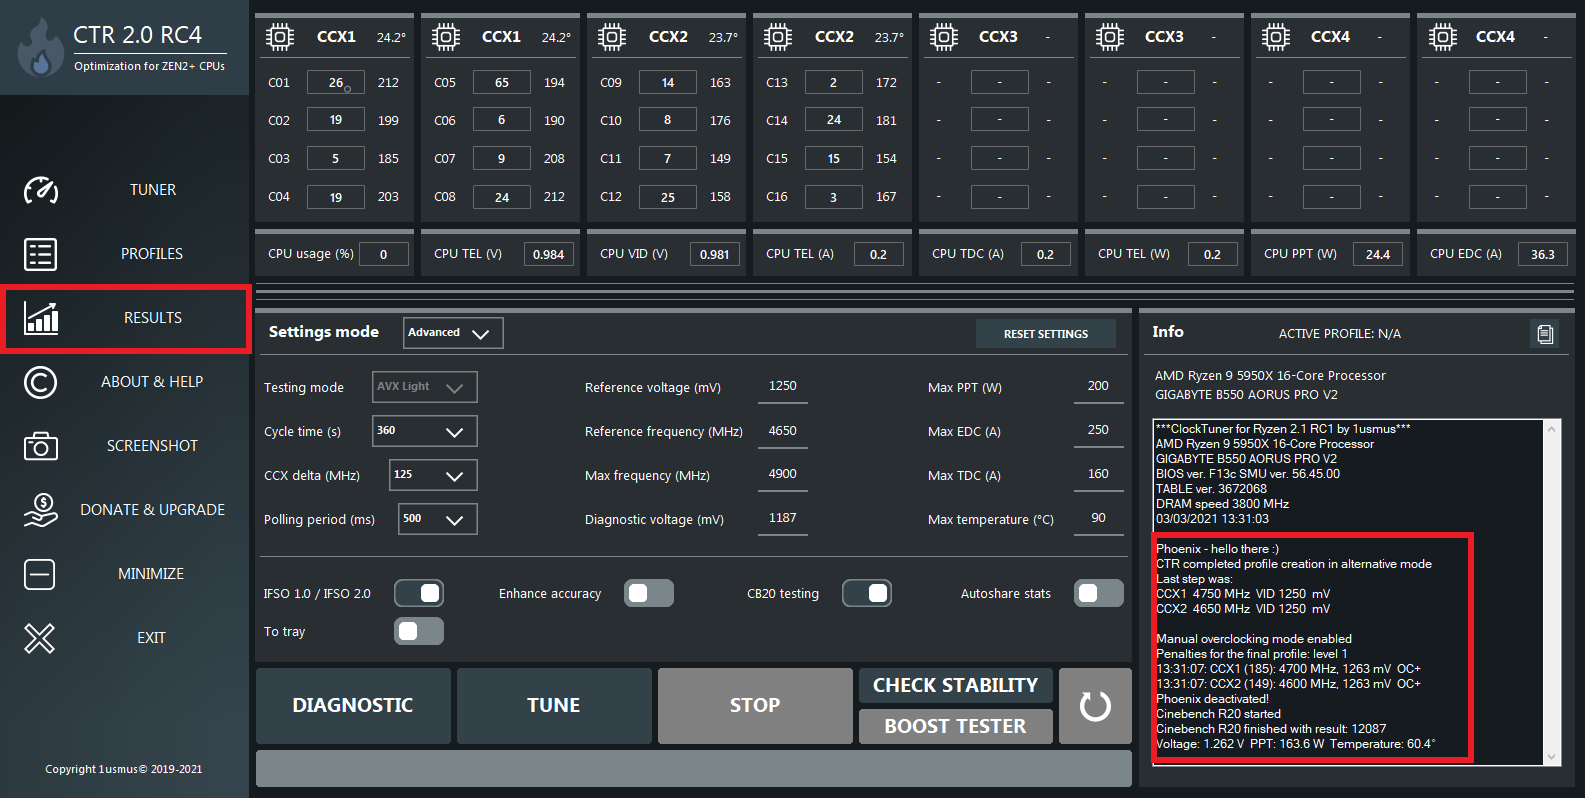
Once again, Phoenix Mode comes to the rescue, reviving CTR after a system crash. The result this time is 4700 and 4600 MHz at 1263 mV and 12087 points in Cinebench R20.
If we again compare the determined setting with the factory performance, this time we see a whopping 9% performance gain, but with more power and voltage consumption. Power, fuel and come… efficiency just went bye-bye. But the P2 profile is not intended for full load, but for scenarios in the partial load, and for that we use the hybrid OC.We switch back to the “Profiles” tune, where we fill the P2 profile with the new values.
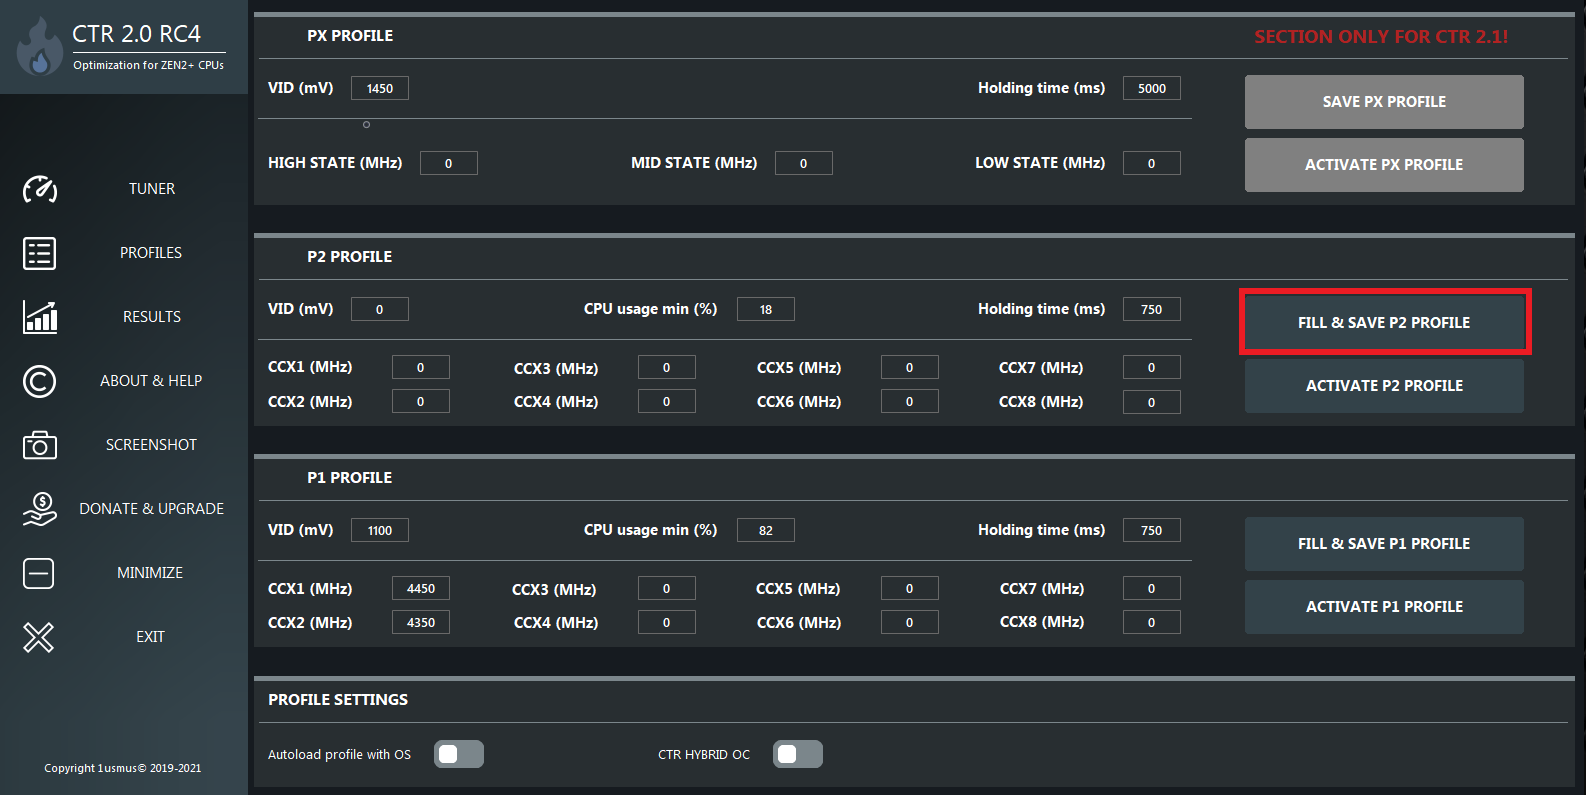
Save twice again and we have two profiles for different usecases, each with the optimal combination of clock and voltage for the quality of the CPU. At this point I would also like to praise the revised GUI of the profile management. While you often ended up in a dependency dilemma here in the last version, it works much better in version 2 and the operation is more intuitive.


1,679 Antworten
Kommentar
Lade neue Kommentare
Urgestein
Urgestein
Mitglied
Urgestein
1
Urgestein
1
Veteran
Mitglied
1
Mitglied
Urgestein
Moderator
1
Neuling
Urgestein
1
Veteran
Urgestein
Alle Kommentare lesen unter igor´sLAB Community →